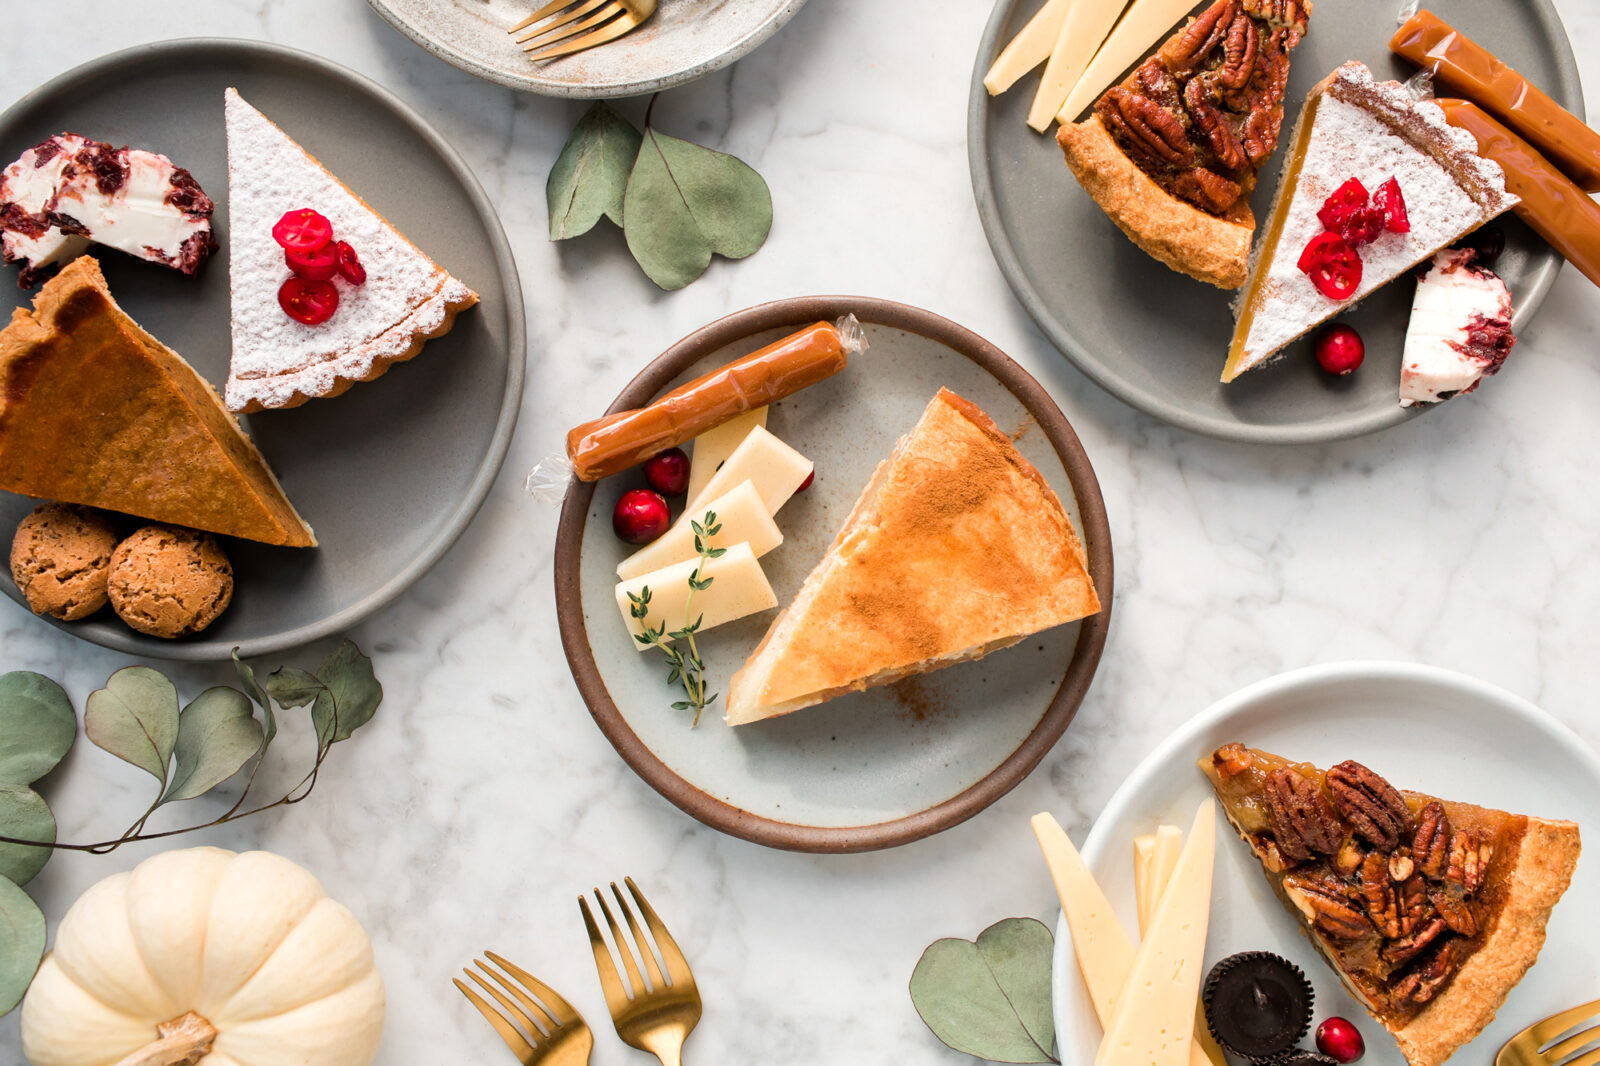
It’s always fun to delight guests with a touch of the unexpected during the holidays. Pairing cheese with pie is a perfect way to do just that. Adding slices of cheese (and other small, sweet treats) to a pie-laden plate elevates dessert into an interactive mini tasting.
Cheese and pie may seem like an unlikely duo, but cheese adds a special, savory bite that keeps pie from being too sweet. Here are four of our favorite pairings — perfect for Thanksgiving and all through the holiday season.
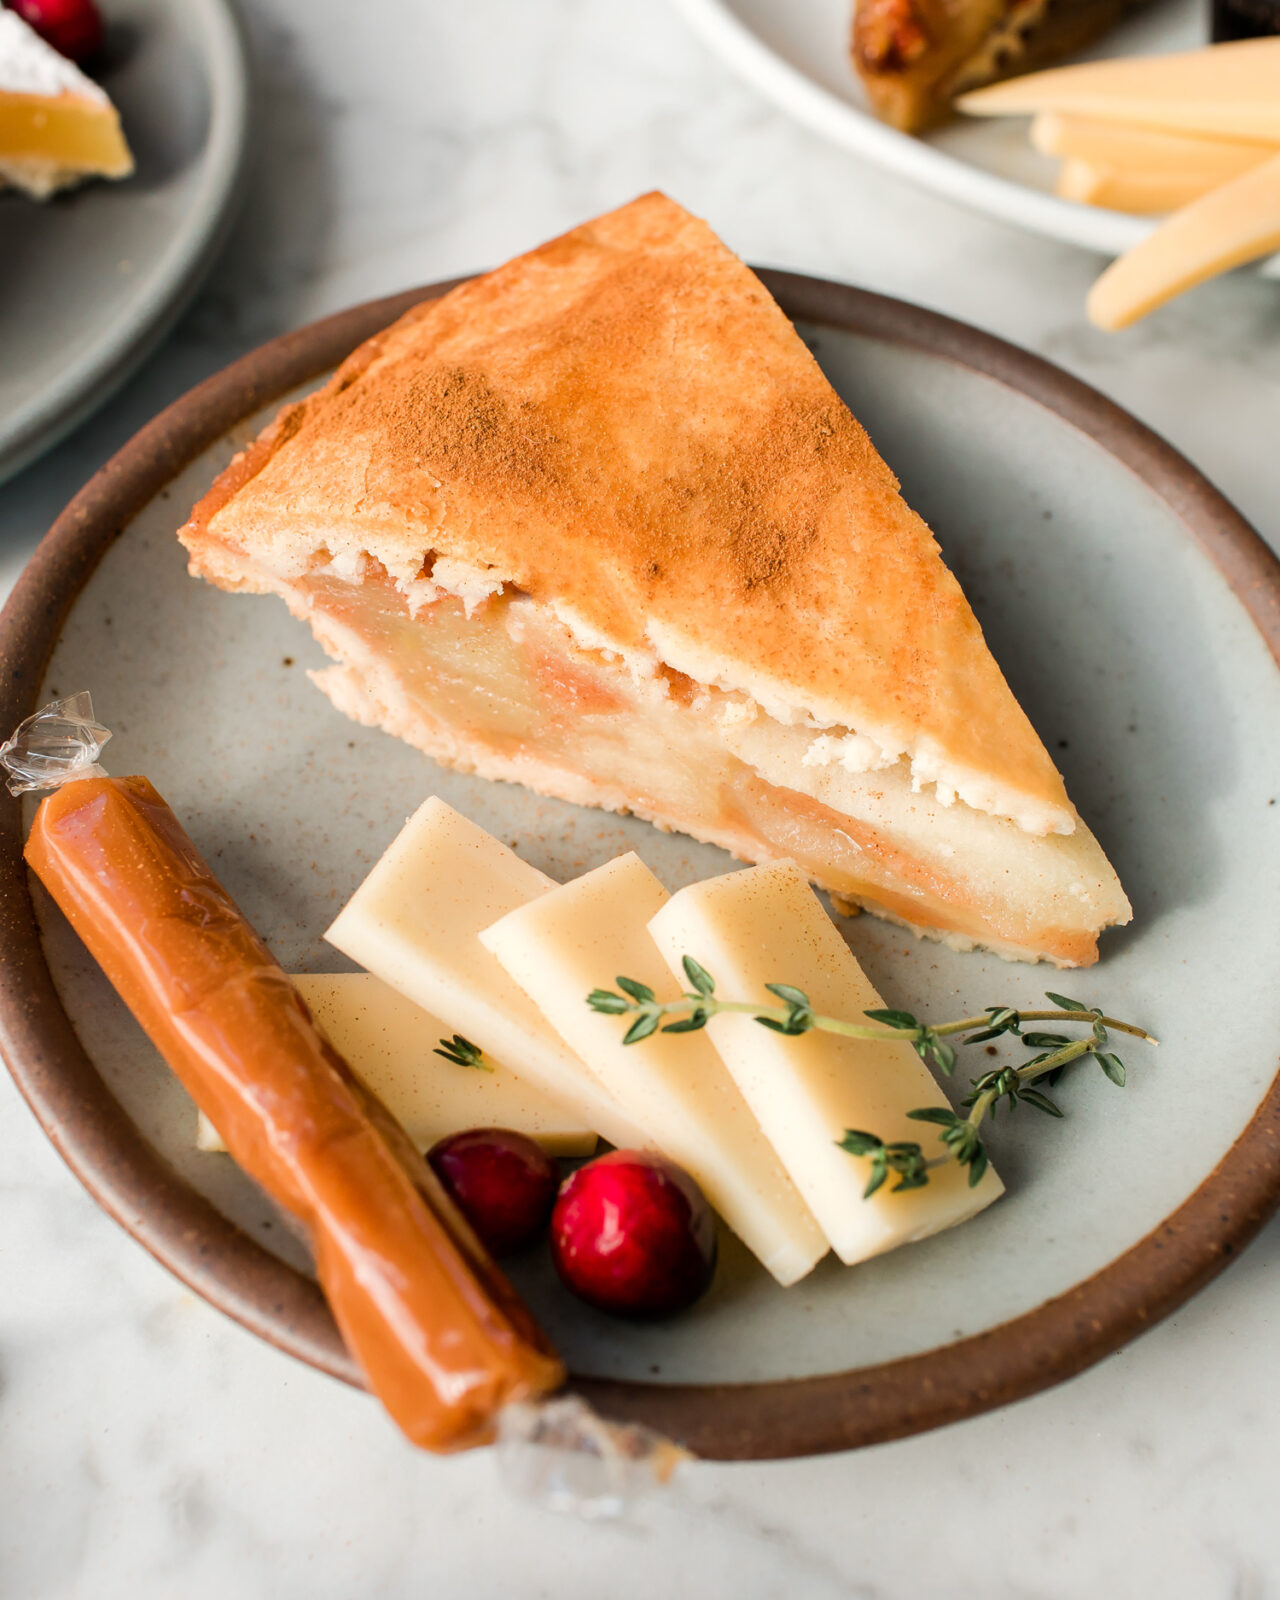
Grand Cru® & Apple Pie
Everyone’s heard of cheddar and apple pie, but swapping in our alpine-style Grand Cru® is a must. It adds a mild, nutty flavor that contrasts perfectly with the tart, sweet apples and flaky, buttery crust.
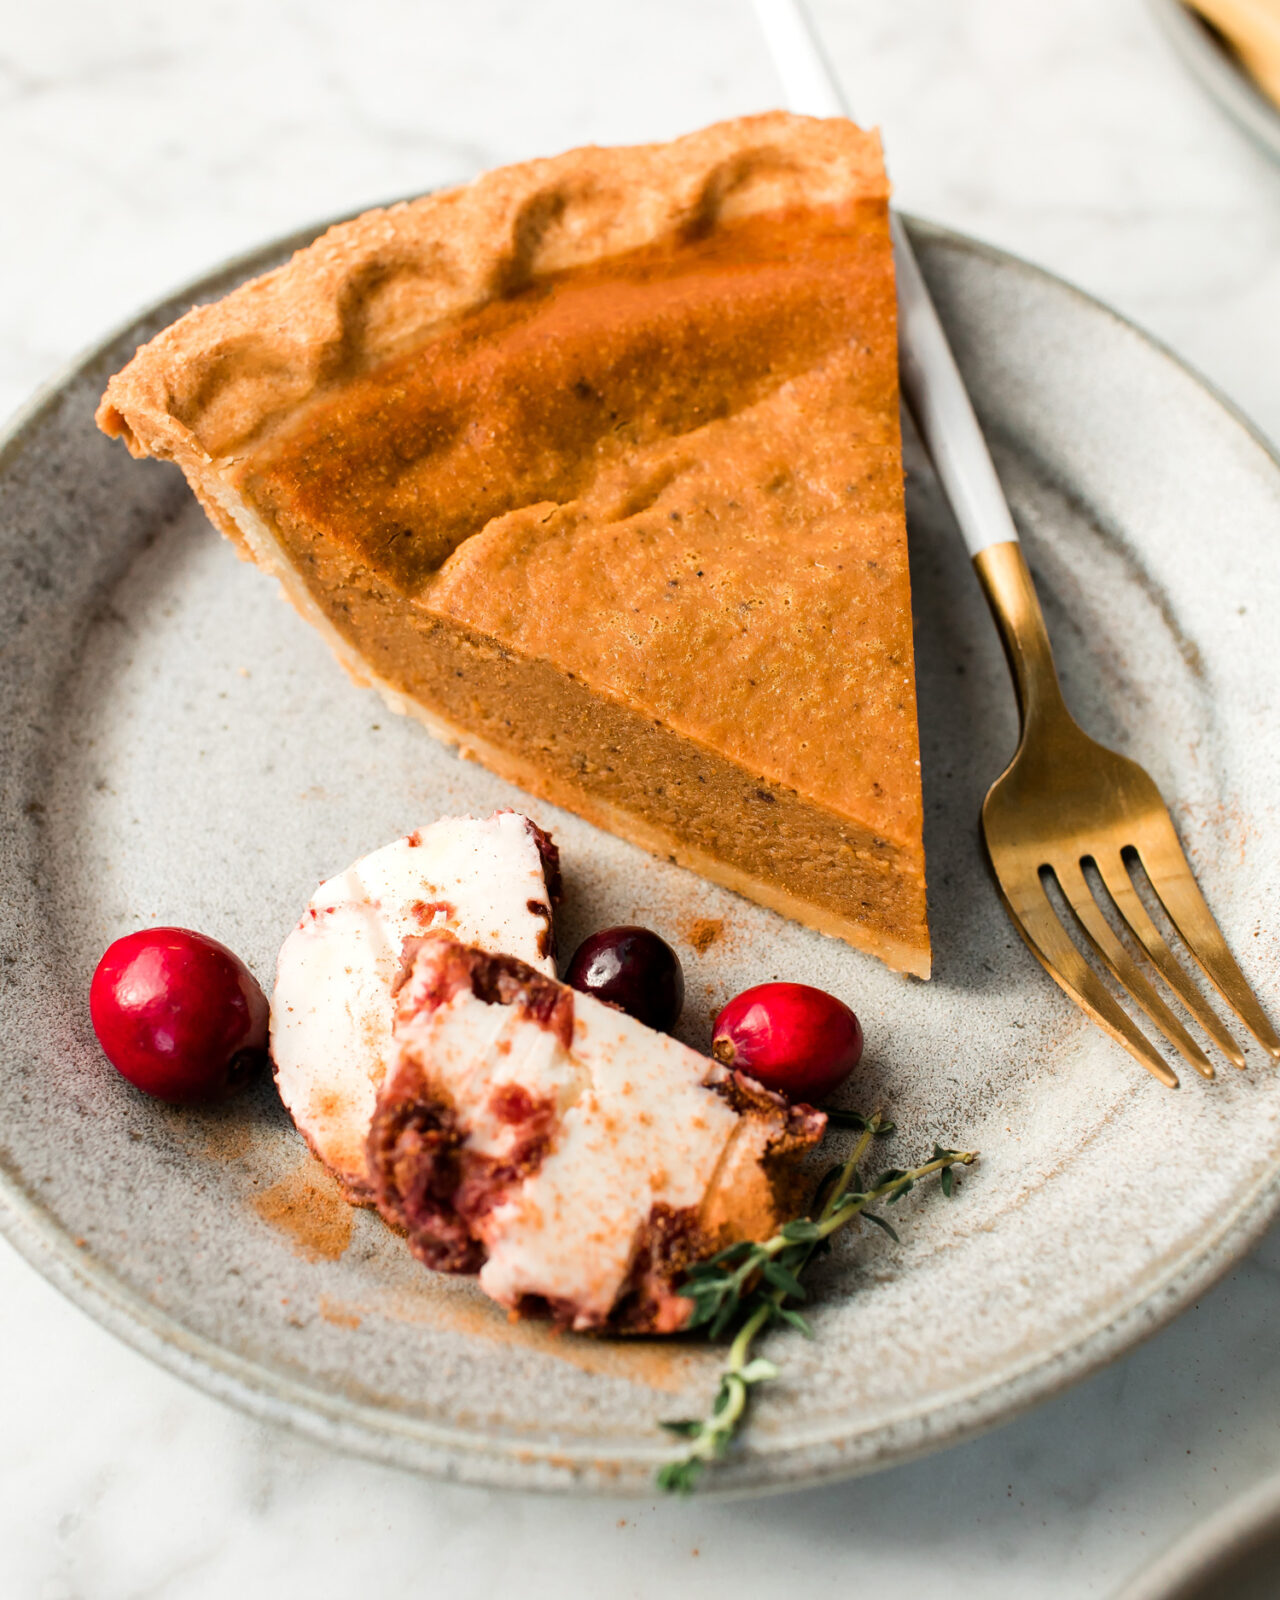
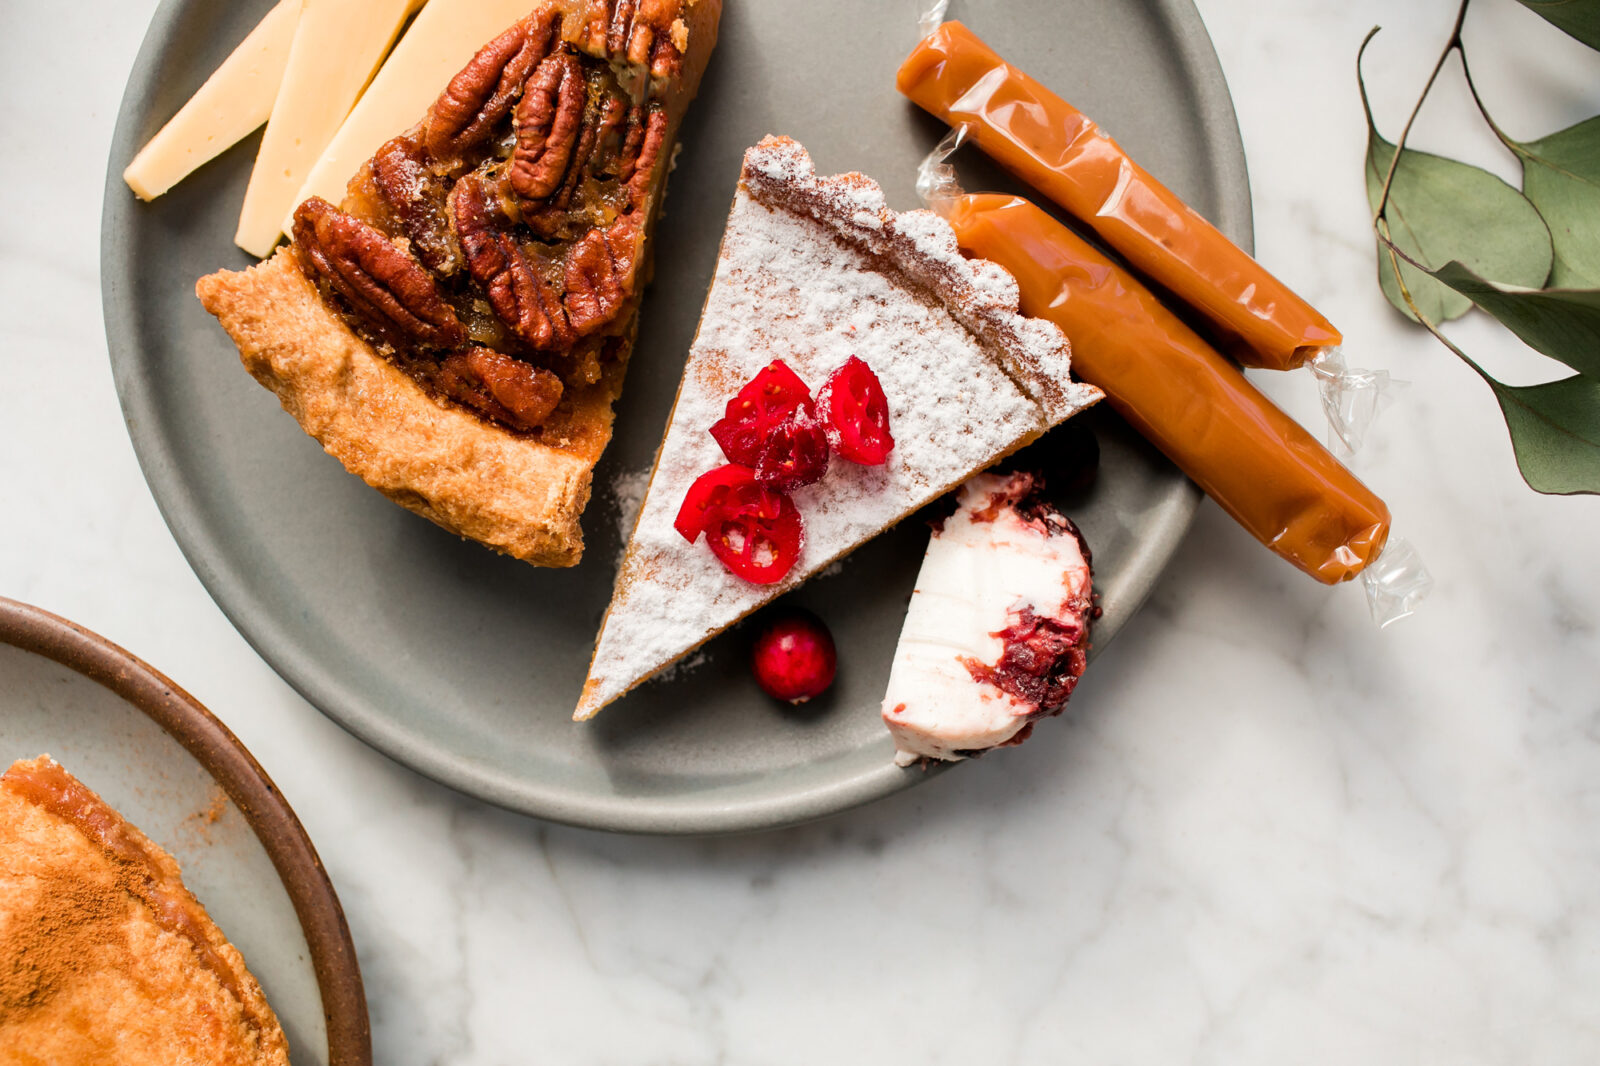
Cranberry Cinnamon Chèvre & Pumpkin Pie
Our seasonal Cranberry Cinnamon Chèvre (at Walmart Supercenters nationwide) is pumpkin pie’s perfect pair. The cranberries add a welcome jolt of acidity, while the cinnamon in both foods ensure a festive-tasting bite.
Original or Smoked Gouda & Pecan Pie
Our Gouda is sweet and creamy, while pecan pie is caramel-y and nutty — the two together are simply meant to be. If you want to up the ante, try our Smoked Gouda with the pie for a uniquely savory-sweet pairing.
Cinnamon Chèvre & Lemon Tart
A lemon tart is a classic, year-round dessert that requires a festive touch for the holidays. Enter in: Cranberry Chèvre goat cheese (available at Imperfect Foods). Together, lemon and cranberry are tart-sweet, and a few slices of our seasonal Chèvre add a needed earthy, savory balance.
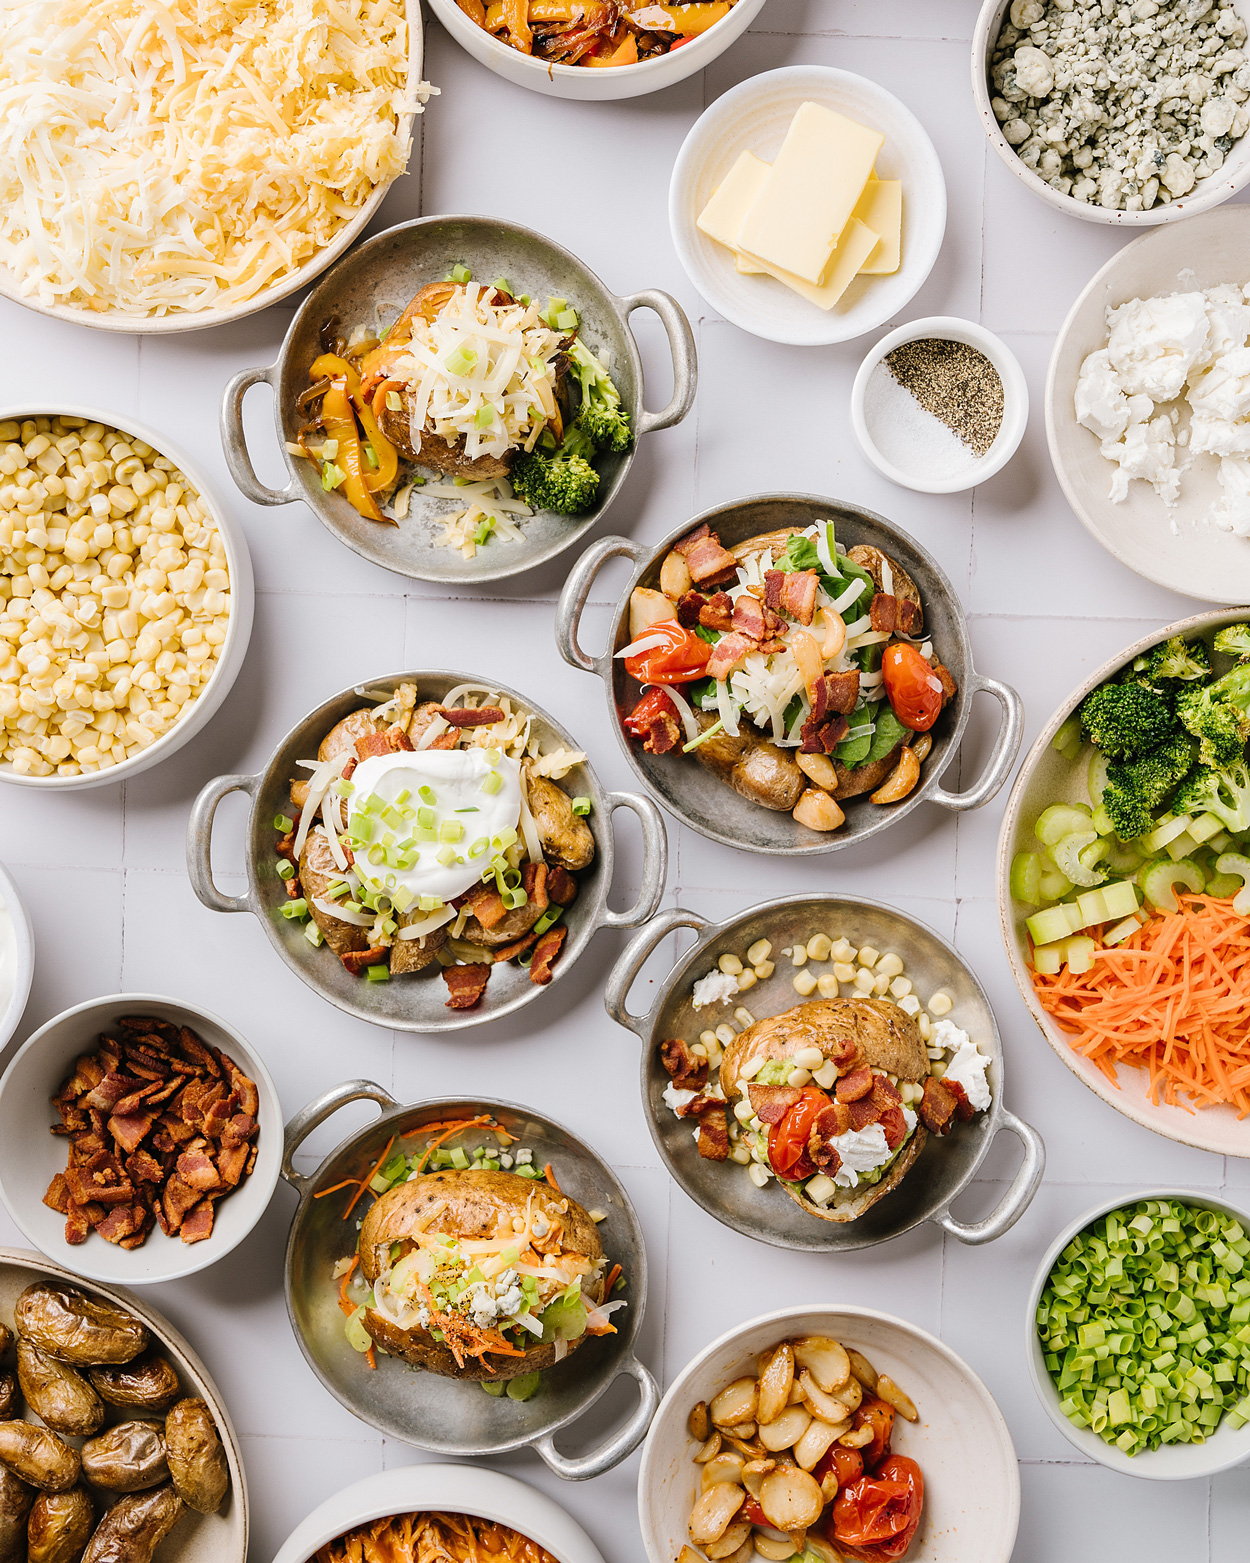
How to make a baked potato bar for an easy weeknight meal featuring Roth Grand Cru® — what to serve and how to keep your baked potatoes warm for a baked potato buffet.
Busy nights call for easy meals. You know the busy nights I am talking about, when your whole family is coming and going and everyone walks into the house borderline HANGRY. This time of year is BUSY. Between school, sports, appointments, long days at work — there is a lot going on.
One thing that I have been doing more and more is a bar-style meal. Where you make a main item and leave out lots of things to customize your individual dish. This is great for my family because we have some vegetarians and some meat-eaters and everyone leaves the table satisfied.
Think taco bar, DIY burrito bowls, make your own pizza, and a personal family favorite — the baked potato bar.
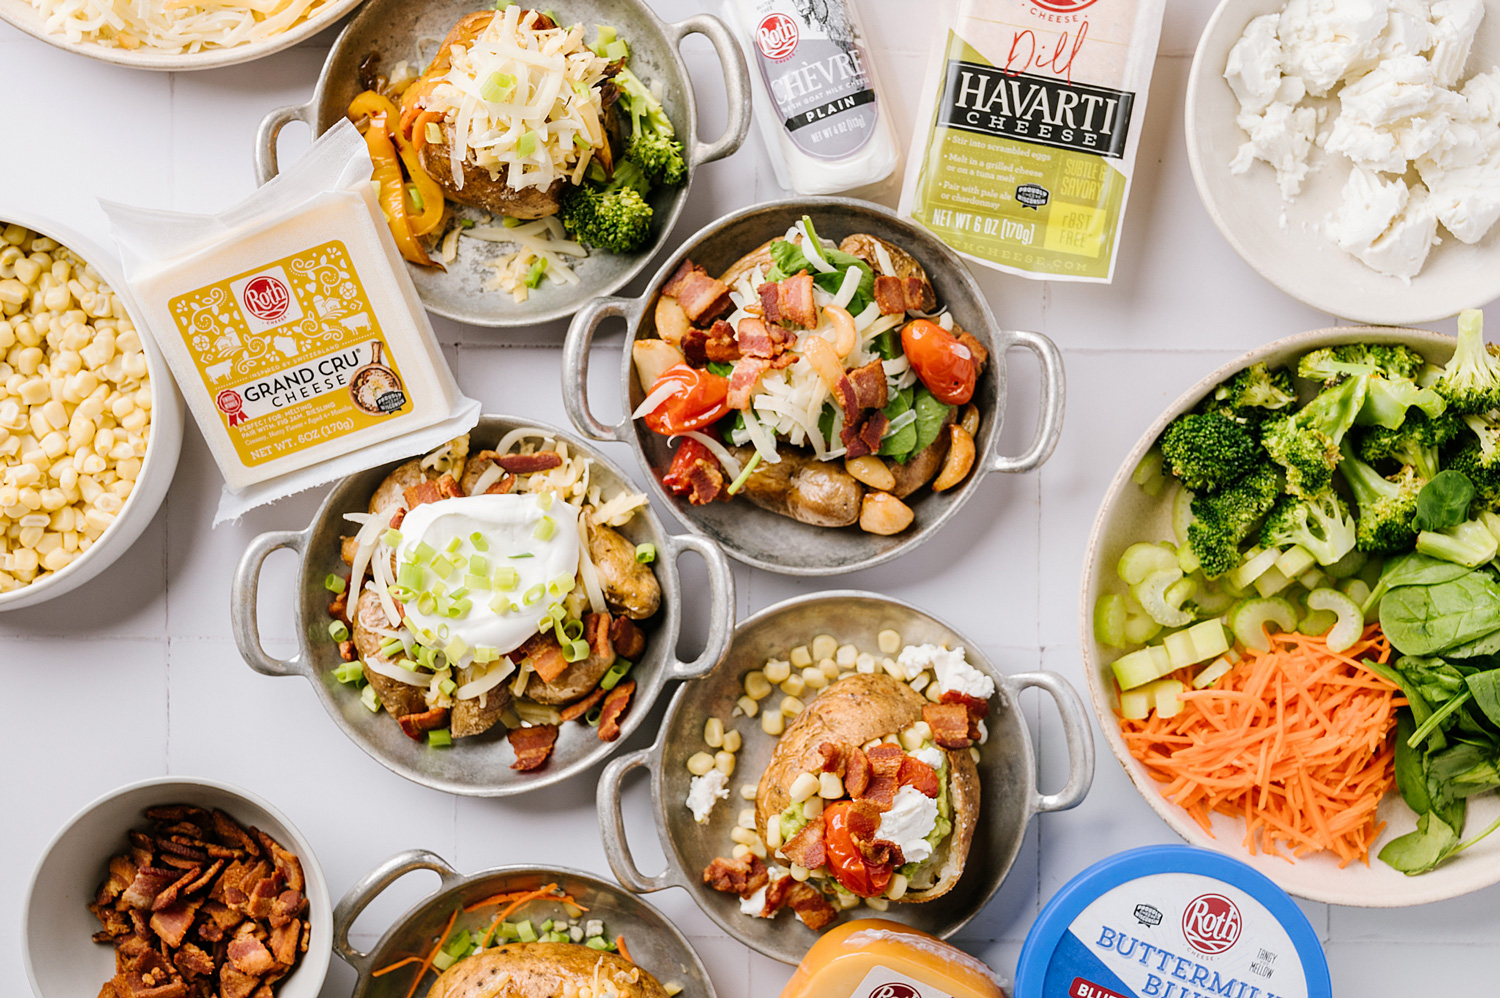
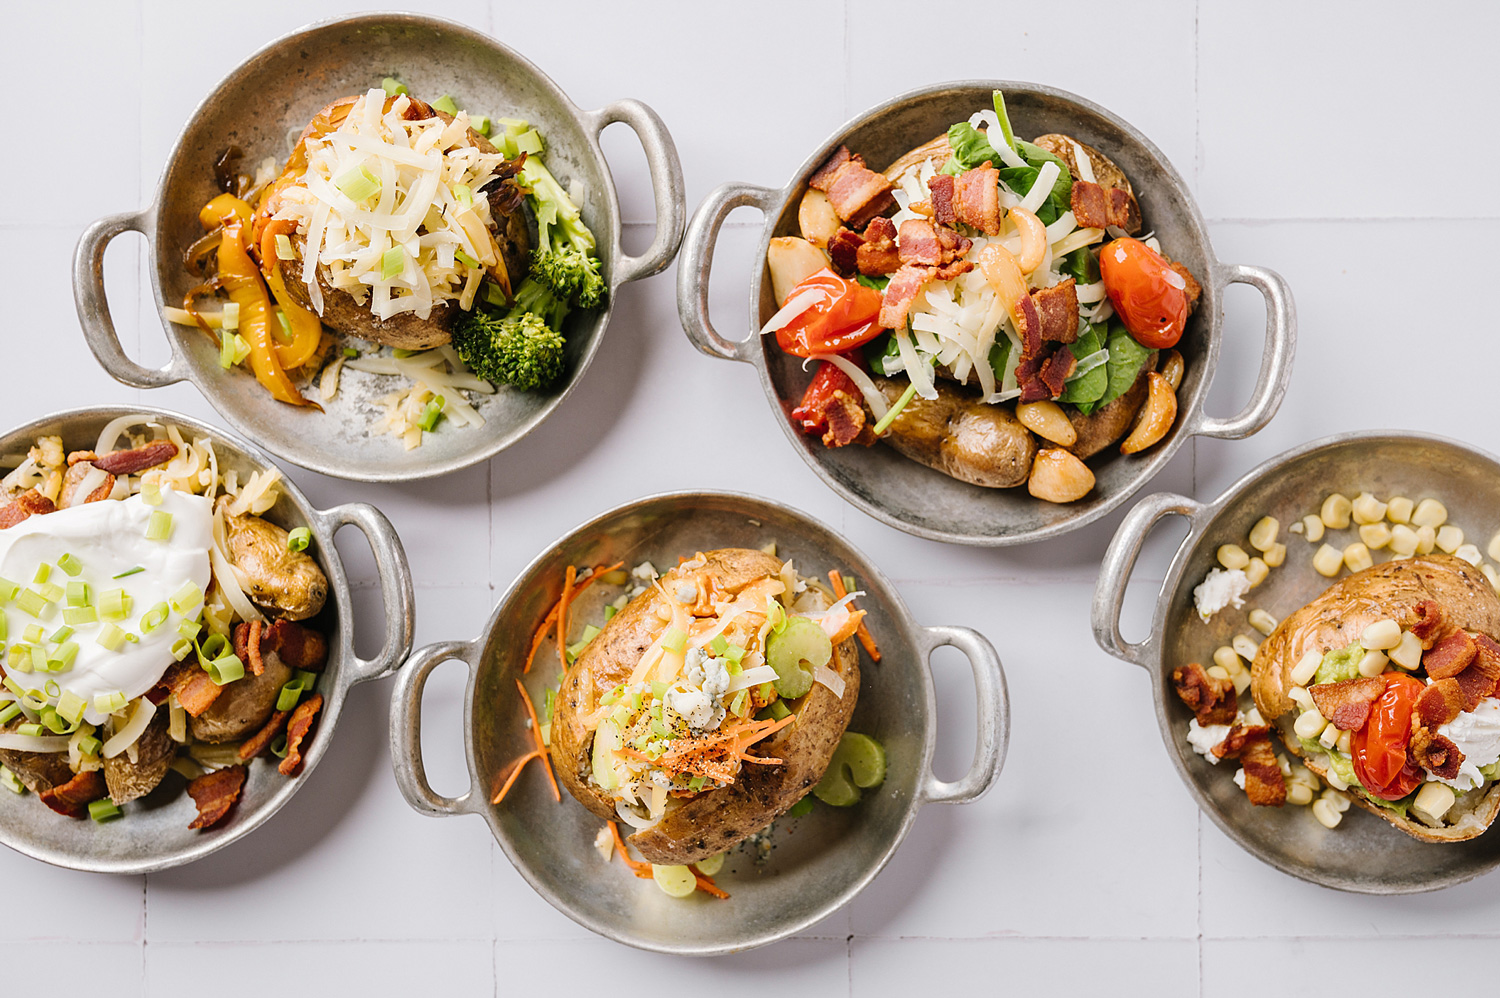
My kids all love baked potatoes and this is an excellent way to turn a side dish into a meal. We add pulled pork or shredded buffalo chicken, bacon, veggies, LOTS of shredded Roth cheese, sour cream, sautéed peppers and onions, chili, pretty much anything you can think of — it can go into a potato.
It’s also quick to get on the table. If my afternoon is busy, I can prep this in the morning or while I am cooking another meal. I do this a lot if I am already cooking something and doing a lot of chopping, etc. I do it for two meals – a couple of extra minutes saves me so much clean up and prep time later. Future me is always grateful.
A baked potato bar is great for a weeknight meal, but it’s also an inexpensive way to entertain. This is great for a kid’s party, a team dinner before race day, or for watching a football game.
How to Make Baked Potatoes //
I know that you are probably thinking that baked potatoes are not a quick thing to make. And you are correct, they do take a long time to bake, but you don’t have to do it in the oven, and once they are in the oven, it’s hands-off.
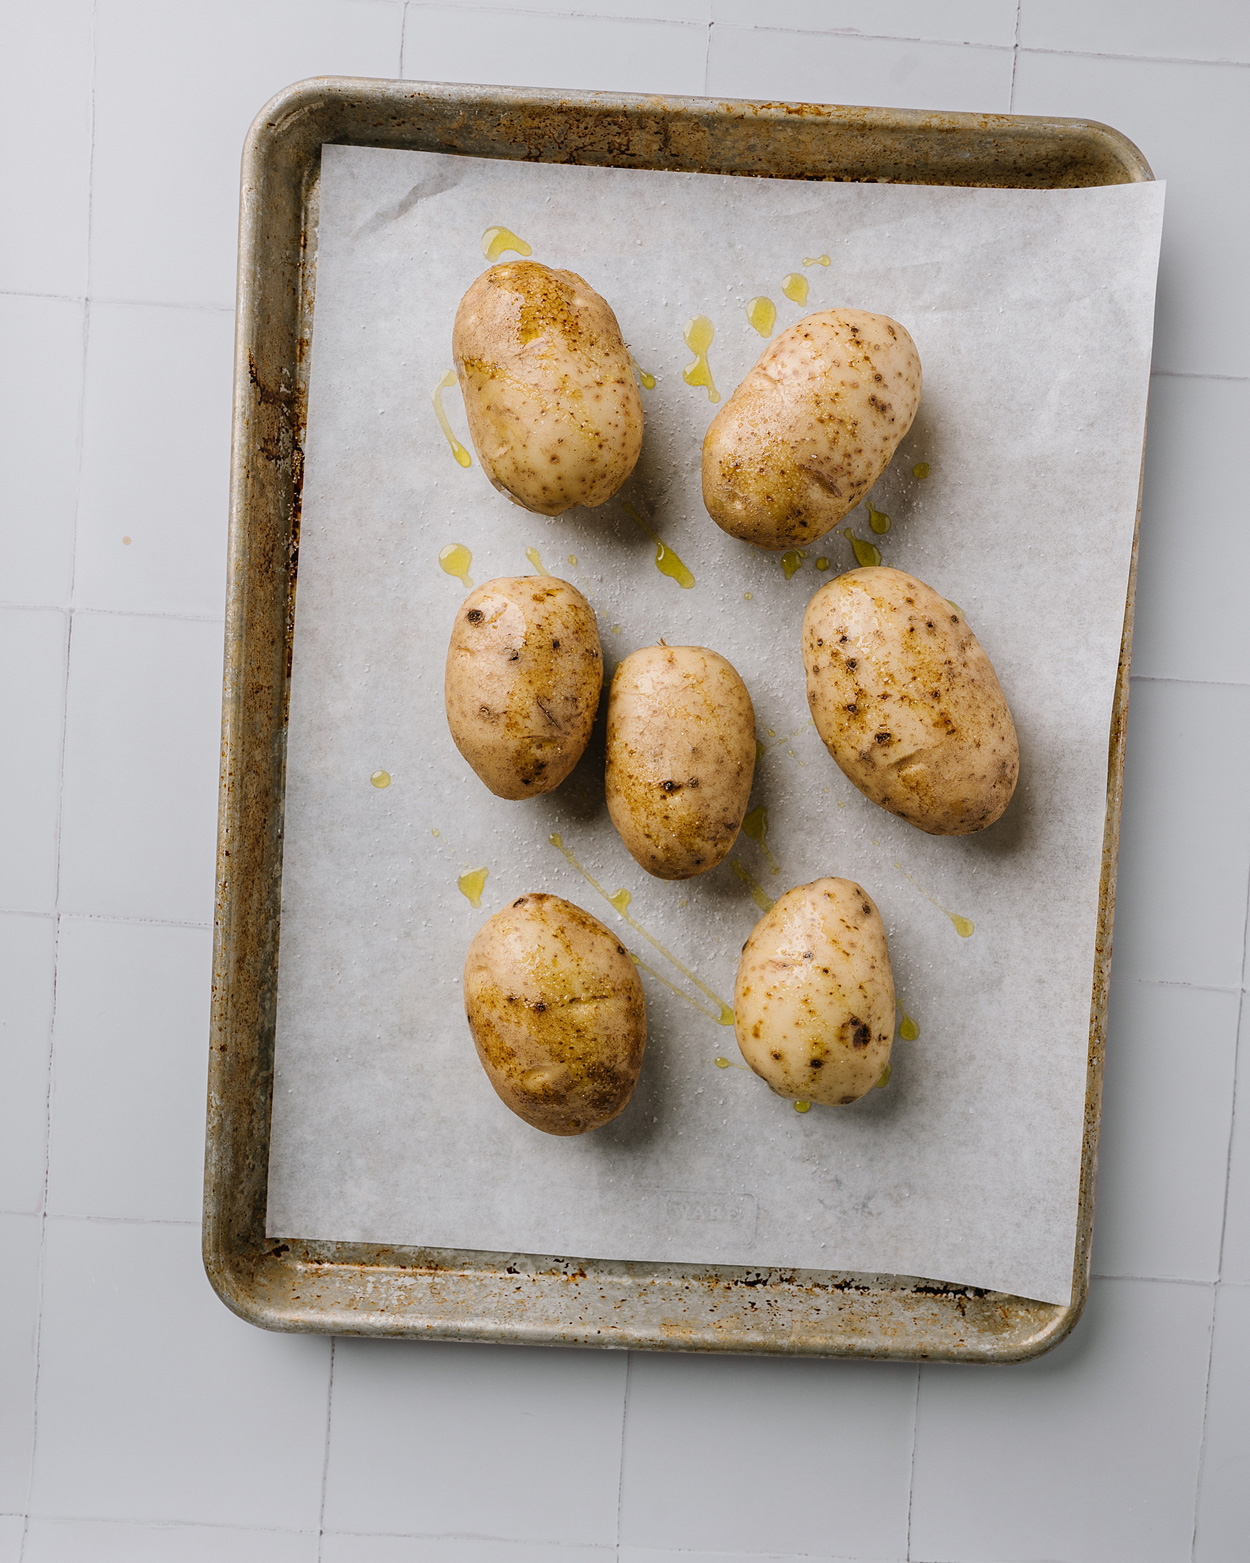
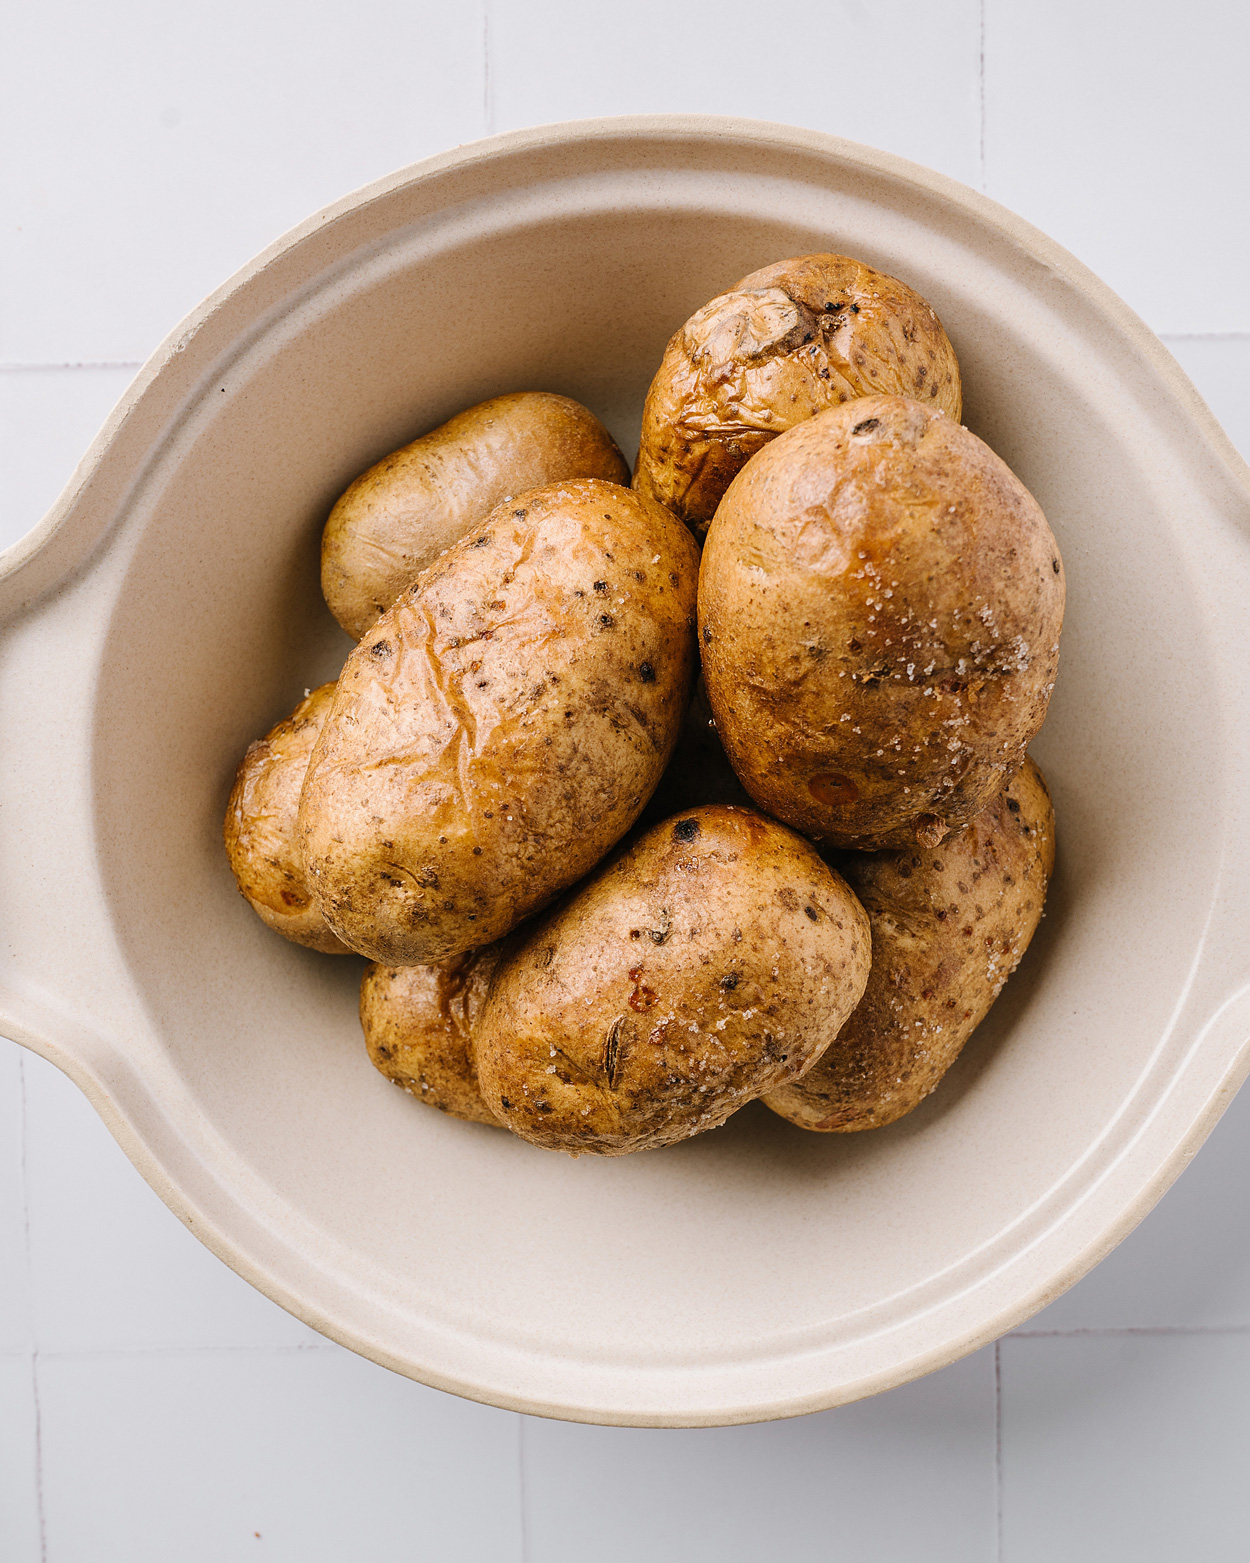
More often than not, I bake potatoes in the oven. I wash them really well, dry them, prick them with a fork, coat them in oil and salt, and then bake them in a 375° F oven for 70 to 90 minutes. The skins are crisp and are perfectly seasoned.
If you would like to cut the cooking time in half, you can slice the potatoes and place them slice side down on an oiled sheet pan.
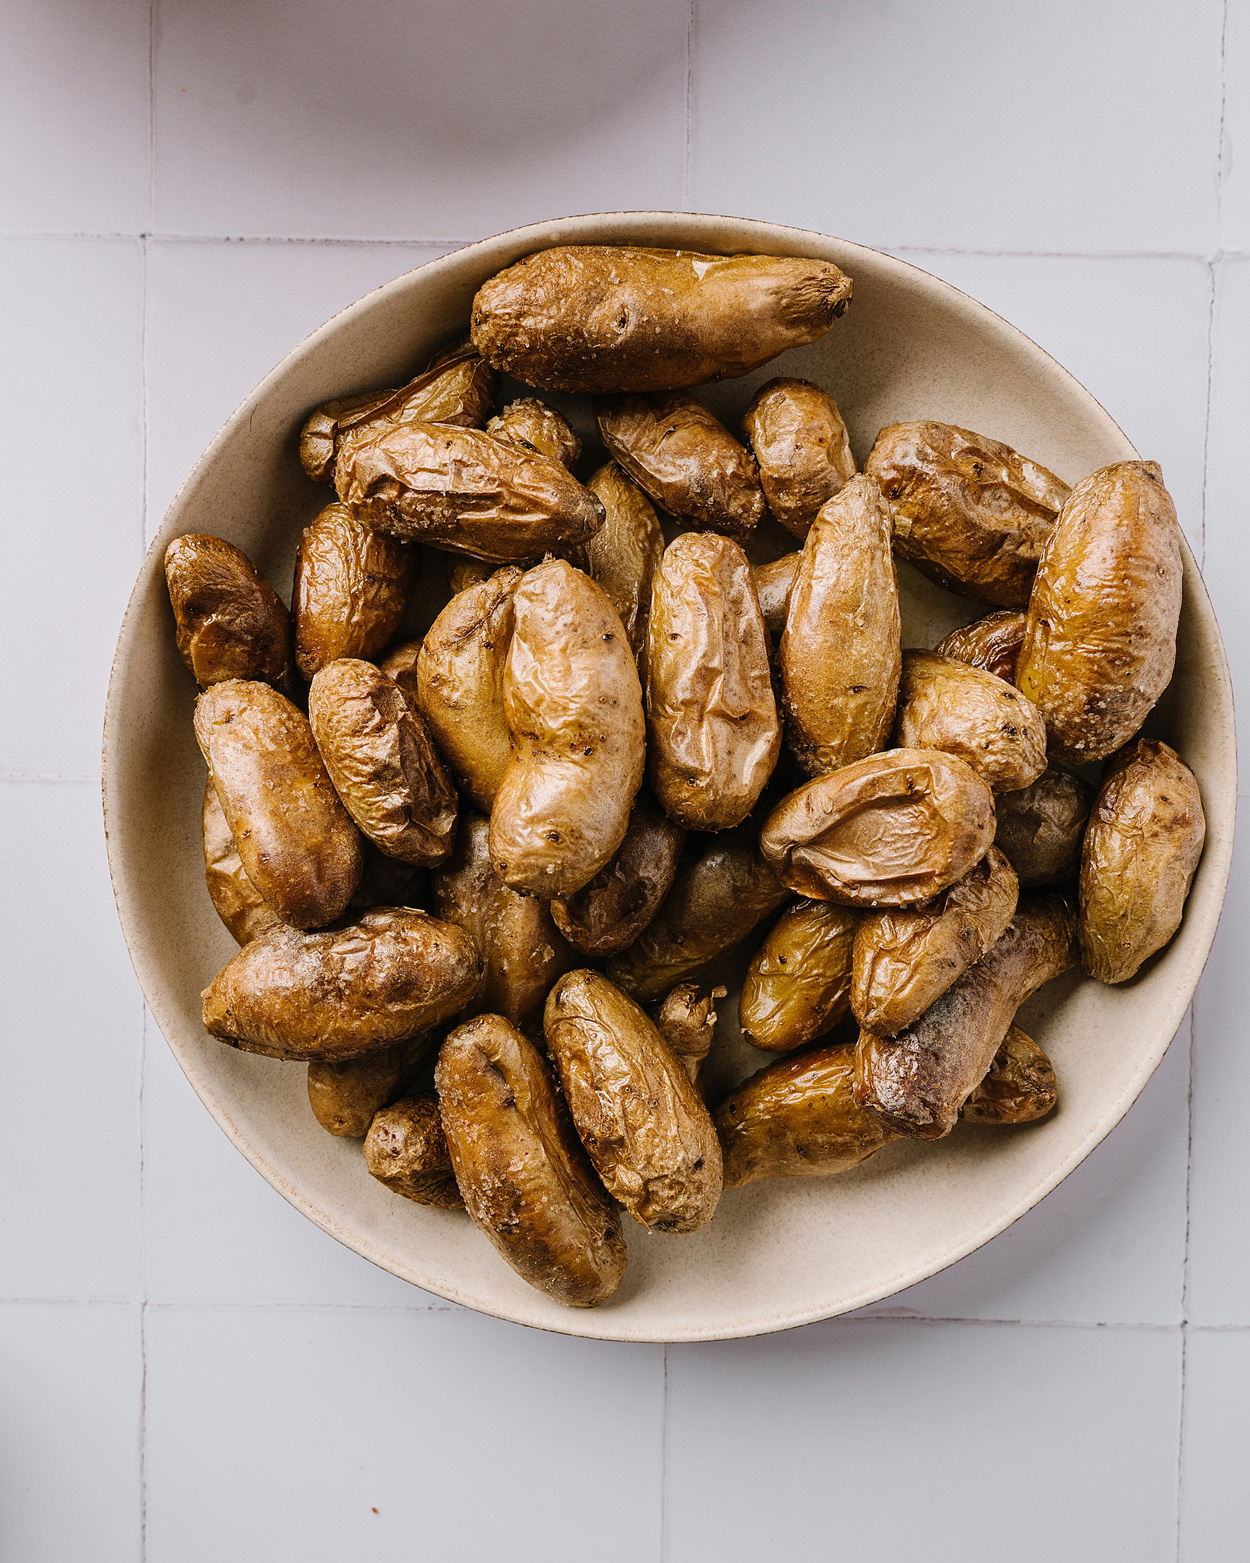
(Alternatively, you can use small potatoes like fingerlings and do a roasted potato bar. I really like this option when I want a few different toppings and don’t want to eat one big potato, I can make two or three mini options.)
Another way to cook them is in your slow cooker. Do the same as above, then wash, prick, oil, and salt the potatoes, but also wrap them in foil. Slow cook on HIGH for 4.5 to 5 hours or on LOW for 7.5 to 8 hours, or until the potatoes are tender and cooked through.
Which Toppings to Include //
The sky is literally the limit as to what to include as a topping for your baked potato bar. Take inventory of what is in your fridge and freezer, and it’s fair game for a baked potato. A potato is a blank canvas that is begging to be topped with delicious things.
Sure, a baked potato with a generous pat of butter and salt is delicious, but we can do better than that!
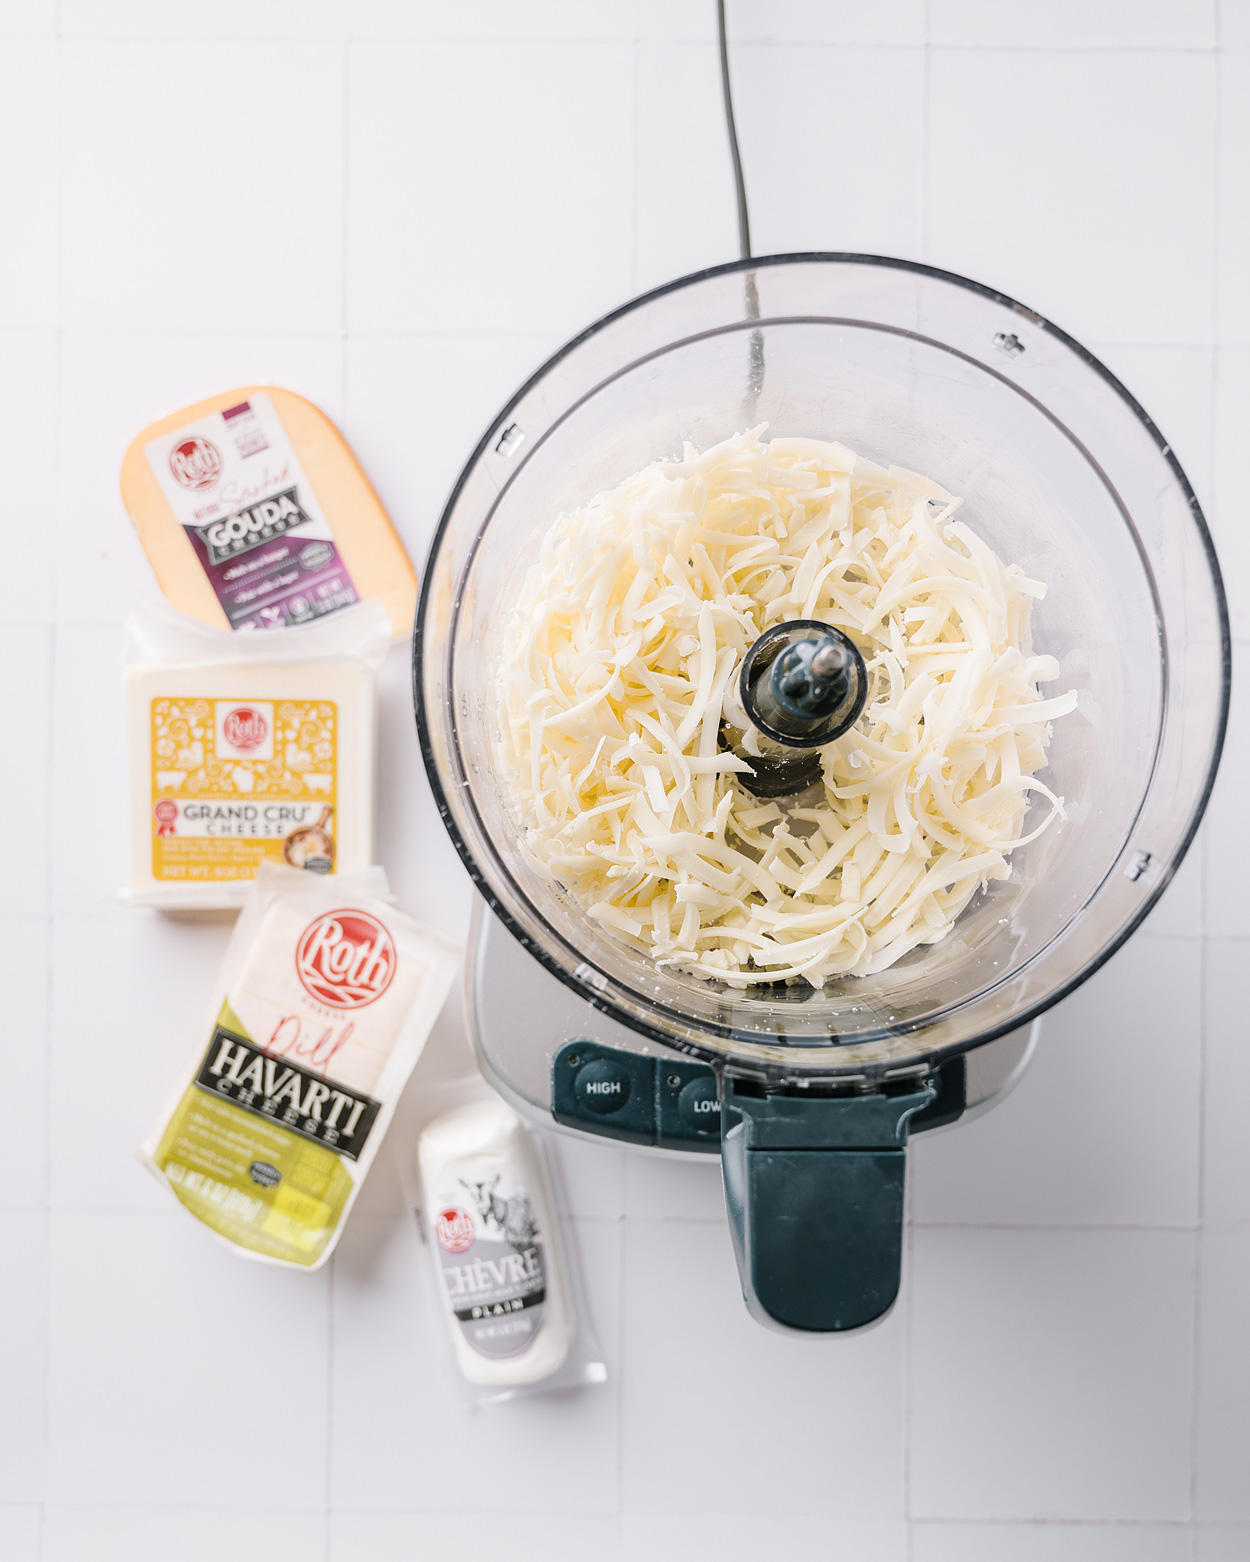
Cheese // Is there anything better and melty, gooey, cheese on a piping hot potato? I honestly don’t think there is. I used to buy the bags of pre-shredded cheese, but I am a convert to shredding my cheeses myself.
When you buy the bags of cheese, they add starch to the bag to keep the shreds from sticking together and they just don’t melt the same sexy way that cheese you shred yourself does. It makes a huge difference in the end result.
You also have total control over the kind and quality of cheese you use. (You know I love my Roth cheese, especially their alpine-style Grand Cru®.) When you shred the cheese yourself, you can use all of your favorites and choose varieties you might not always think of.
TIP: This cheese shredder attachment has been a game-changer when it comes to shredding cheese. I use it ALL the time. I also use the shredding disc on my food processor. Freeze your cheese for 15 minutes before shredding. It keeps the cheese from clumping and easier to get through the machine.
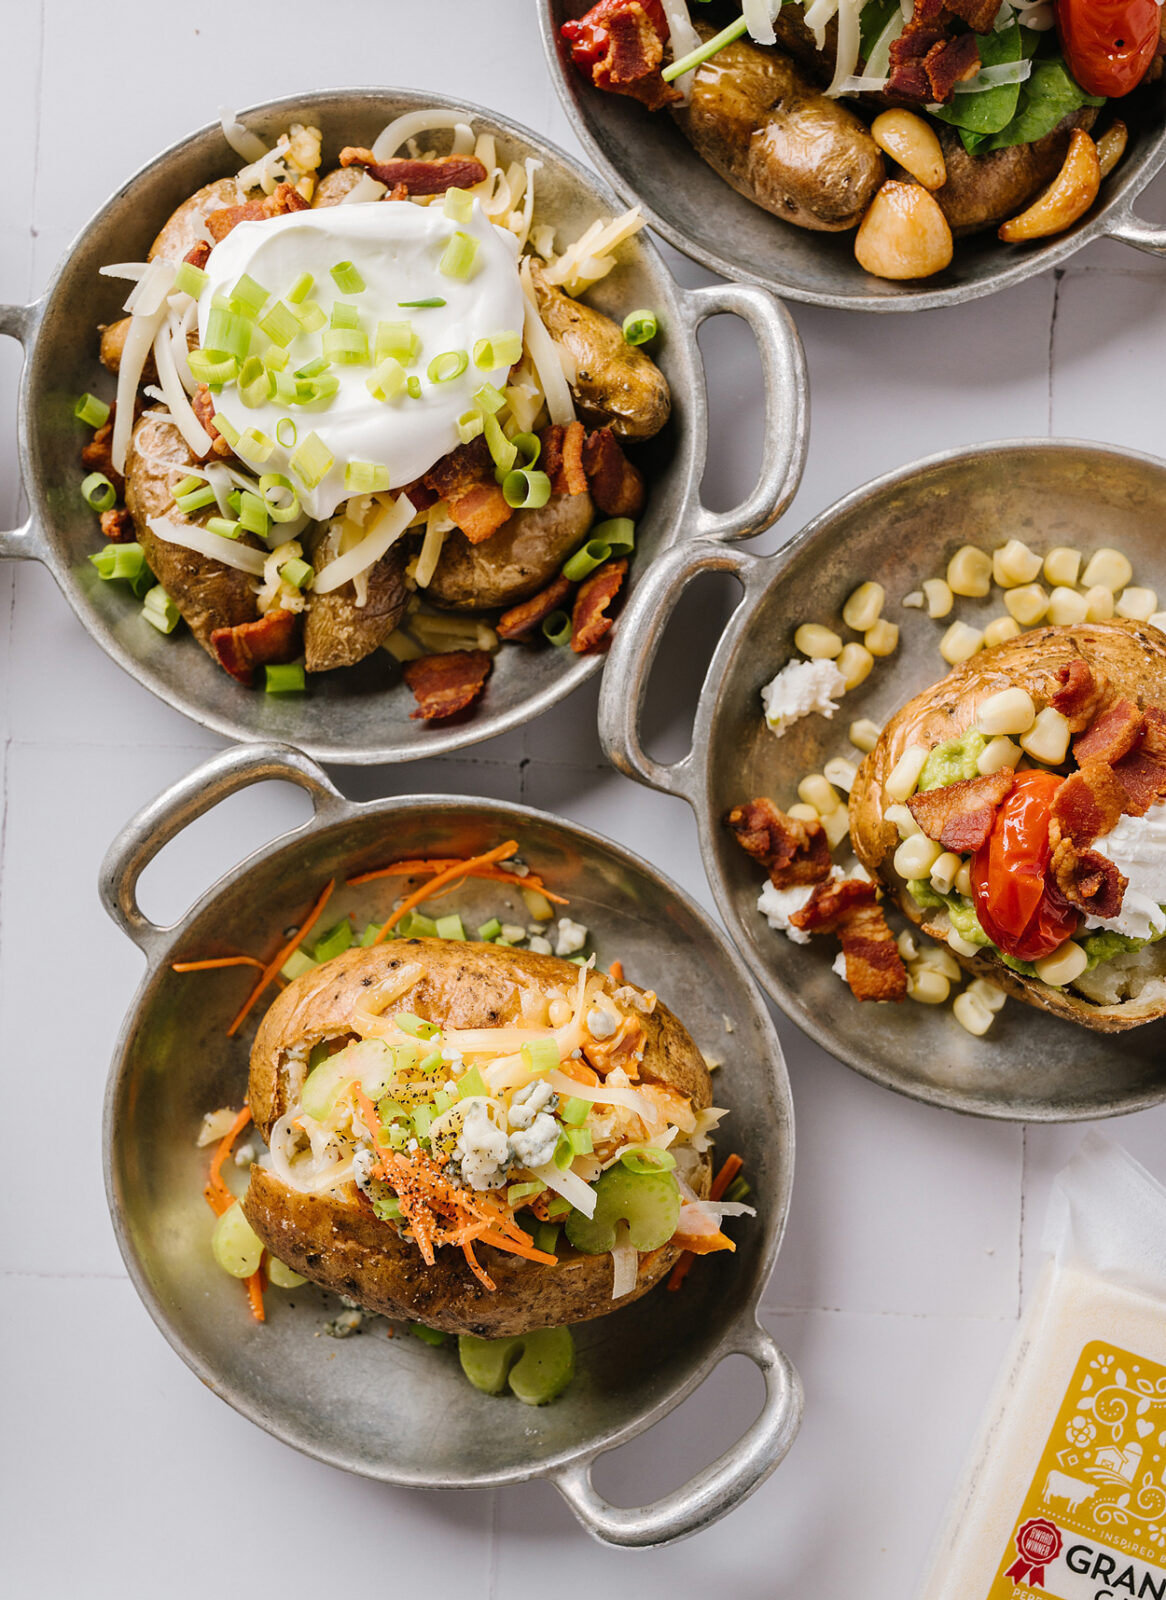
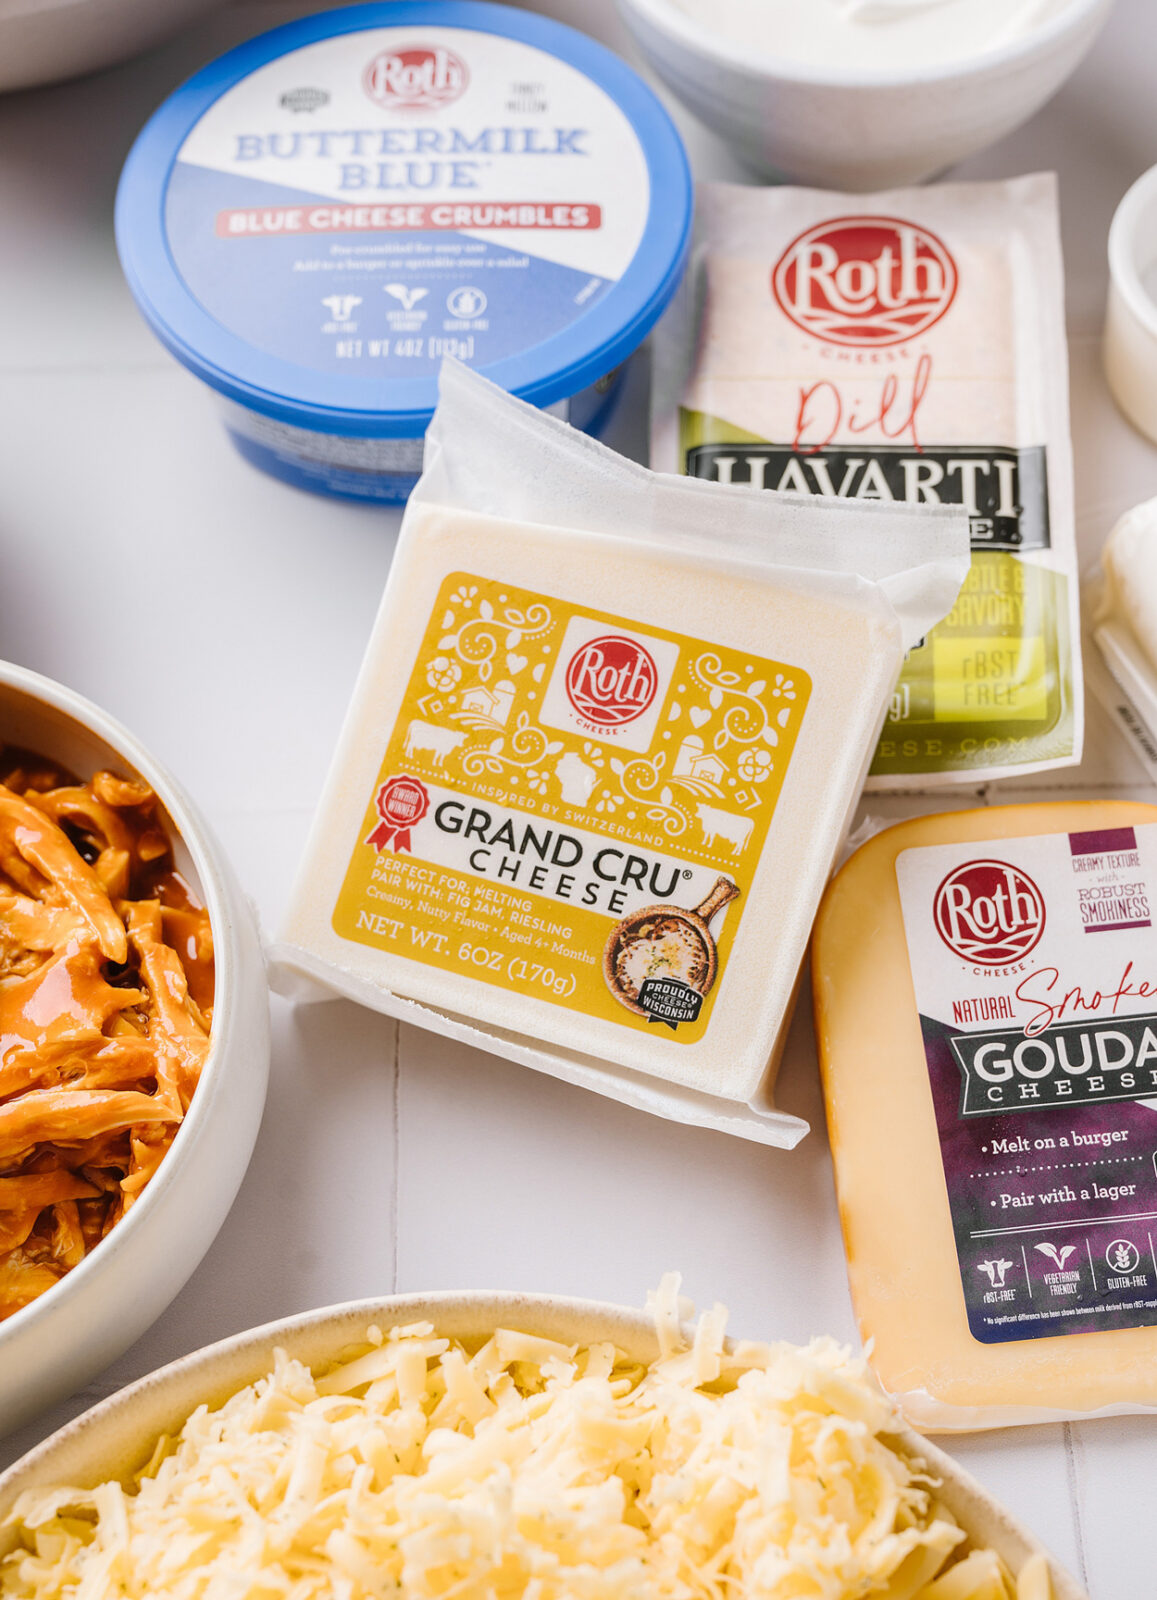
Cheese // I always have a ton of different kinds of cheese in my fridge. Creamy, sharp, soft, bold, I like to keep a good variety in my fridge. I love cheese and want to try as many kinds as I can. For a baked potato bar, I like to have a few different kinds to add different flavor profiles and textures to our potatoes.
Grand Cru® goes well with so many things. It’s an amazingly delicious cheese that is good in so many things. It’s slightly sweet, melts like a dream, and is a great all-around option for just about anything you want to melt cheese on. I love it melted in a potato with sautéed onions and peppers. This is my #1 choice for a loaded baked potato.
The inspiration for this potato bar was our New Year’s Eve raclette, and Grand Cru® is the star of that show over roasted potatoes and slices of baguette. Add a few slices of apples… **chef’s kiss**
Buttermilk Blue® adds a bold pop of flavor. Buttermilk Blue® crumbles are great for a baked potato bar because you simply open the container and add a huge amount of flavor to your baked potato. A buffalo chicken baked potato with carrots, celery, green onion, and a generous amount of blue cheese and shredded Grand Cru® is my little guy’s potato of choice.
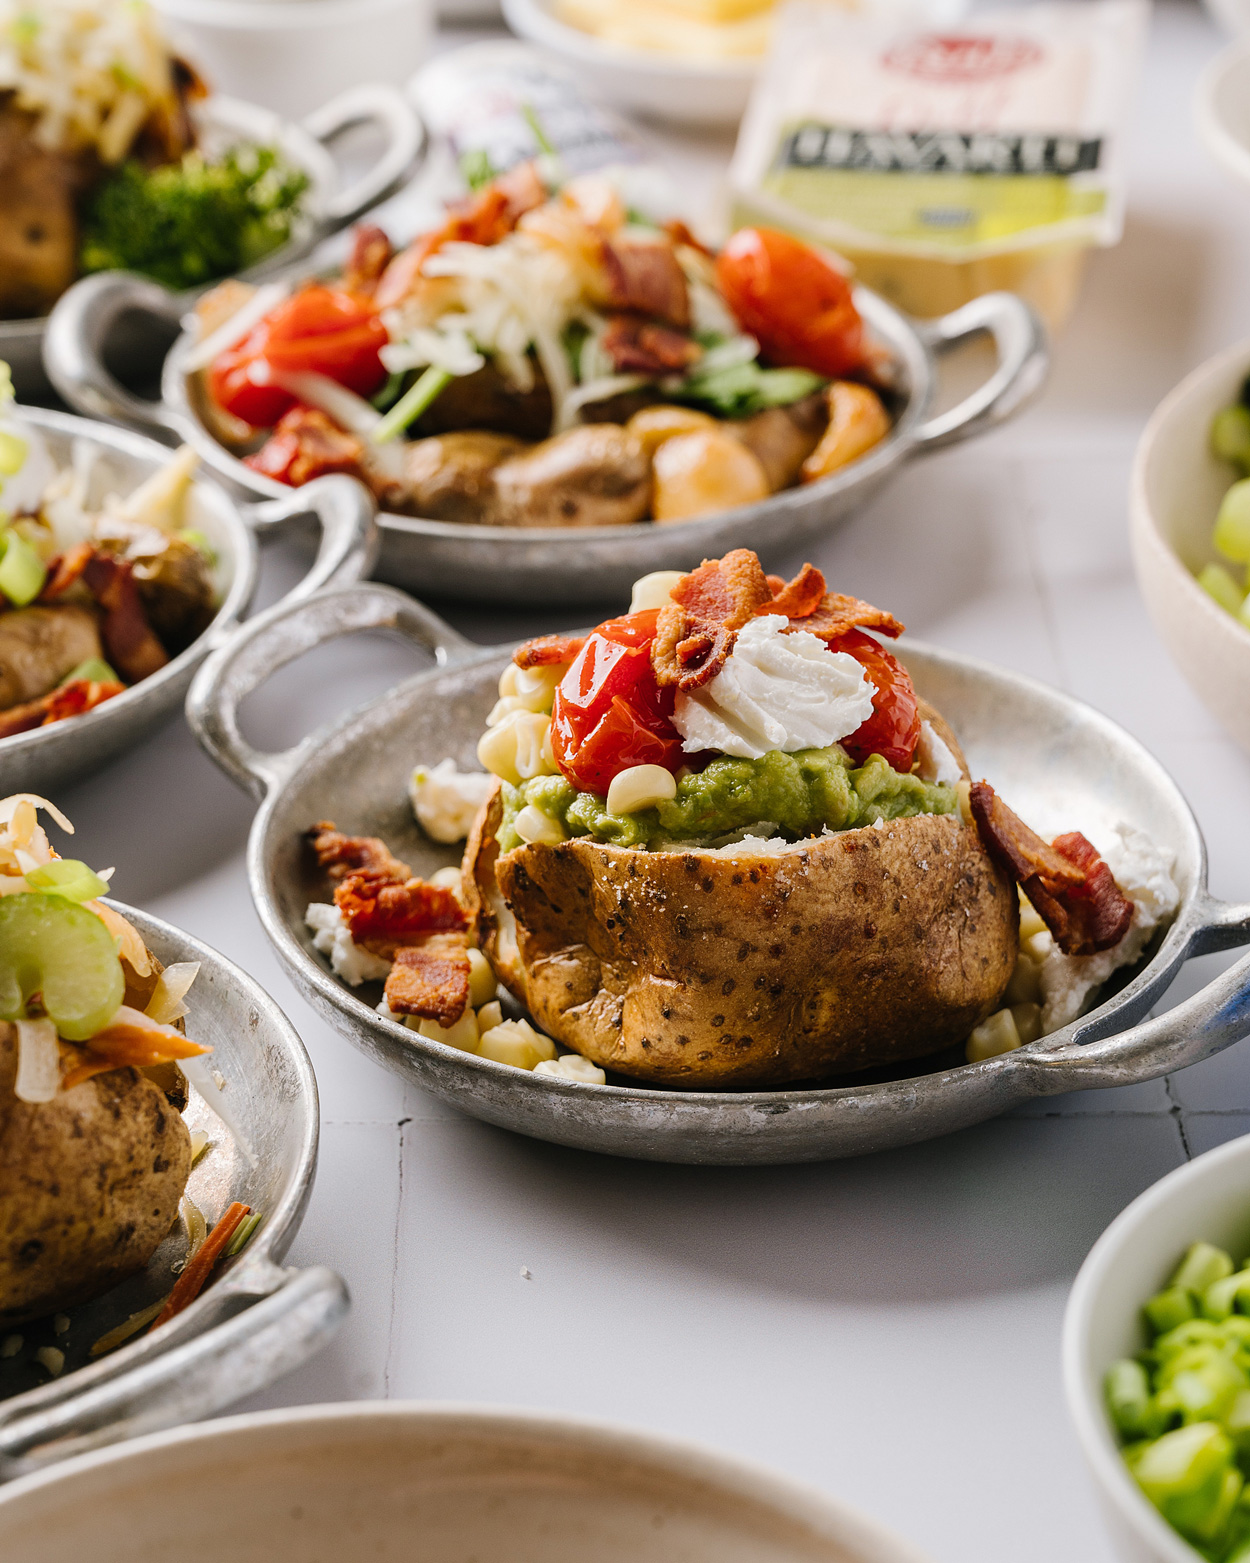
Chèvre goat cheese is perhaps not the first cheese you would think of for a baked potato, but trust me when I say it works perfectly. It adds fresh, sharp, flavor and I like to make a very loose version of street corn with it. Corn, guacamole, roasted tomatoes, bacon, and Chèvre. Delicious!
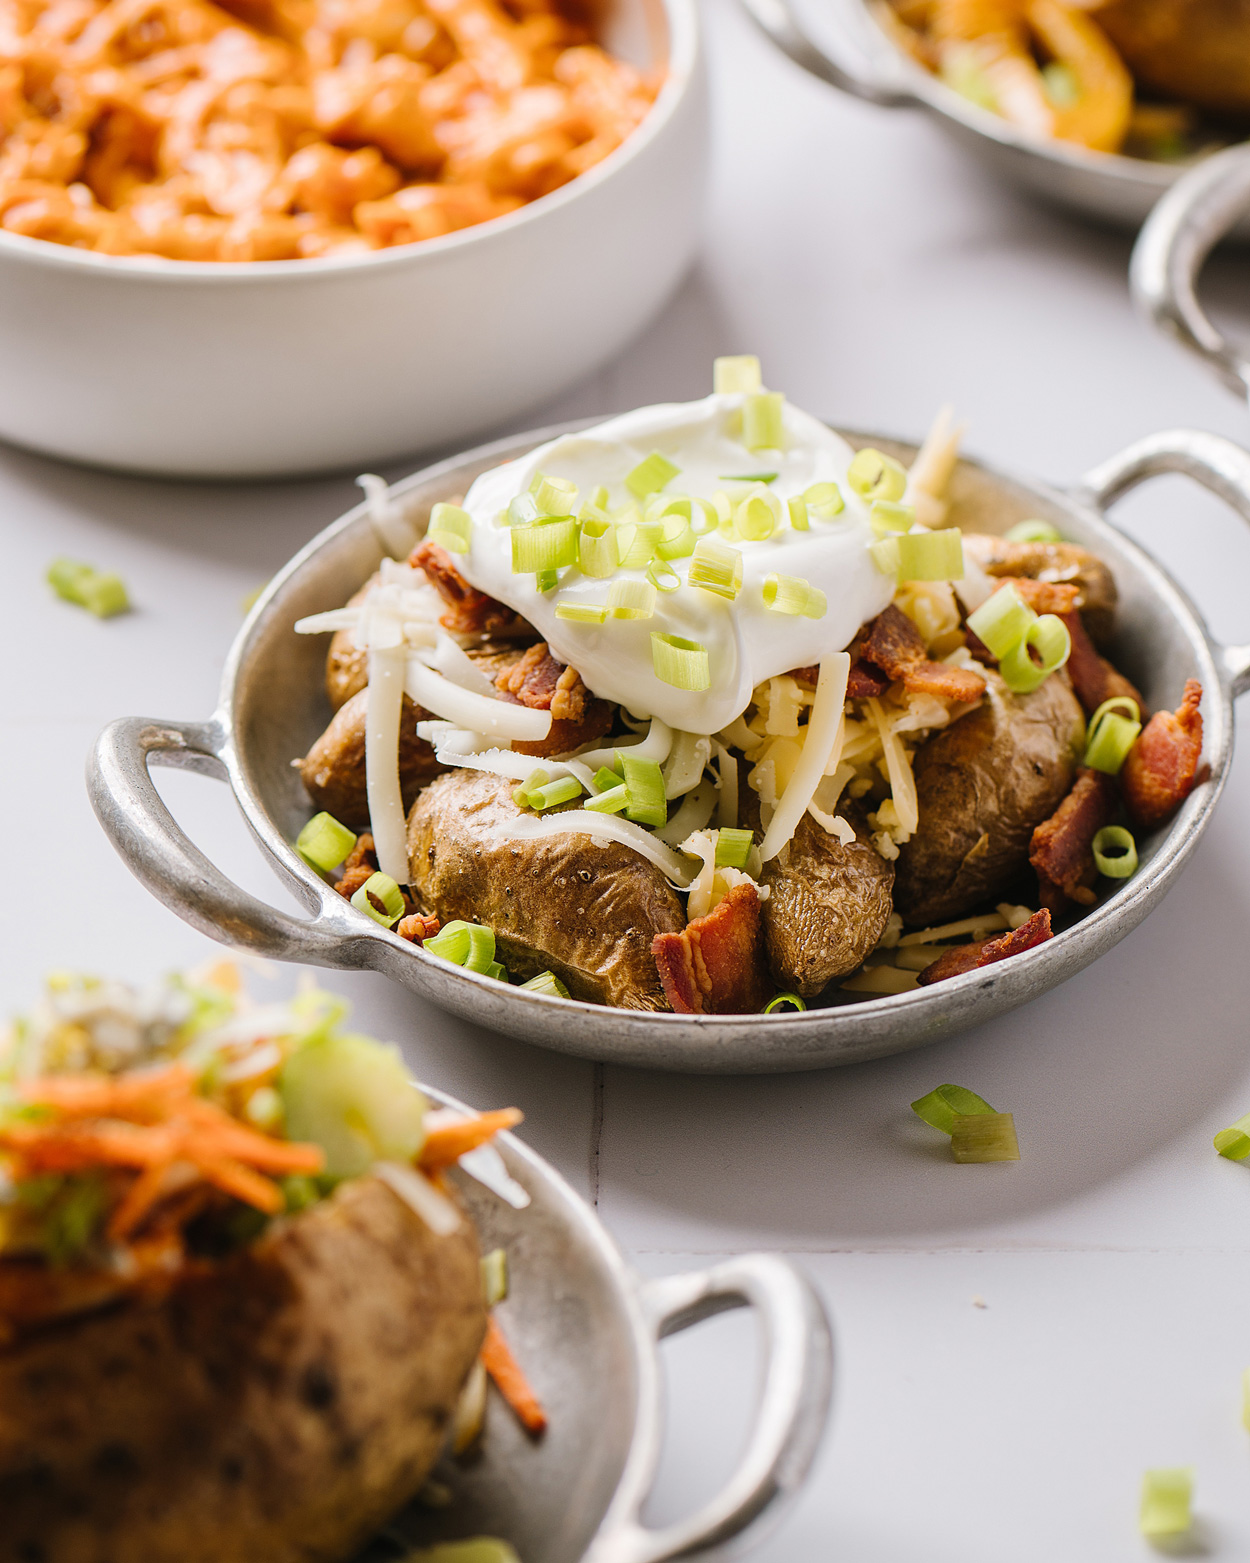
Gouda is one of my all-time favorite cheeses. It’s mellow and creamy and melts so beautifully. Lots of shredded Gouda, bacon, green onions, sour cream, and a generous amount of black pepper.
Dill Havarti rounds out my delicious cheese selection. Another amazing melting cheese, it’s super creamy and I love the hit of dill. (I think that dill is underused and under-appreciated.) This one is my go-to for a vegetable potato. Roasted broccoli, spinach, onions and peppers, TONS of Dill Havarti, and a generous dollop of sour cream.
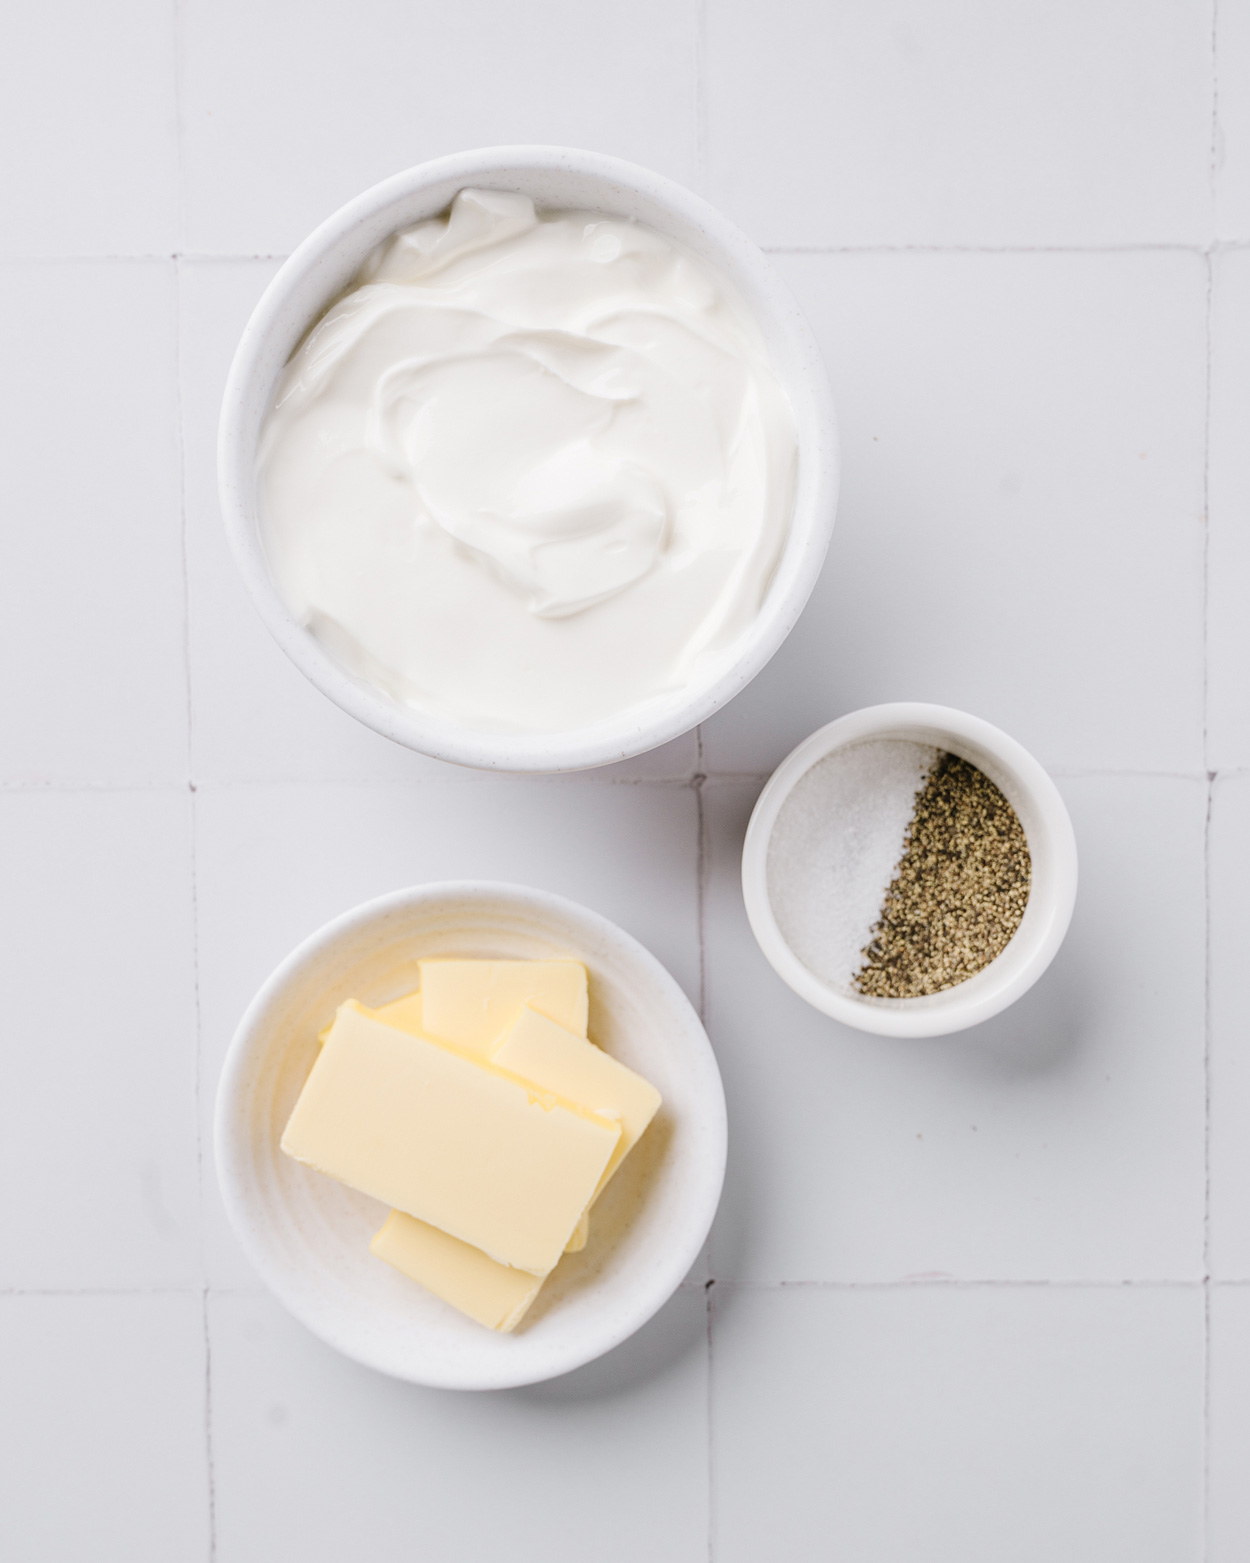
Sour Cream // A big bowl of cool sour cream is always a good idea, but it is a MUST for a baked potato. I also will add a bowl of garlic herb sour cream too.
Meats // Can you have a loaded potato without bacon? I didn’t think so either. I always have some pulled pork in my freezer and it is INCREDIBLE in a baked potato. For this potato bar, I bought a rotisserie chicken and tossed it with some buffalo sauce. Chili, taco beef, sloppy joe, pepperoni, ham, sausage. Any protein works.
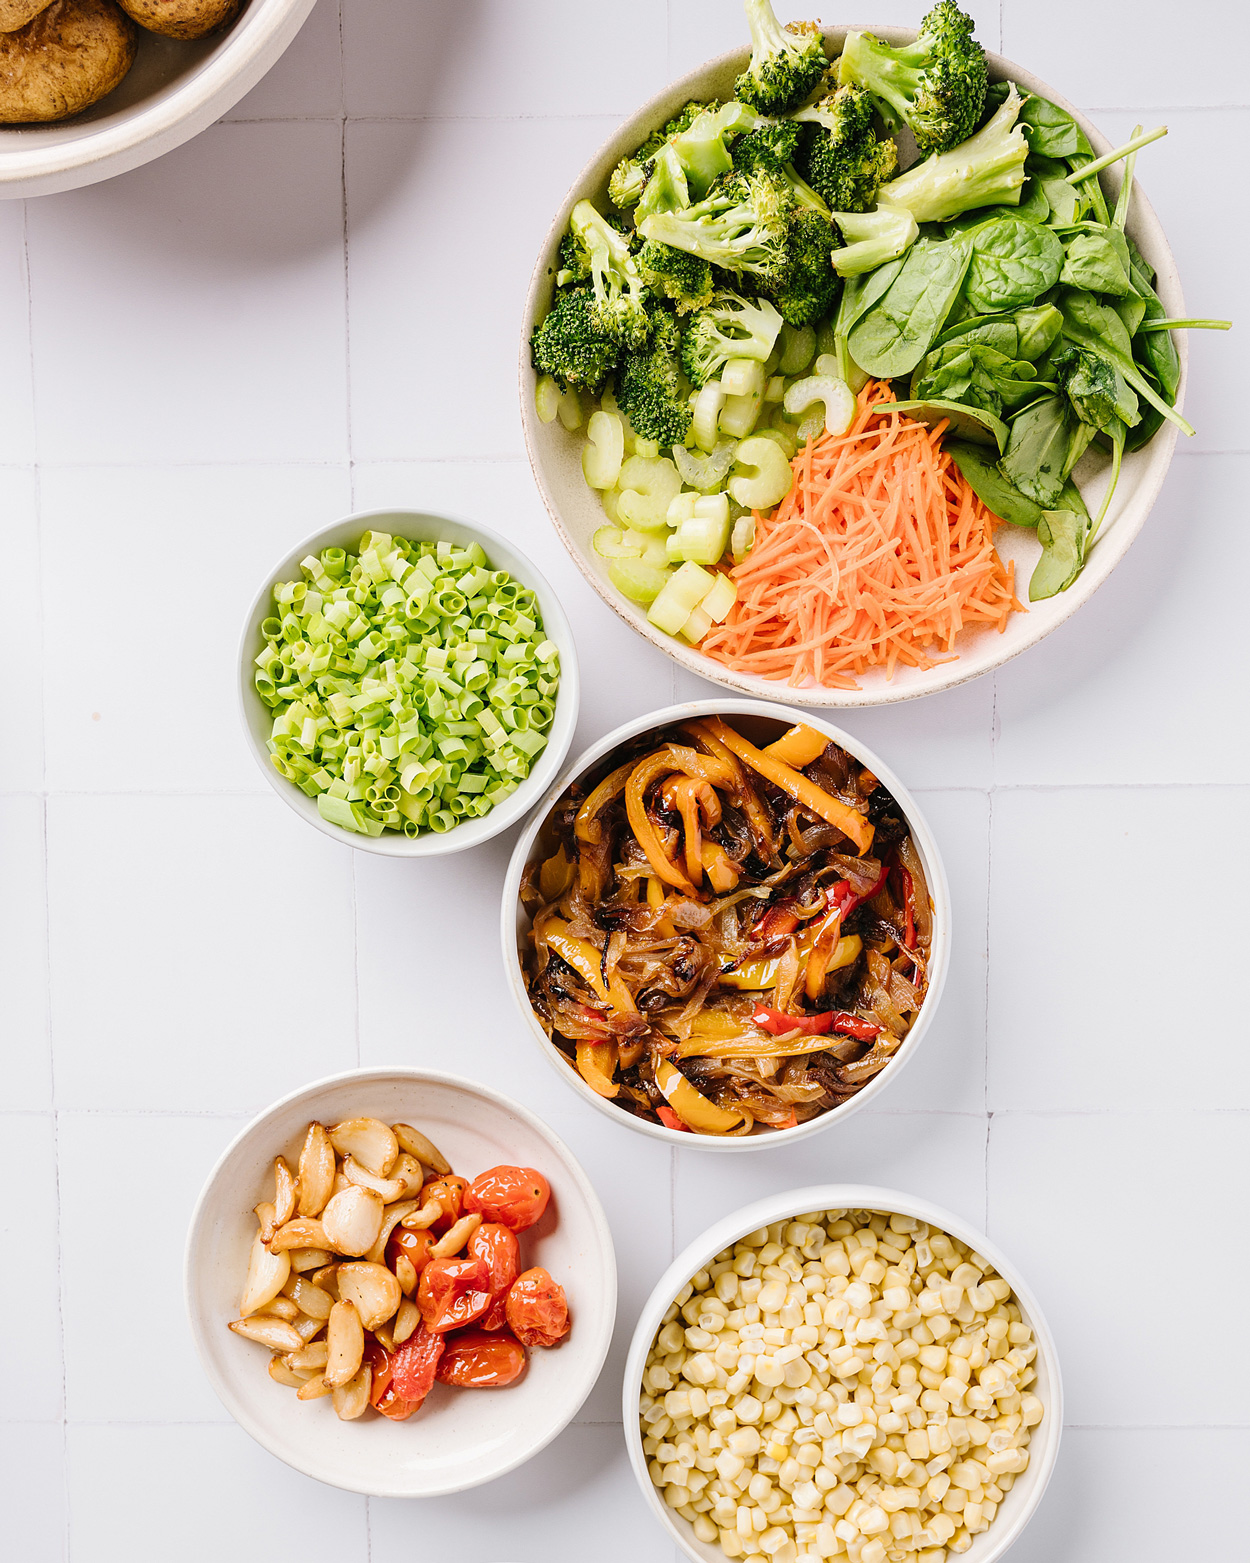
Vegetables // I like to air fry some broccoli, as it crisps up and stays bright green. Sautéed onion and peppers, diced tomatoes, avocado, corn, sautéed mushrooms, spinach, green onion, roasted garlic, chives, sliced jalapeños. This adds color and crunch.
TIP: Check out the salad or mezze bar at your local grocery store. This is a great way to save time and get to try some new things. I bought the roasted tomatoes and garlic when I grabbed the rotisserie chicken.
Extras // Butter, salsa, pizza sauce, ranch, barbecue sauce, sea salt flakes, herbs, red pepper flakes, anything that adds flavor and interest to your potato.
Essentially anything you can think of belongs in a potato, so get creative and make your own delicious combinations.
How to Set Up Your Baked Potato Bar //
01. Bake your potatoes using your desired method. Whether you make oven-baked potatoes or slow cooker potatoes, make a few extra for leftovers.
02. Prepare your toppings. Shred your cheese, warm your cheese sauce, set out your toppings in bowls or on a rimmed baking sheet lined with parchment for easy cleanup. I set mine out on my kitchen counter in an assembly line so that everyone can grab a plate and utensils and get busy customizing their potatoes.
03. Assemble! Add toppings and get creative! I like to add cheese to the bottom and the top for maximum gooey meltiness.
TIP: Cut your potato in half and make two different kinds to maximize textures and flavors. Discover a new favorite combination!
How to Keep The Potatoes Warm //
If I need to hold my potatoes and keep them warm, I will keep them in a 200° F oven on a sheet pan until I need them. You can also keep already baked potatoes warm on the LOW setting in a slow cooker.
What to Serve With A Baked Potato Bar //
You don’t really need to serve anything else, a loaded baked potato is a meal in its own right, but I do like to serve some other things if I am serving this for a crowd. And obviously serve dessert. 🙂
I have a confession. I don’t like goat cheese. I don’t like yogurt either. It’s always been too tangy for me. Yet I sometimes need to use ingredients that I don’t necessarily love and I have to try them. (The perils of being a recipe developer, some days are much better than others.)
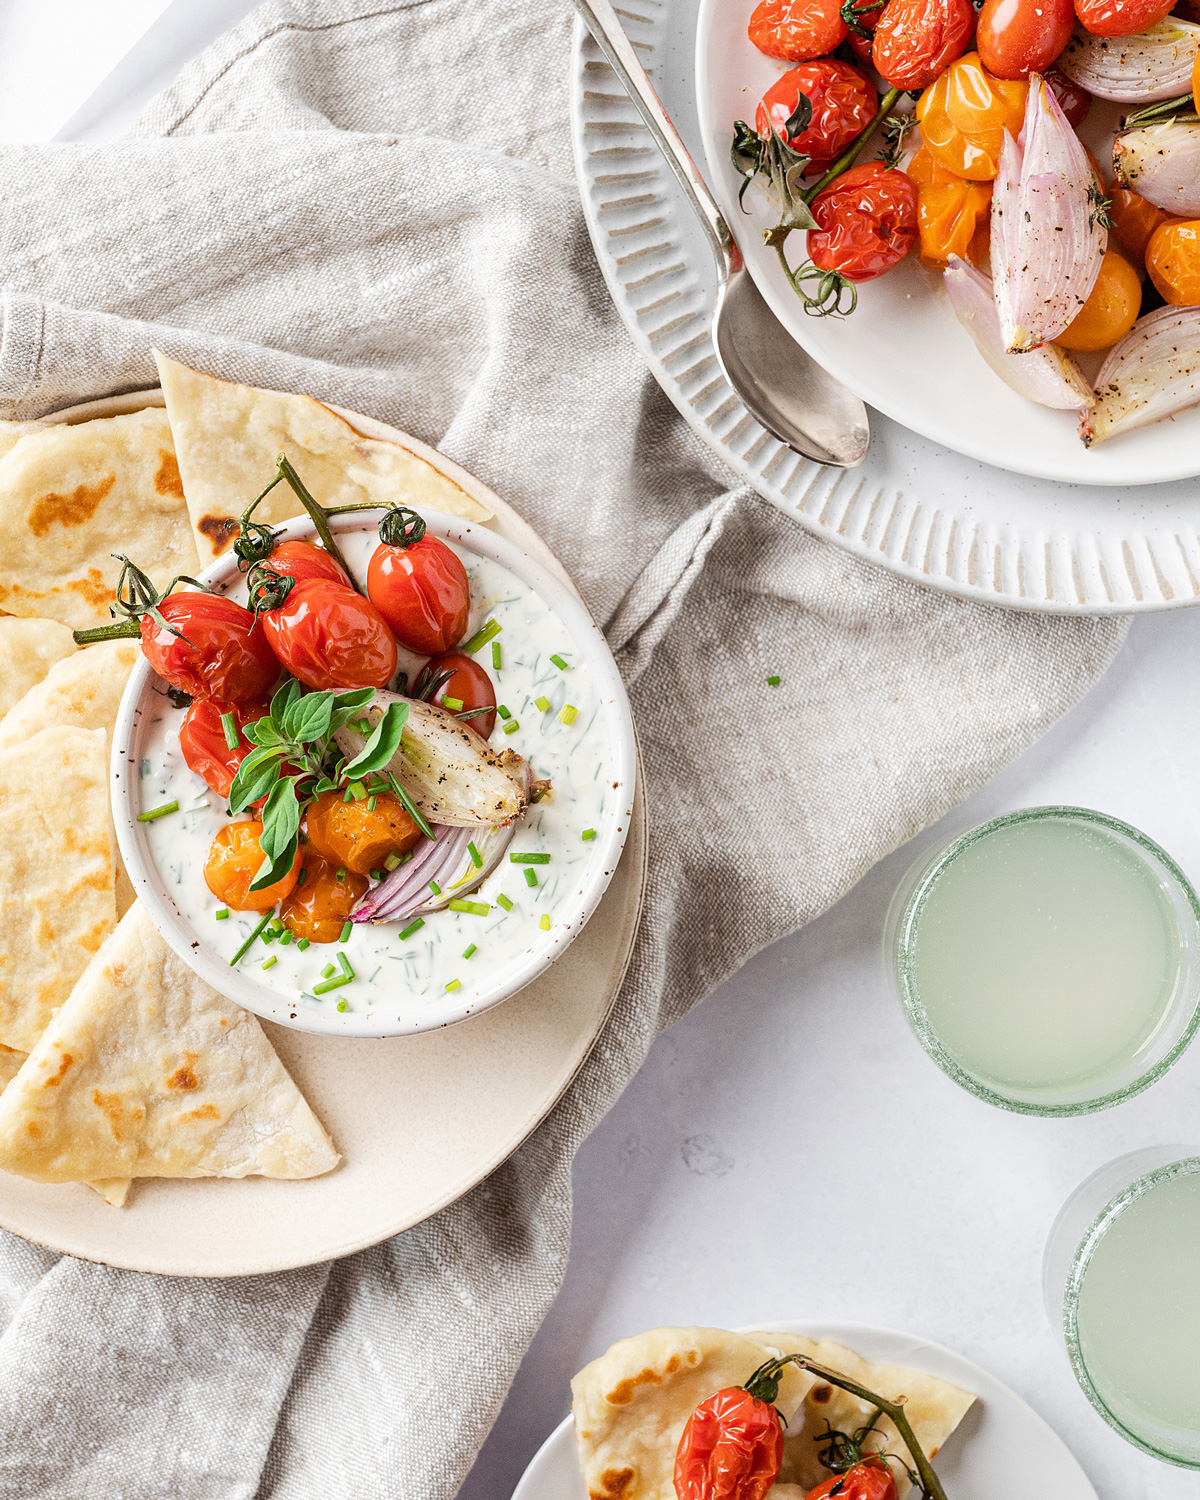
So you can imagine my surprise when I dipped my flatbread into this herbed goat cheese dip and I actually loved it. No one was more shocked than me. Roth Chèvre might be my gateway into the world of goat cheese. It’s mild, fresh tasting, and not overly goat-y.
So why would I make a recipe with an ingredient that I don’t like? Well, because my husband likes it, and he loves a dip. I also had a ton of fresh herbs to use before they wilted in my crisper drawer.
Lastly, every month I get shipped a box of delicious cheeses from my friends at Roth Cheese and I wanted to expand my culinary horizons. I love their cheeses and can’t decide which one to eat first, but I always give the goat cheeses to my neighbors. (They also make a Wild Blueberry and Garlic Herb version.)
So I made a really delicious whipped herbed goat cheese dip and now I won’t avoid things with goat cheese on restaurant menus. Here’s to more beet salads in my future!
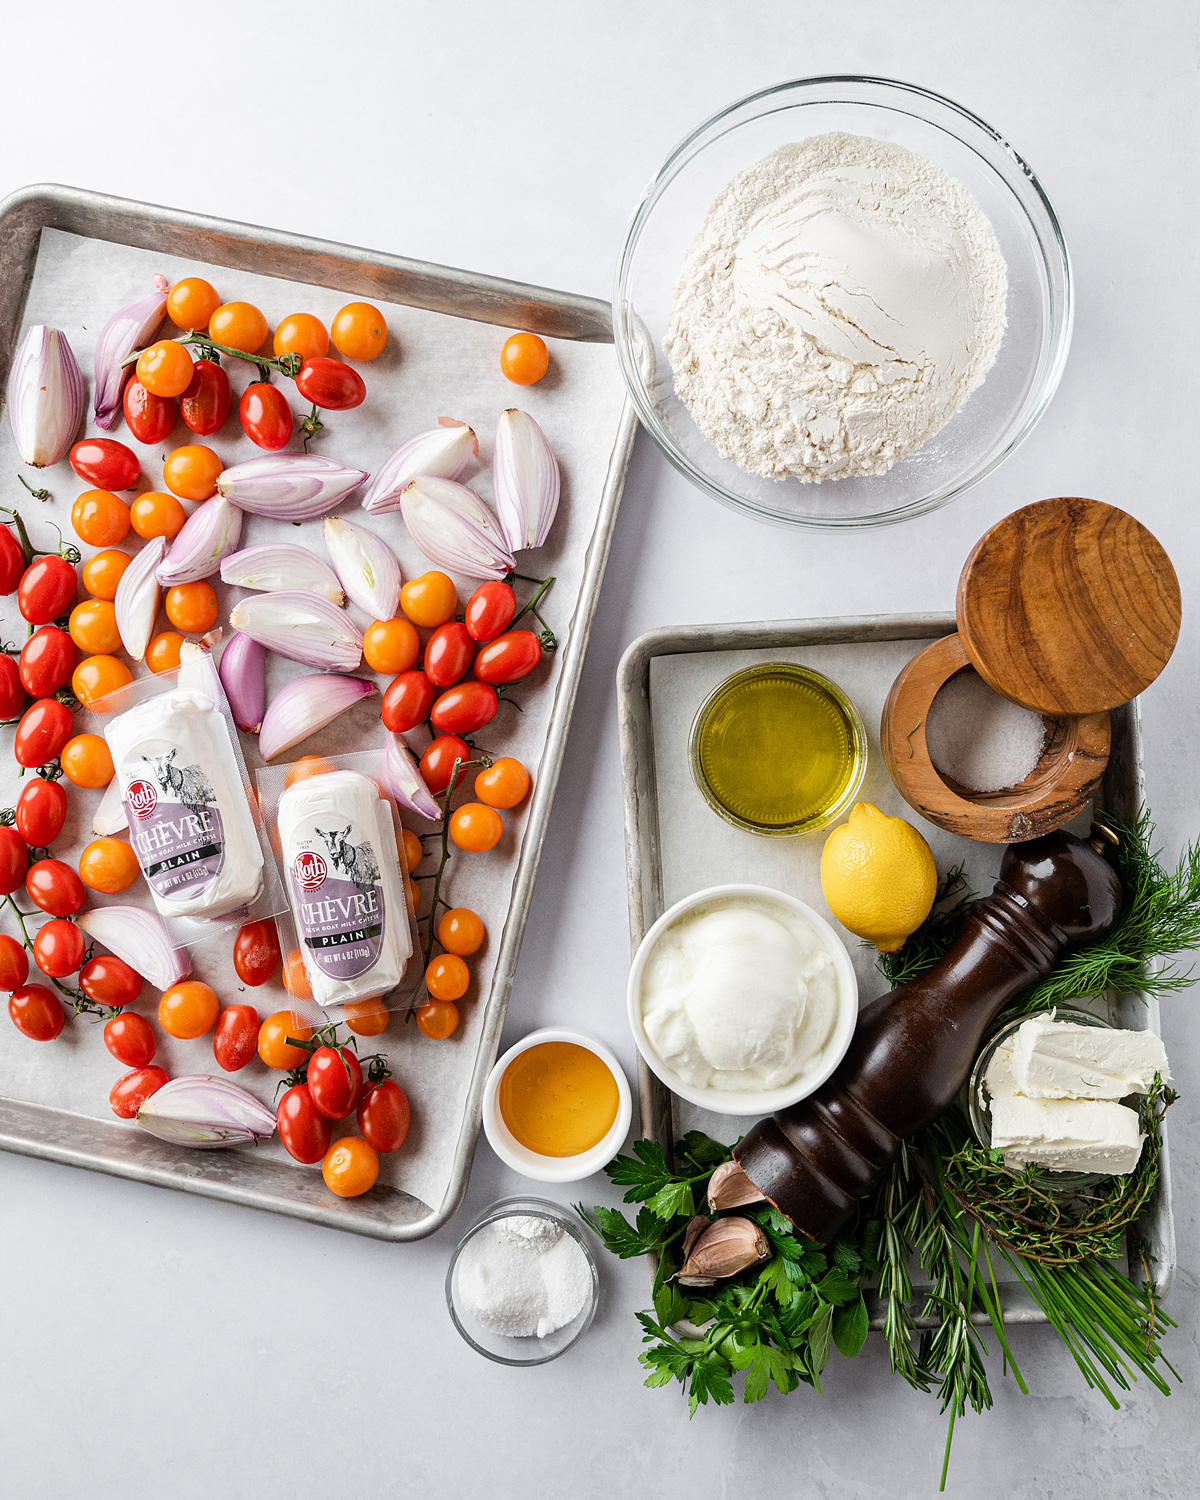
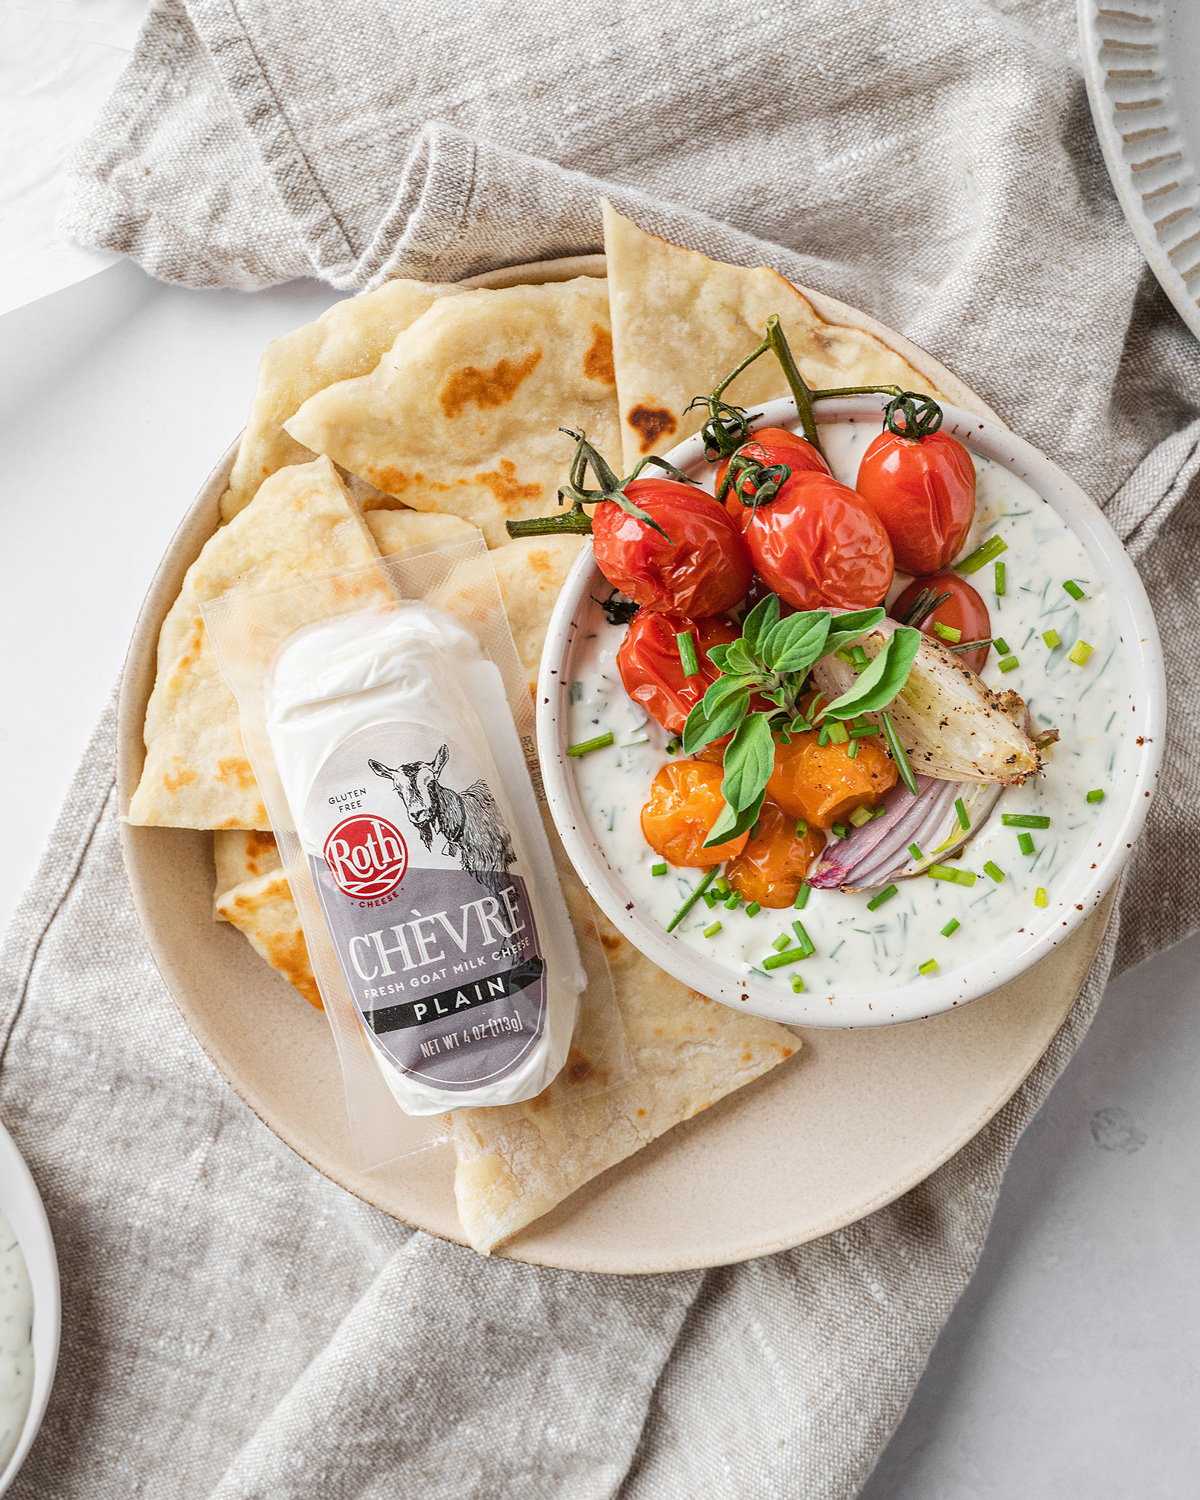
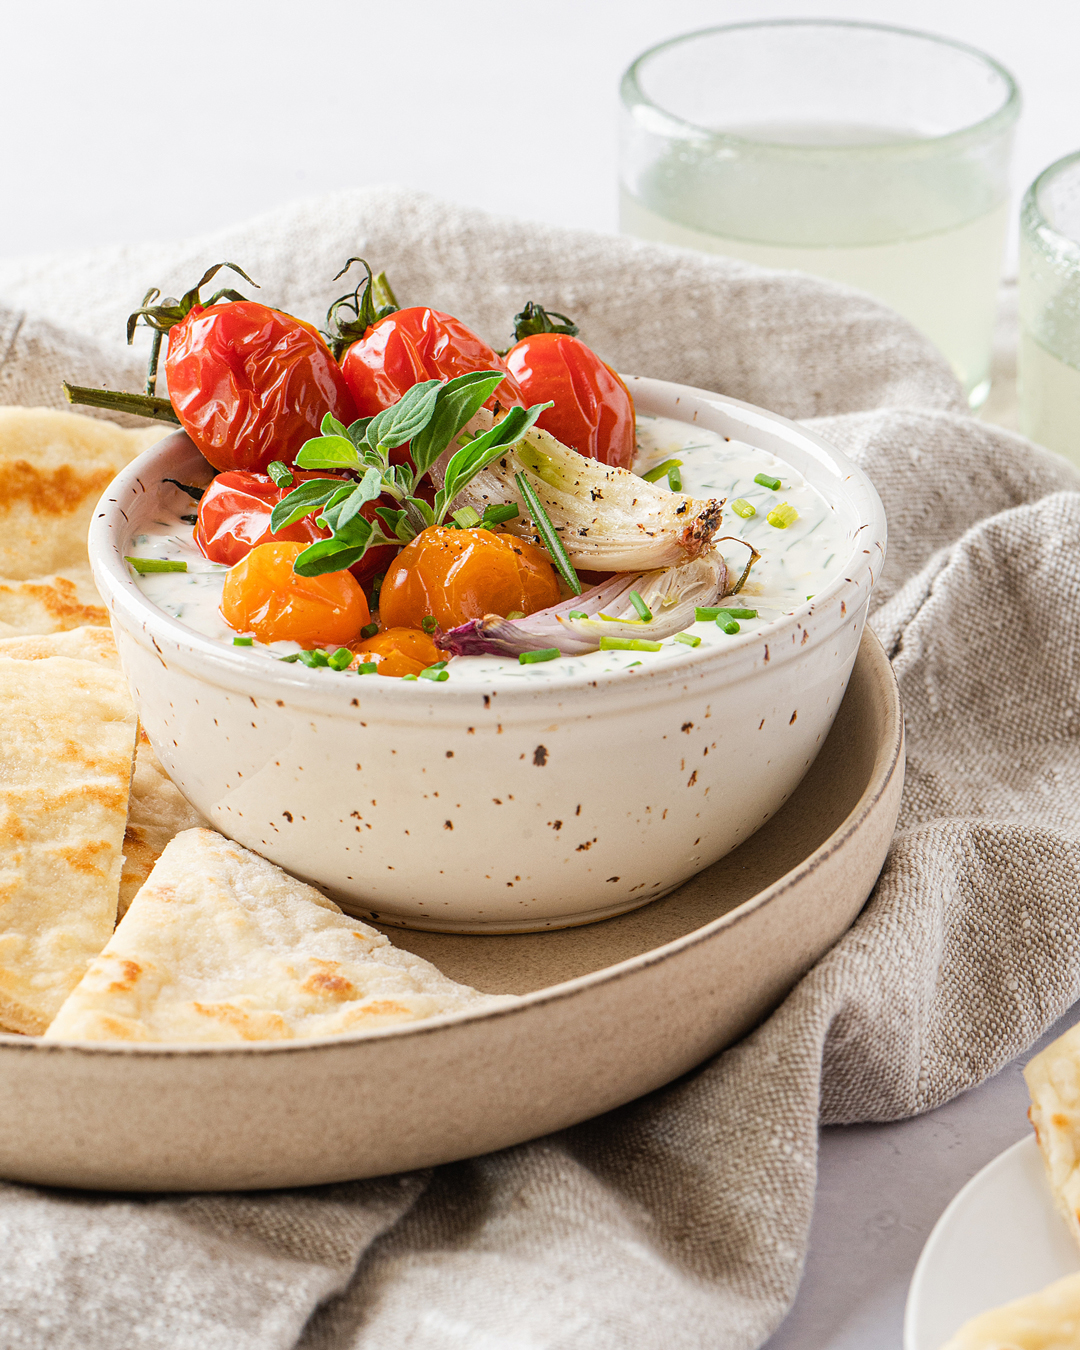
Ingredients to Make Whipped Chèvre, Roasted Tomatoes, and Homemade Flatbread //
This is a great recipe to make if you have some herbs and tomatoes to use up before they start to go. The flatbreads will impress everyone when you tell them you made them yourself. No one has to know how easy they are to make.
Whipped Goat Cheese Ingredients //
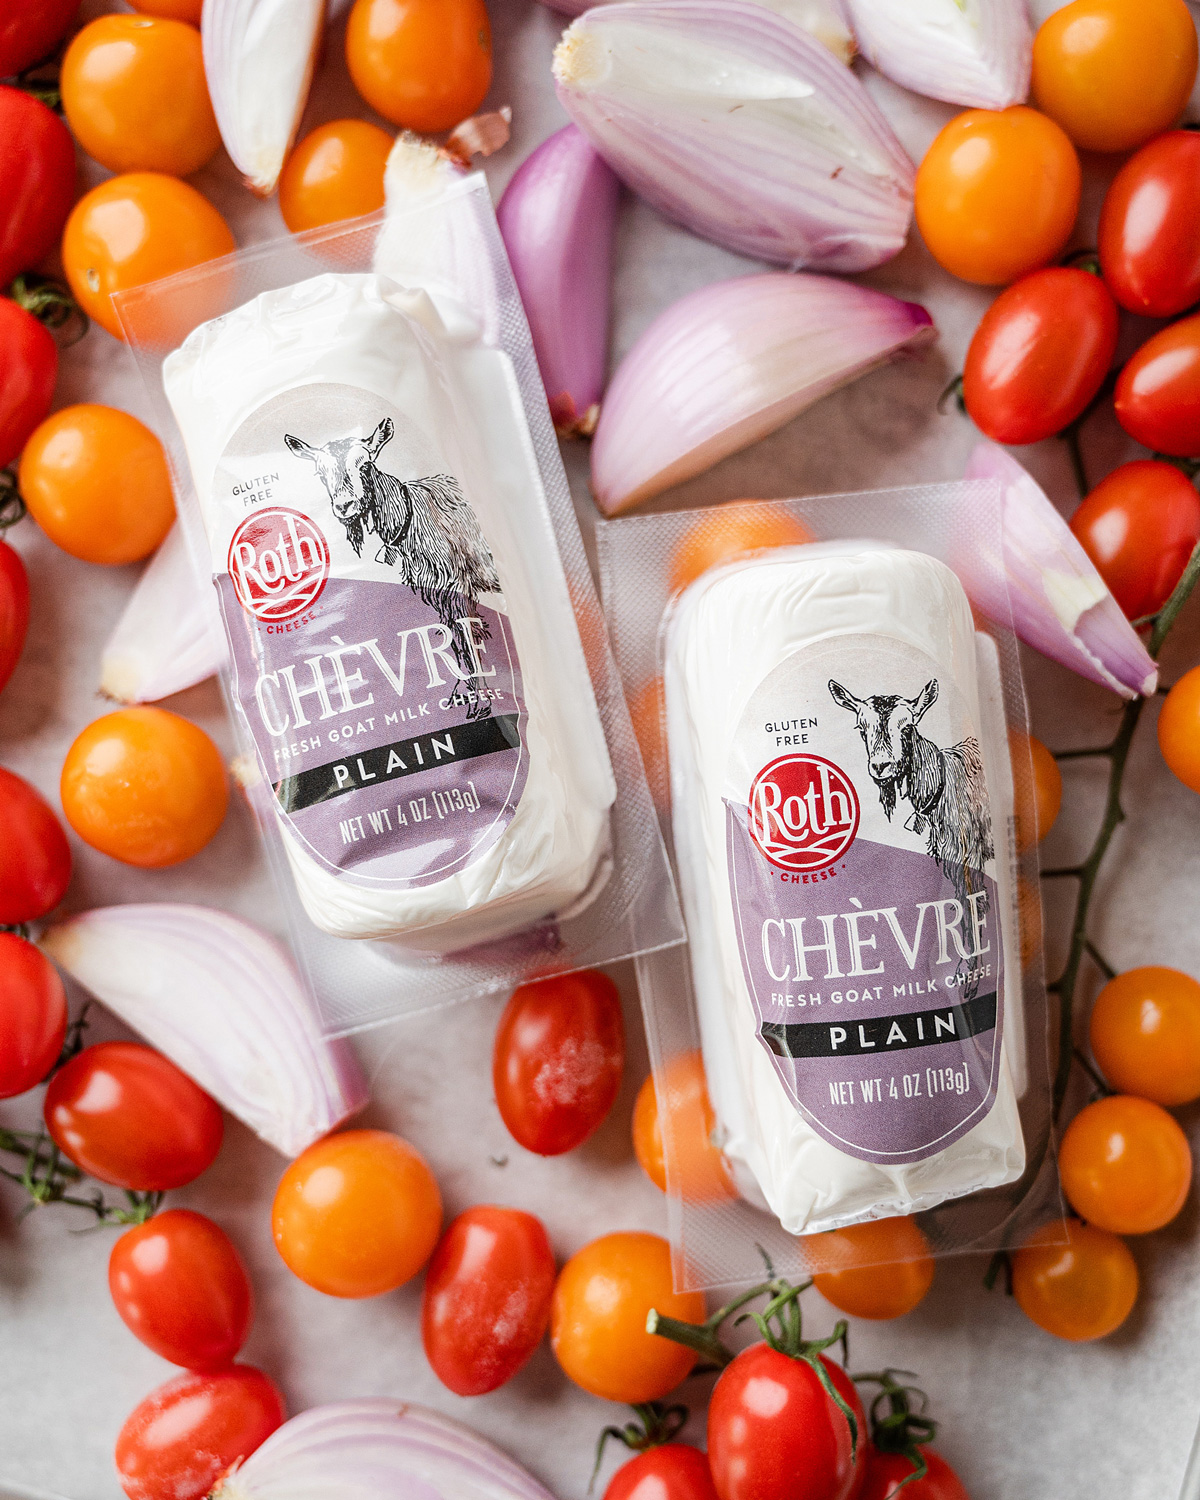
Roth Chèvre: This is a creamy, mild goat’s milk cheese that is perfect to start with if you think that you don’t like goat cheese. It’s soft, mild, and takes on other flavors beautifully. It comes in 4- and 8-ounce packages that can be found at your local Walmart. (You can also use the Garlic Herb version and really punch up the flavor.)
Honey: This doesn’t make the dip sweet, but it does balance out the tartness of the cheese.
Lemon: Lemon juice brightens the whole dip up. Feel free to fold in the zest when you are folding in the herbs.
Fresh herbs: I almost always have parsley, dill, and chives either in my fridge or growing in my garden. Fresh herbs add so much flavor and brightness to any dish you make.
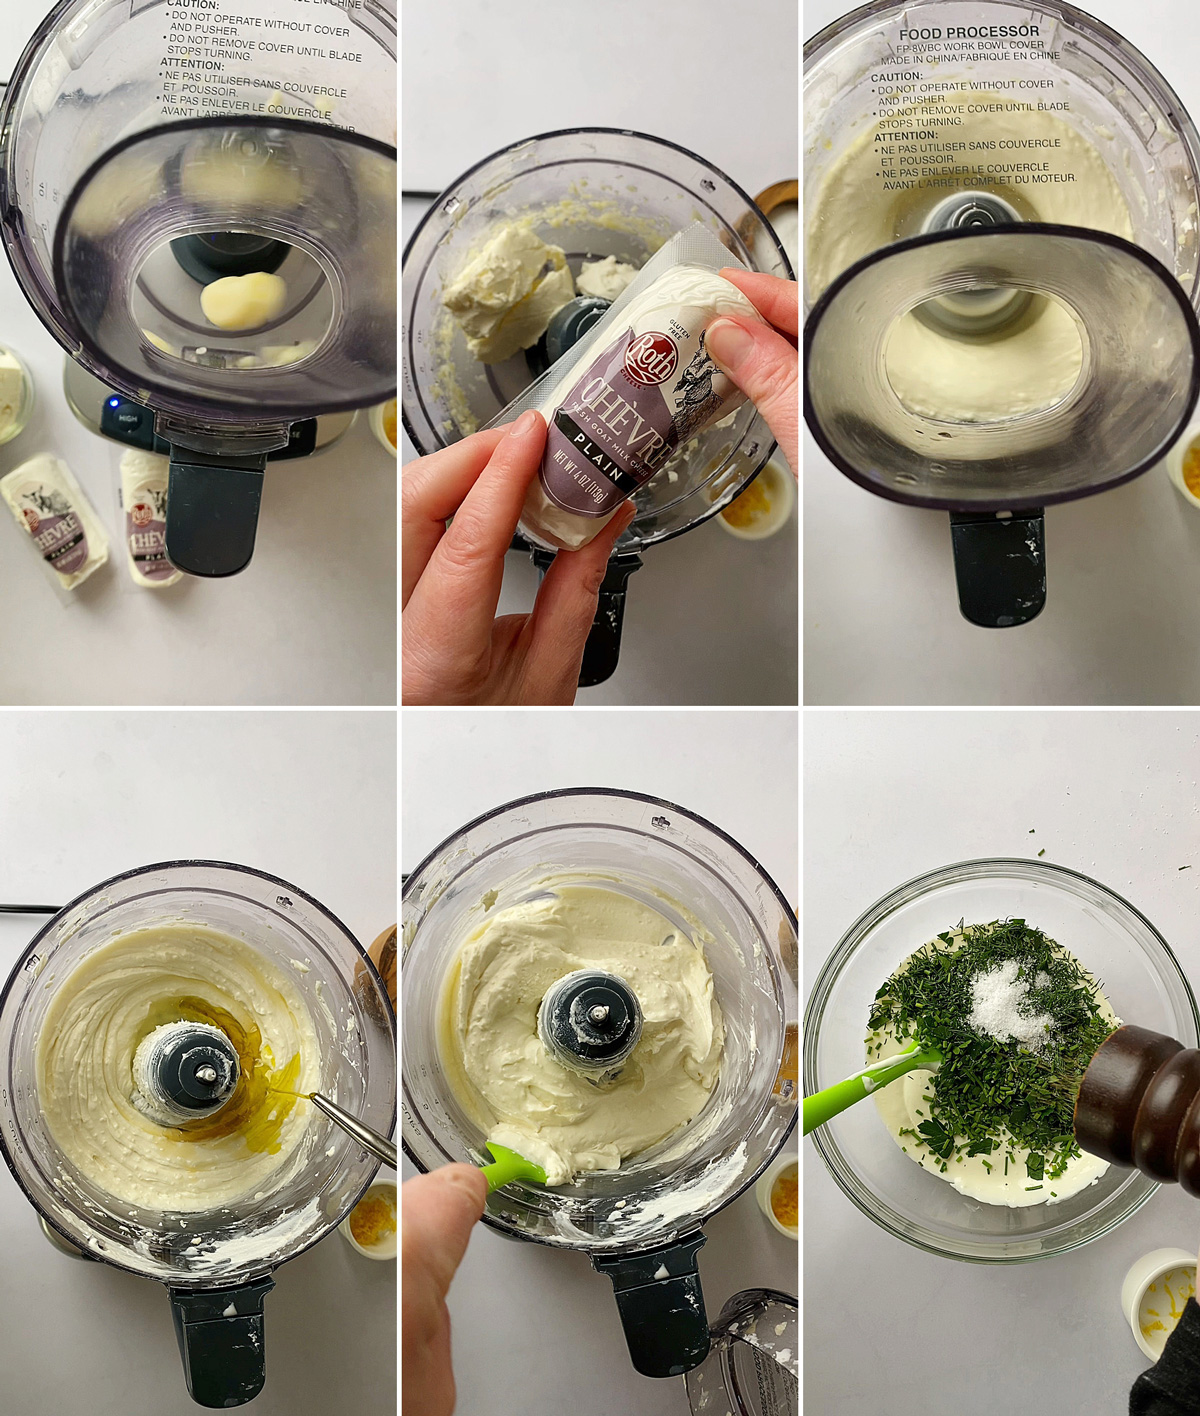
Garlic: My favorite trick is to drop whole cloves into a running food processor and let the machine do all the work. I start a lot of recipes this way.
Olive oil: This adds a little fattiness and also helps mellow out all of the other flavors.
Roasted Tomato Ingredients //
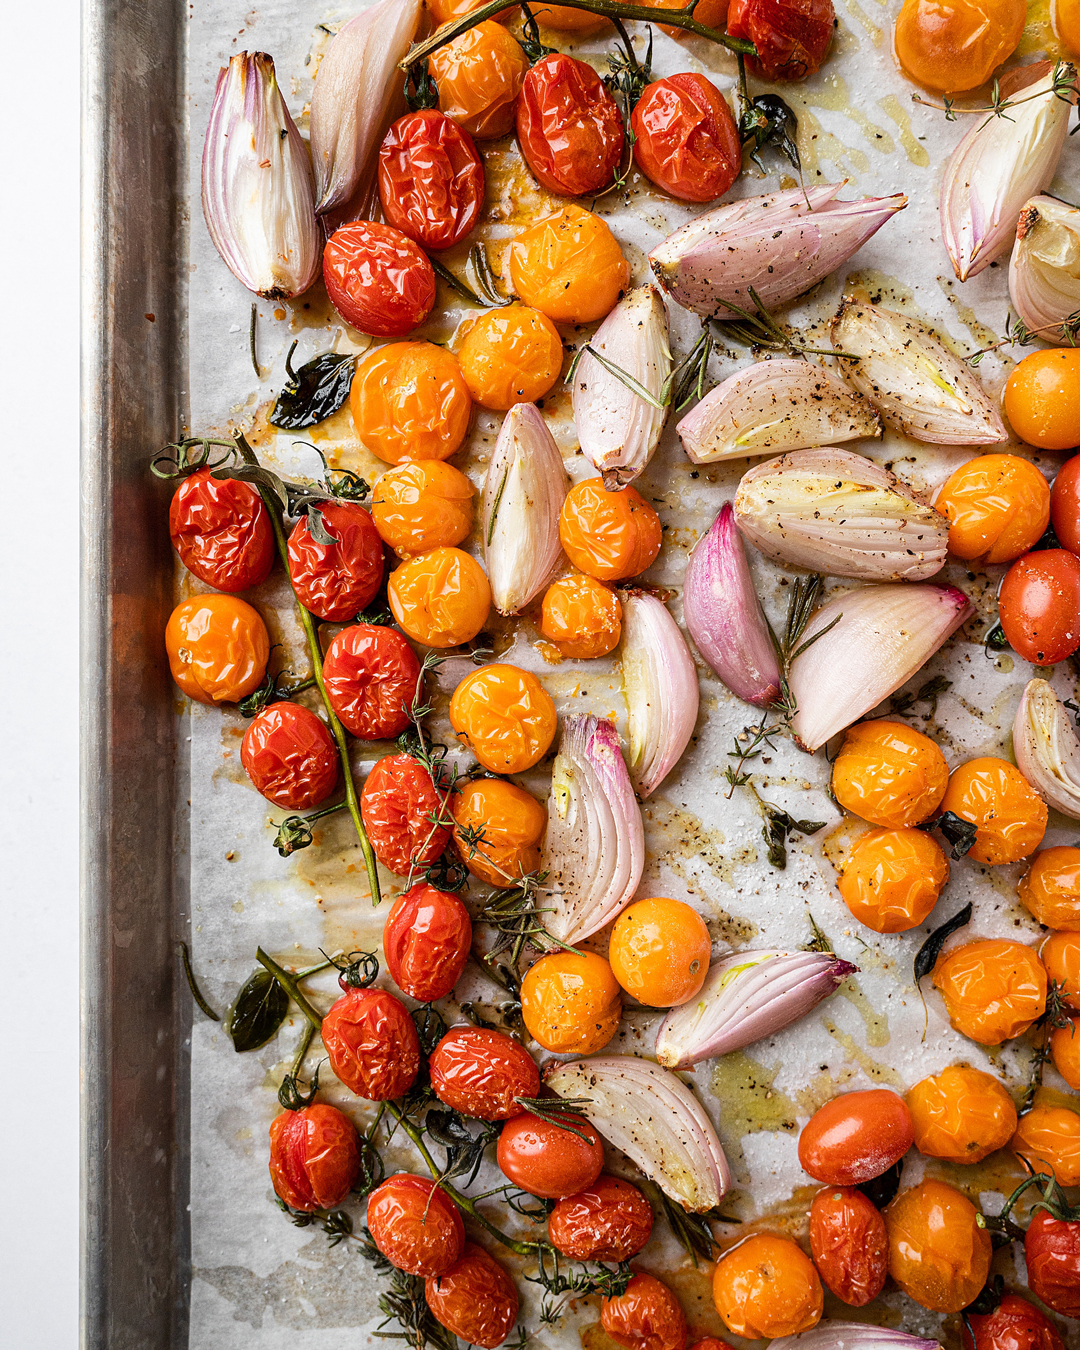
Cherry tomatoes: I love the way that tomatoes on the vine look. But you can use any kind of tomato you like. I like to use cherry tomatoes because they take less time and are sweeter than large tomatoes.
Shallots: You can leave shallots out if you don’t have any available, but I love the way shallots get sweet when they are roasted. Quarter them to reduce cooking time.
Fresh herbs: I use rosemary, thyme, and oregano, but any herb will add flavor.
Olive oil: Be generous and coat everything well.
Homemade Flatbread Ingredients //
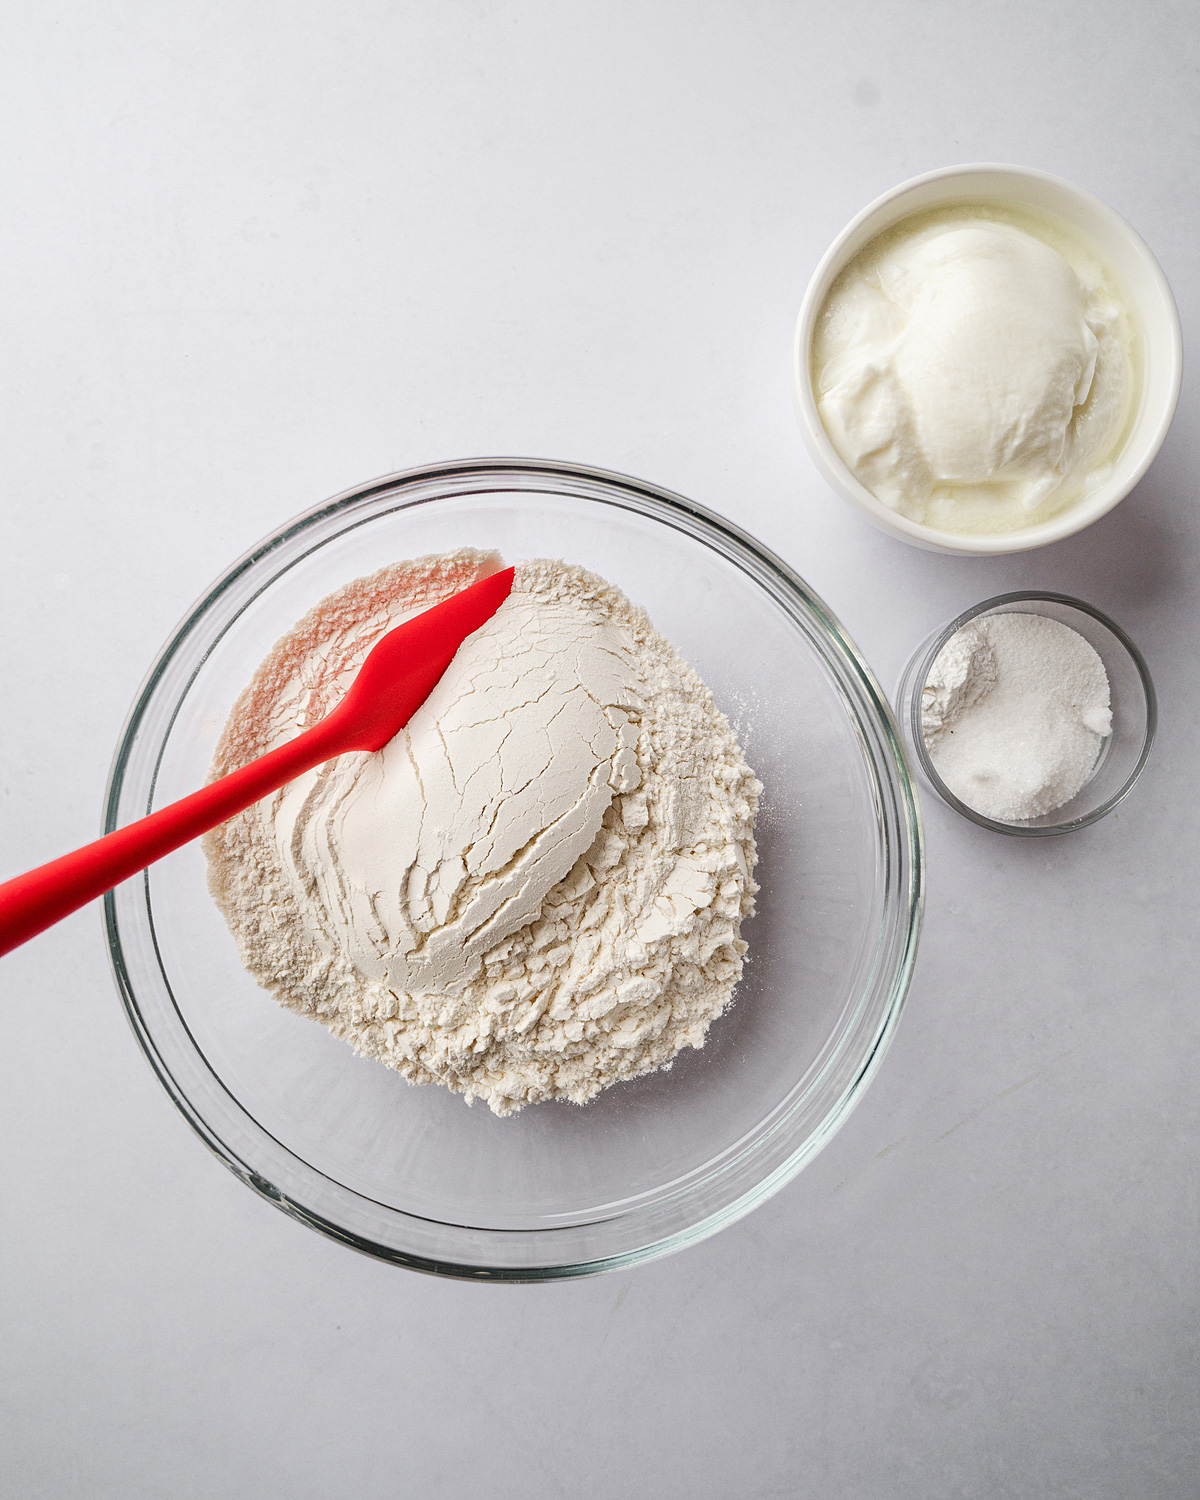
Flour: All-purpose flour is the base of this simple flatbread recipe.
Sugar: Just a pinch adds enough sweetness to balance the tang from the yogurt.
Baking powder: This gives the flatbread lift and helps create the bubbles when cooking.
Yogurt: Helps make a tender flatbread and replaces water in this recipe.
Salt: It might seem like a lot of salt, but you need it to flavor this flatbread.
Olive oil: Coat your pan with olive oil to keep it from sticking., but also it It also helps turn the flatbreads golden brown and crisp up.
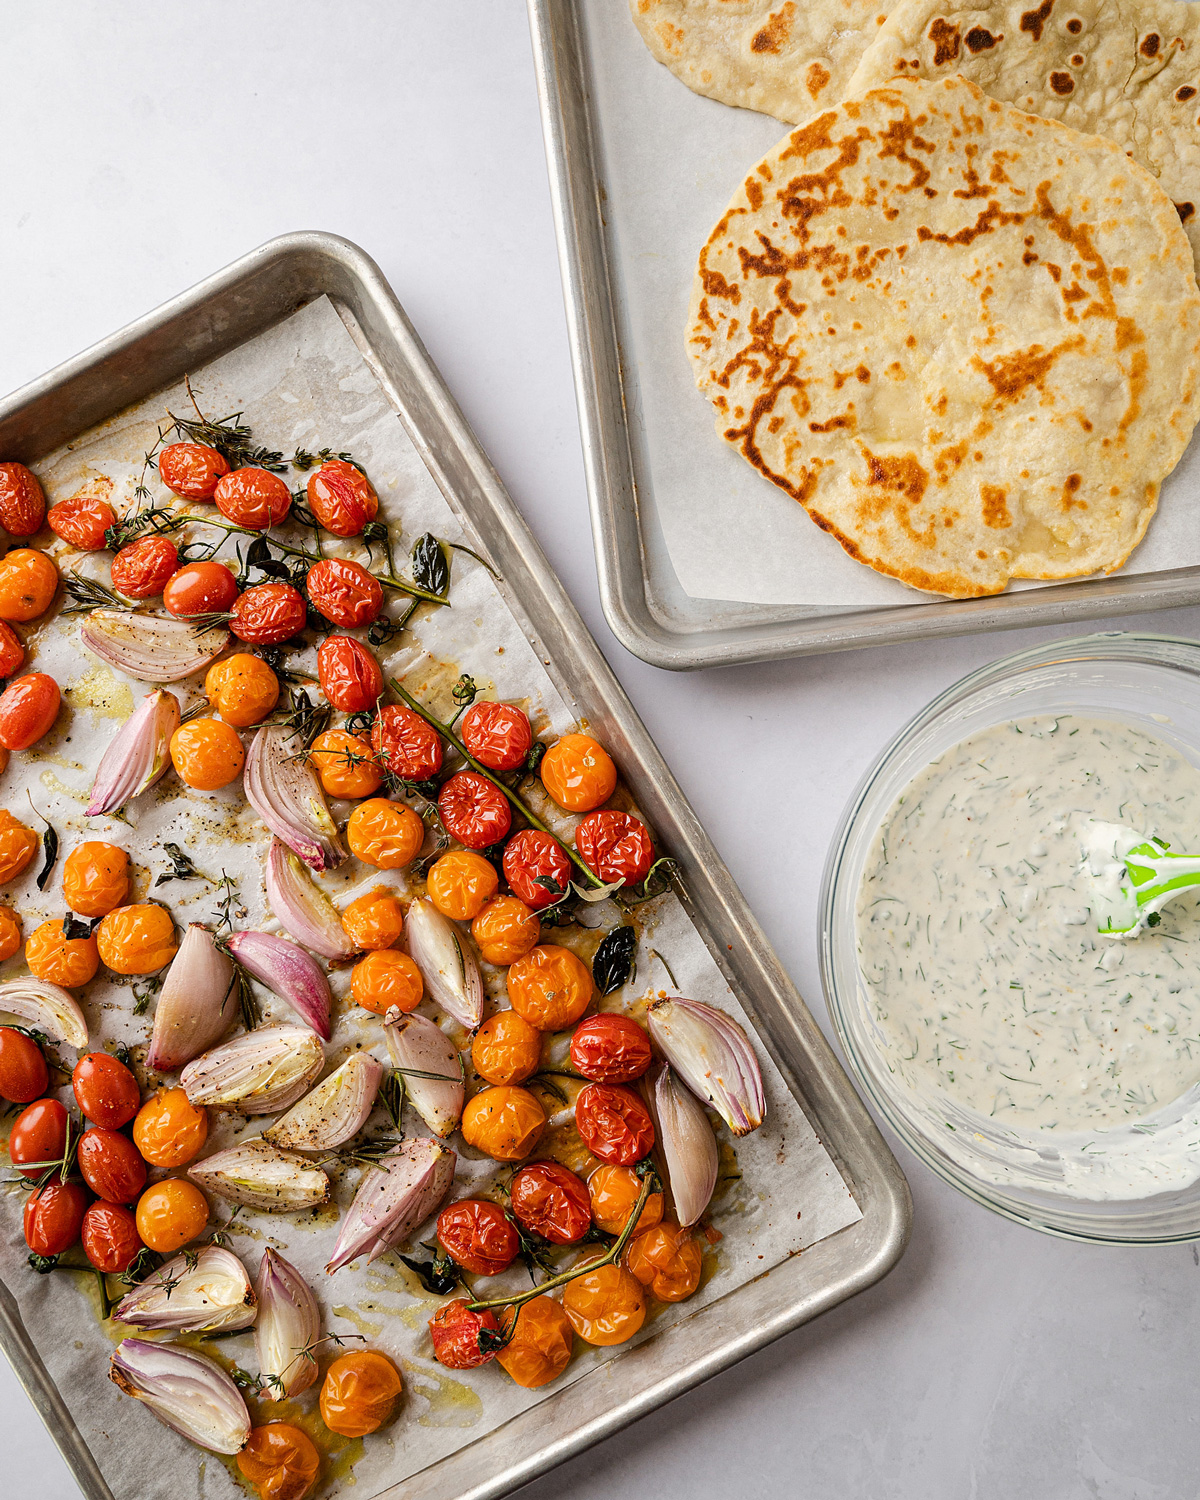
How to Make // The Steps
I like to start by making the whipped goat cheese. It needs some time to chill so the flavors can get to know each other.
Add garlic cloves to a running food processor. Let the food processor do the hard work for you.
Add goat and cream cheeses. Let it run at high speed for 3-4 minutes, scraping the bowl every now and again. Make sure that it is really smooth and creamy.
Add lemon juice, honey, olive oil, and a good pinch of salt and pepper, to taste. Run again for another minute.
Transfer to a bowl and mix through the fresh herbs. Cover and chill for at least an hour before you serve it.
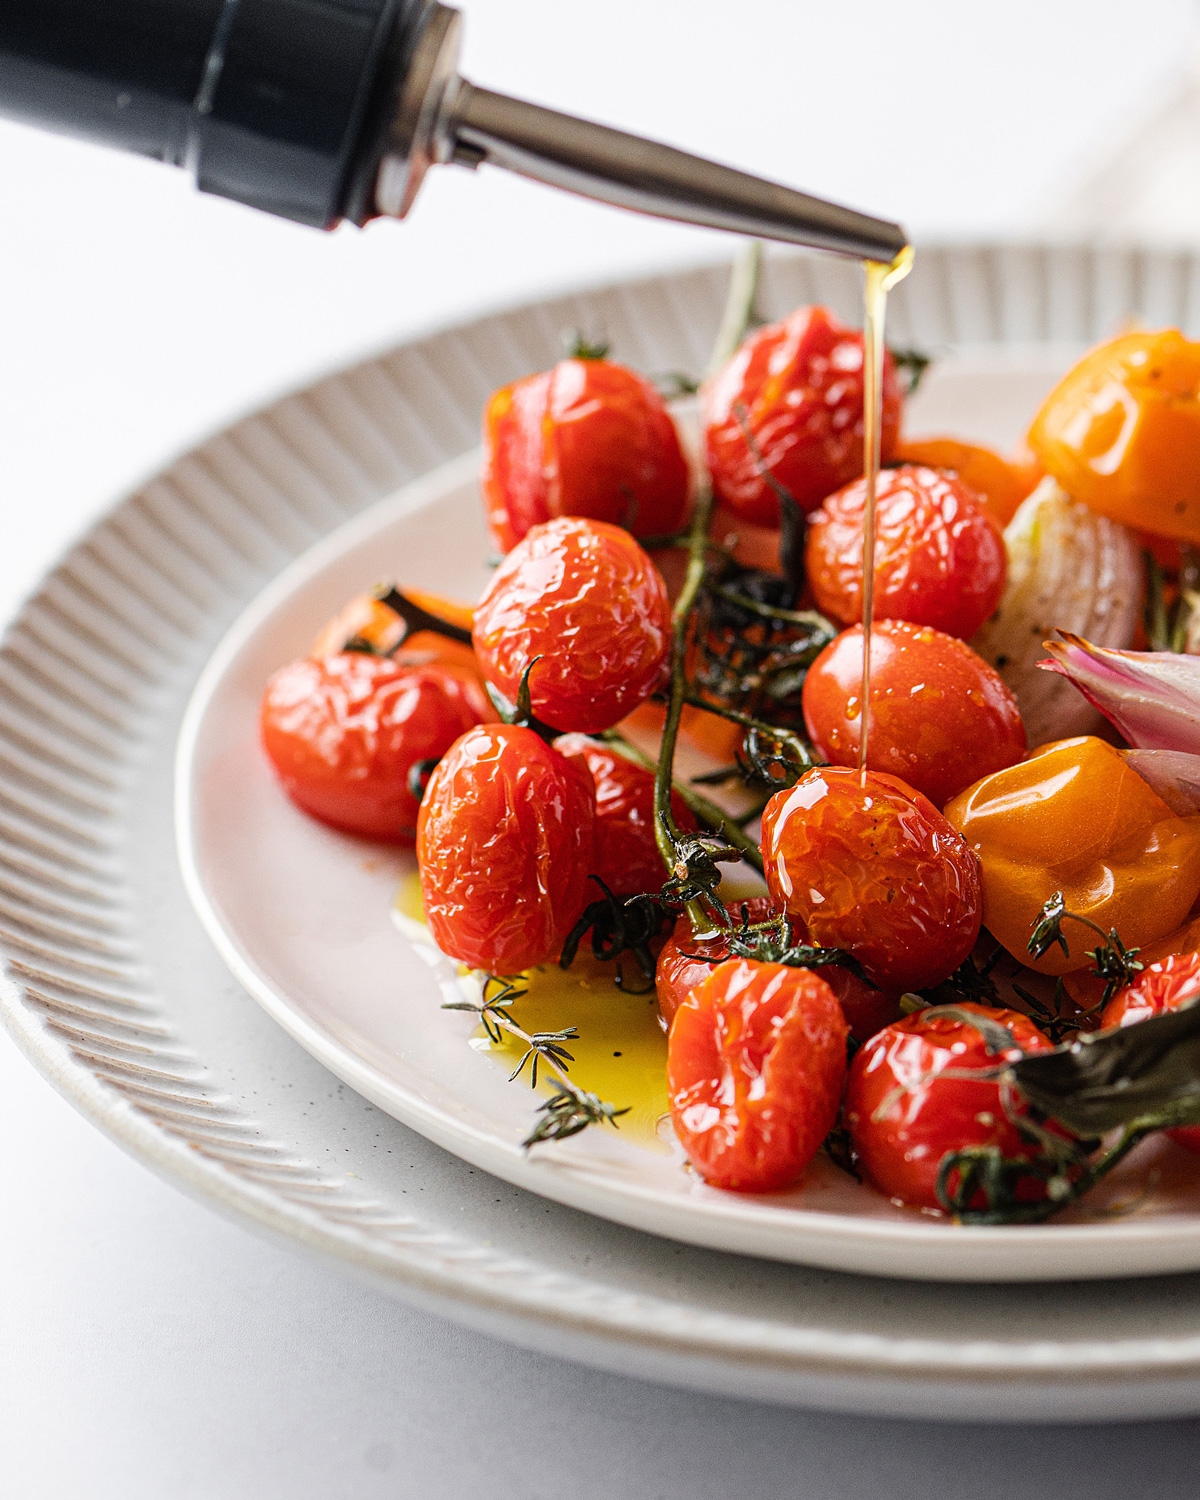
While the dip is chilling, start the tomatoes. Line a baking sheet with parchment paper or foil. Spread the tomatoes and shallots out in a single layer.
Drizzle a generous amount of olive oil, salt and pepper over the top. Add sprigs of fresh herbs.
Roast for 15 to 20 minutes. Set aside.
Time for the flatbreads.
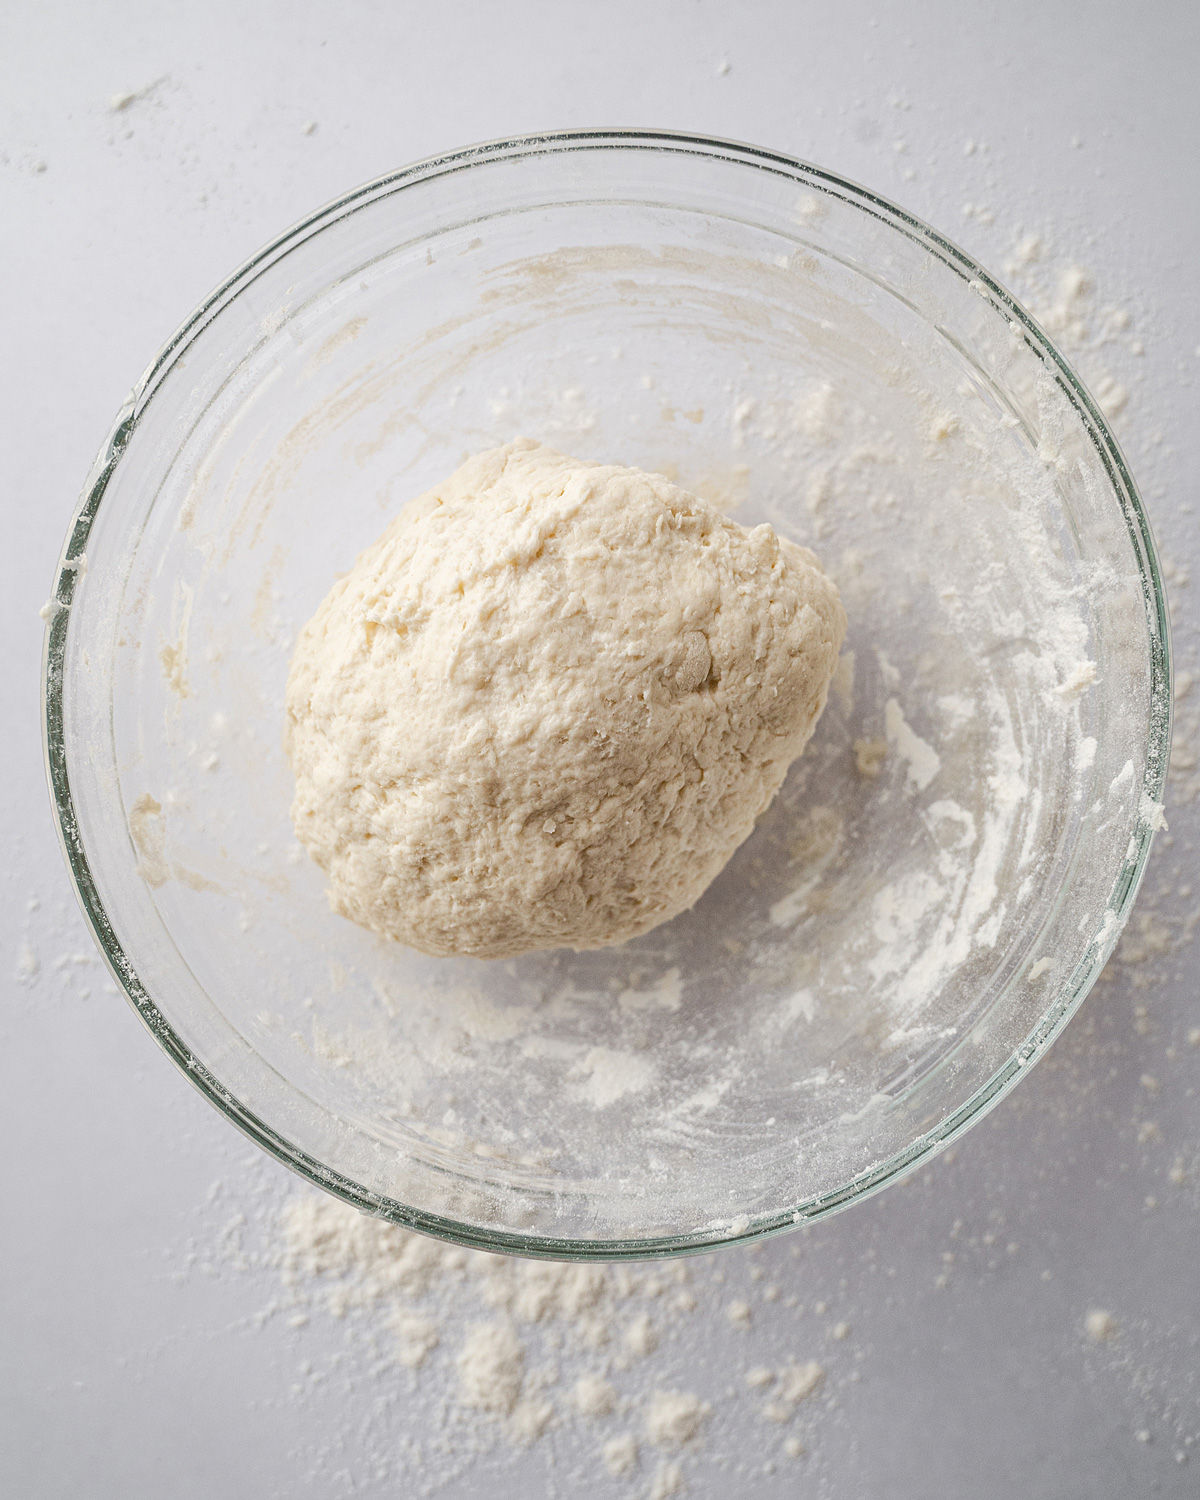
Add flour, sugar, baking powder, and salt to a large bowl. Give it a good mix. Stir in the yogurt and when it starts to come together, turn it out onto the counter. Knead for about a minute or until it is in a ball.
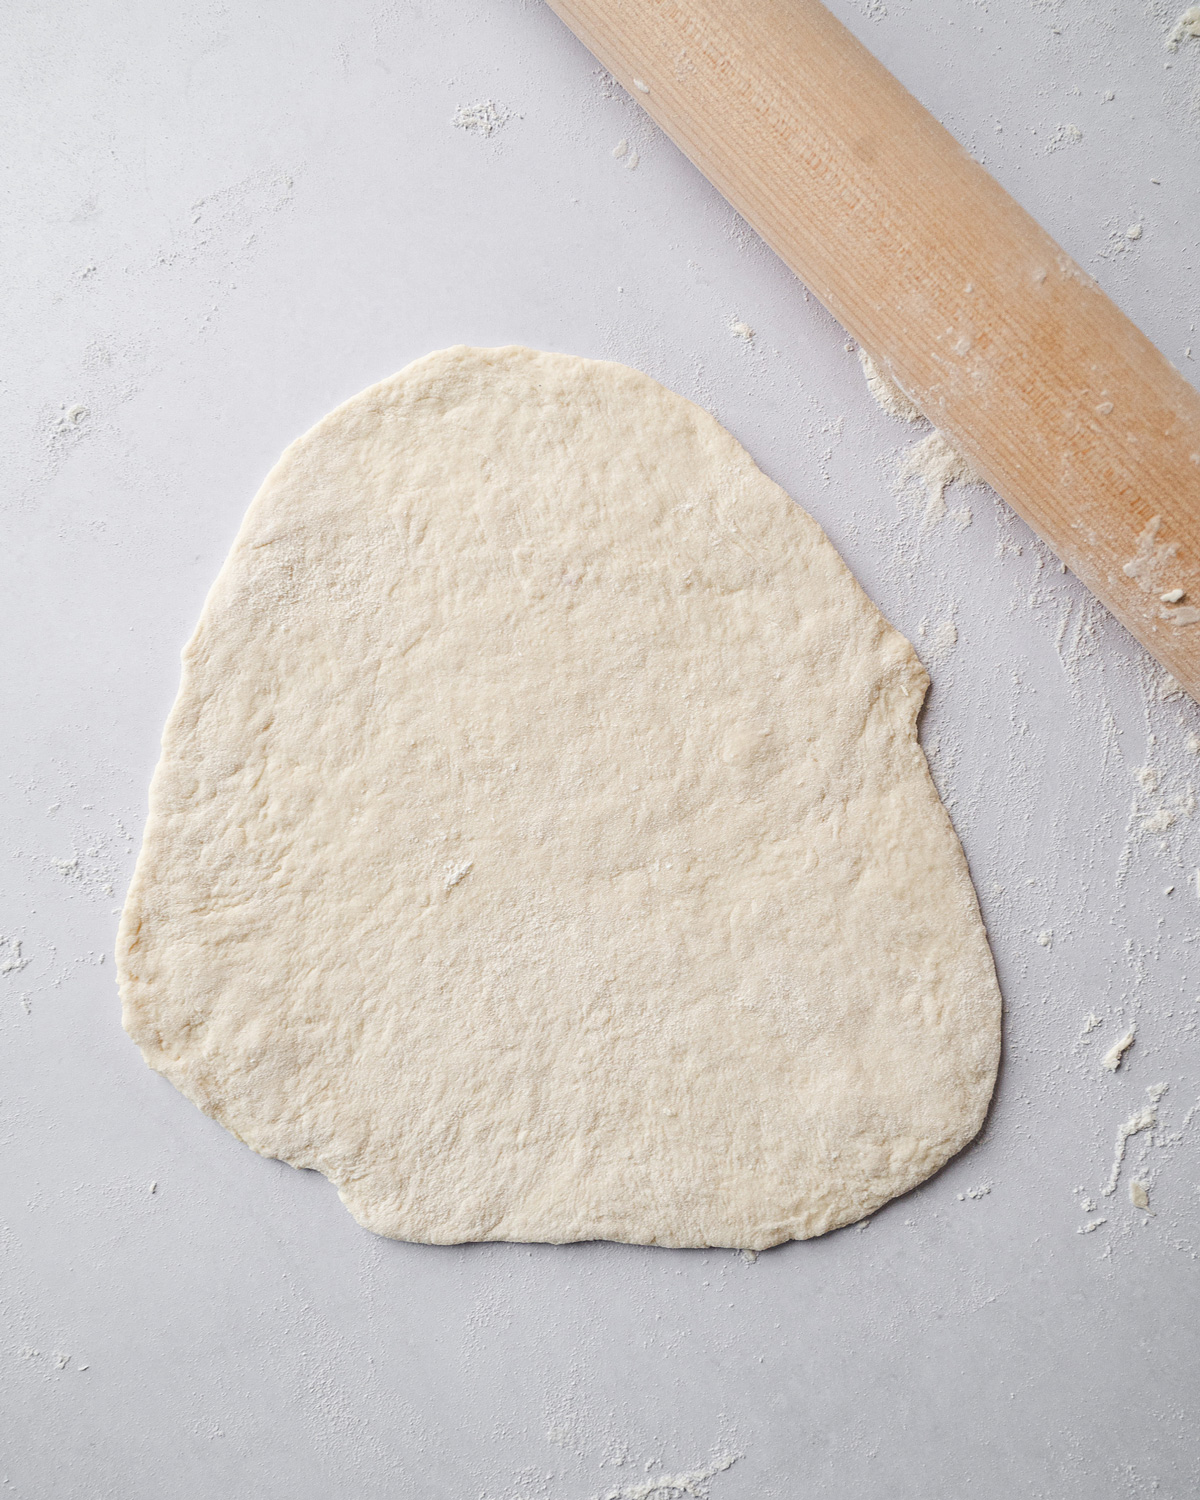
Divide into 4 pieces and cover with a tea towel. Let rest for 15 minutes. Roll out to ⅛ inch.
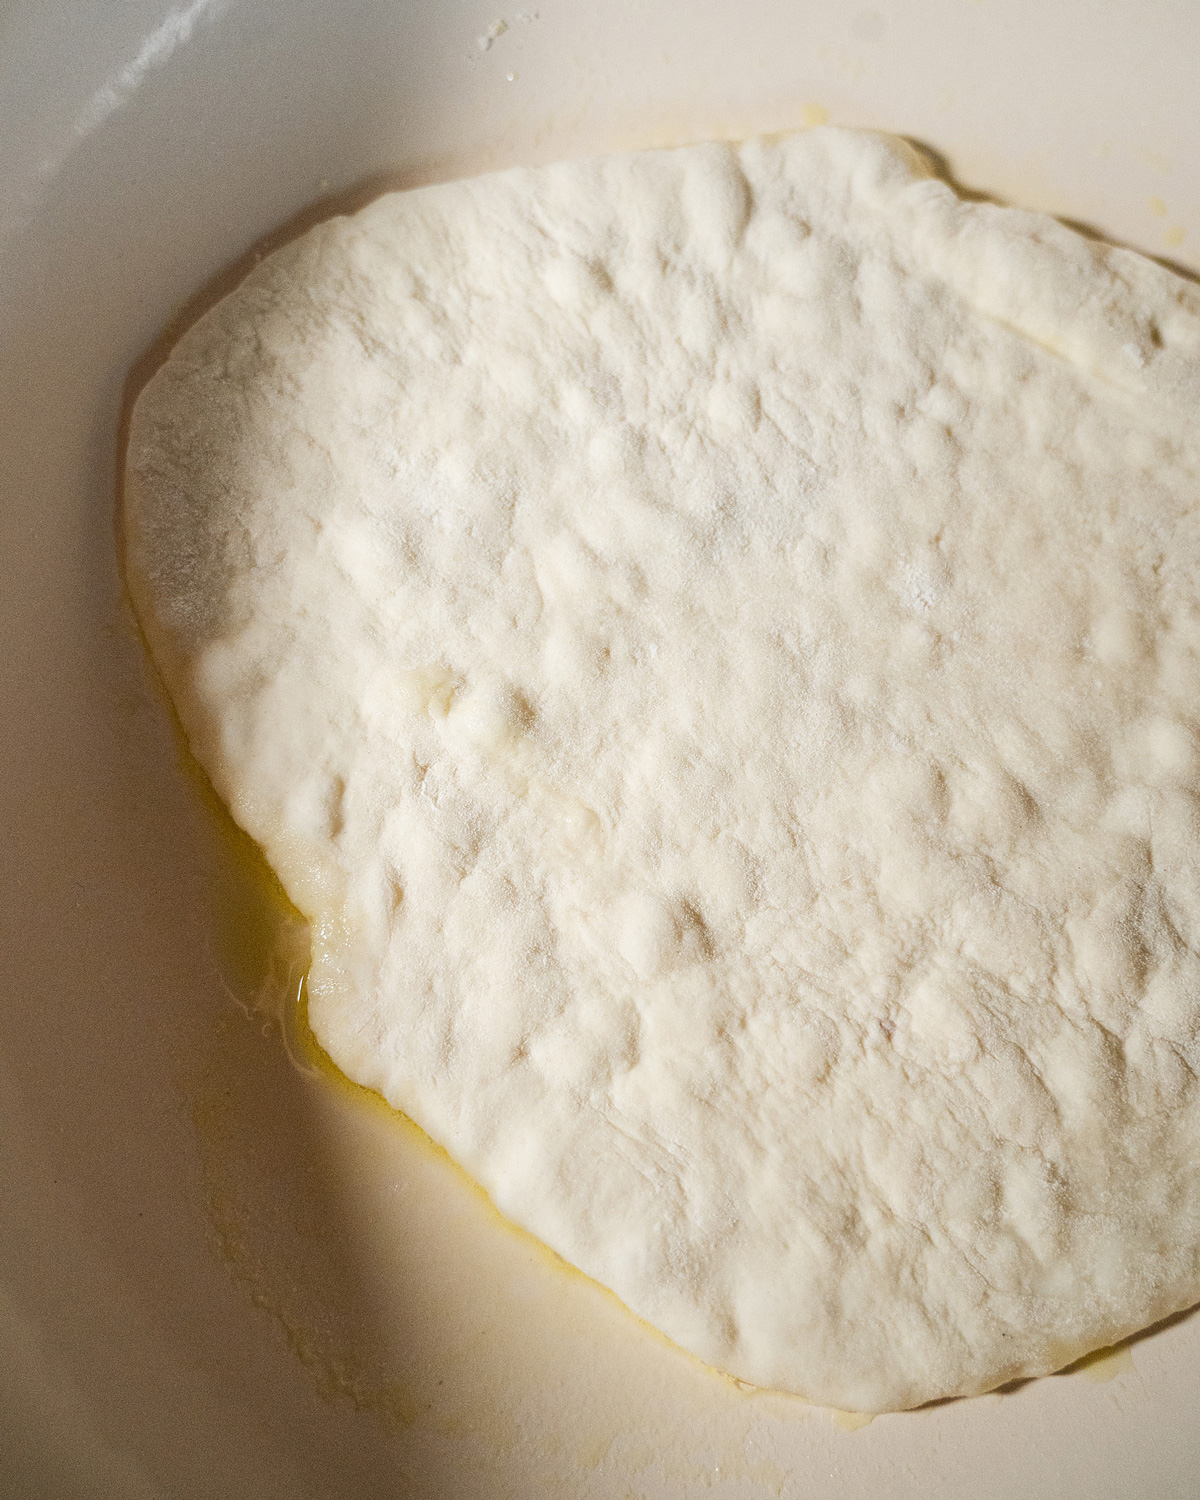
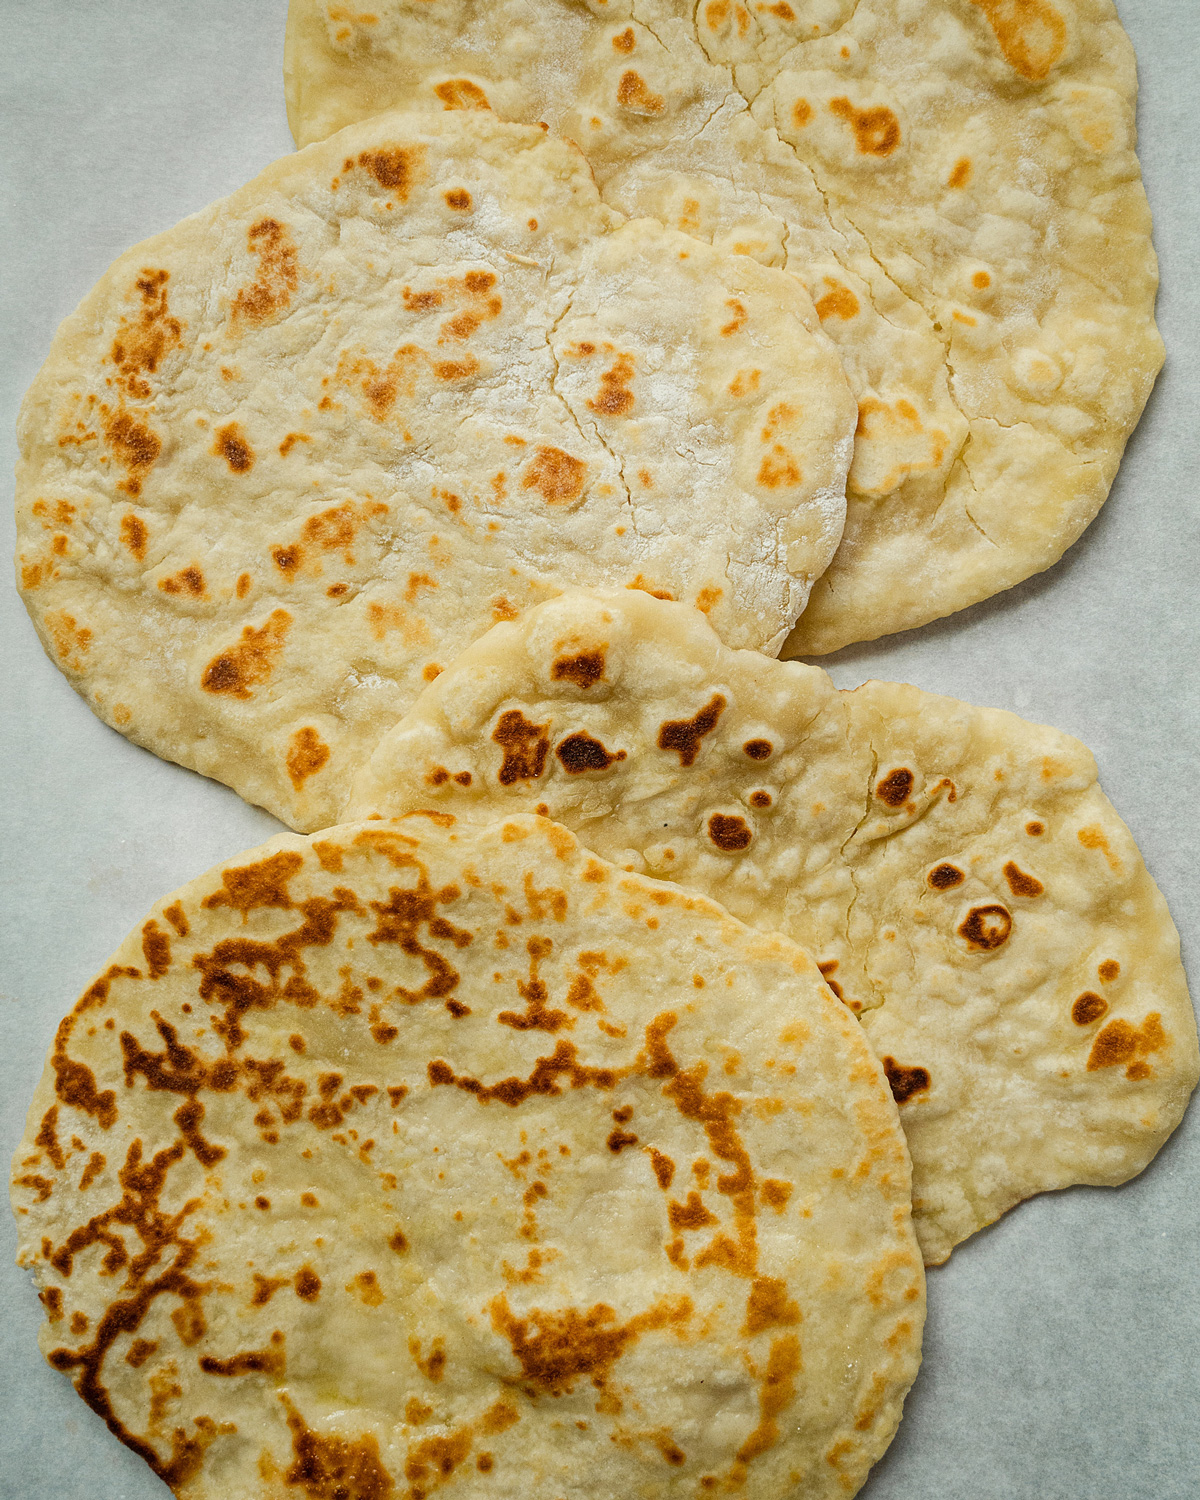
Heat a cast-iron skillet over medium heat. Add 1 tablespoon of olive oil and add the dough to the pan. Cook for about 2 minutes, or until the surface begins to bubble and the bottom turns golden brown. Flip and cook for another two minutes.
FAQs //
What’s the difference between goat cheese and chèvre?They’re the same thing! Chèvre translated from French means both “goat” and “goat cheese”. There are lots of different kinds of cheese made with goat’s milk, but the soft, creamy, fresh, white cheese is commonly known simply as goat cheese.
Can I make this dip ahead of time? YES! It will just get better and better as it chills out in the fridge.
What are the best kinds of herbs to use in this recipe? Honestly, whatever fresh herbs you have. Basil, parsley, chive, dill, thyme, oregano… they all work together and will add tons of flavor to this dip.
Recipe Tips //
It will be hard to not eat all of this dip right out of the bowl, but let it chill for before serving. It will add to the texture, and the flavors will get a chance to get to know each other.
Don’t want to make the flatbread? No problem. Serve on crusty bread, with crackers, or with sliced vegetables.
What else can I do with roasted tomatoes? I like to purée my roasted tomatoes and turn them into a pasta sauce or soup. The roasting brings out the natural sweetness of the tomatoes and elevates anything you put them in. They also make a great side dish all on their own.
Variations of Herbed Goat Cheese //
Roth Plain goat cheese is mild in flavor, so it can take on many different flavor profiles. Here are some other ideas for whipped goat cheese:
Blueberry and Orange: Skip the garlic and herbs, add more honey, orange juice, and orange zest. Maybe even a pinch of cinnamon? Top with blueberry sauce or fresh blueberries. You can also use the Wild Blueberry version to really add to the blueberry flavor.
Strawberries and Balsamic Vinegar: Whip the Chèvre with salt and pepper, olive oil, and top with chopped strawberries and a drizzle of balsamic glaze.
Everything Bagel Goat Cheese: Replace the fresh herbs with a tablespoon or two of everything bagel seasoning.
Goat Cheese Toast: Elevate your morning avo toast. Spread the herbed goat cheese on toast and top with fresh peach slices and a drizzle of olive oil and honey.
How to Store //
This dip will keep in an airtight container for 4 to 5 days in the refrigerator.
You can make and freeze the flatbreads ahead of time (Although, I think they taste best eaten when they are made). Let cool completely, put in a freezer bag, and freeze for up to one month. To reheat, bake at 350° F for 5-10 minutes.
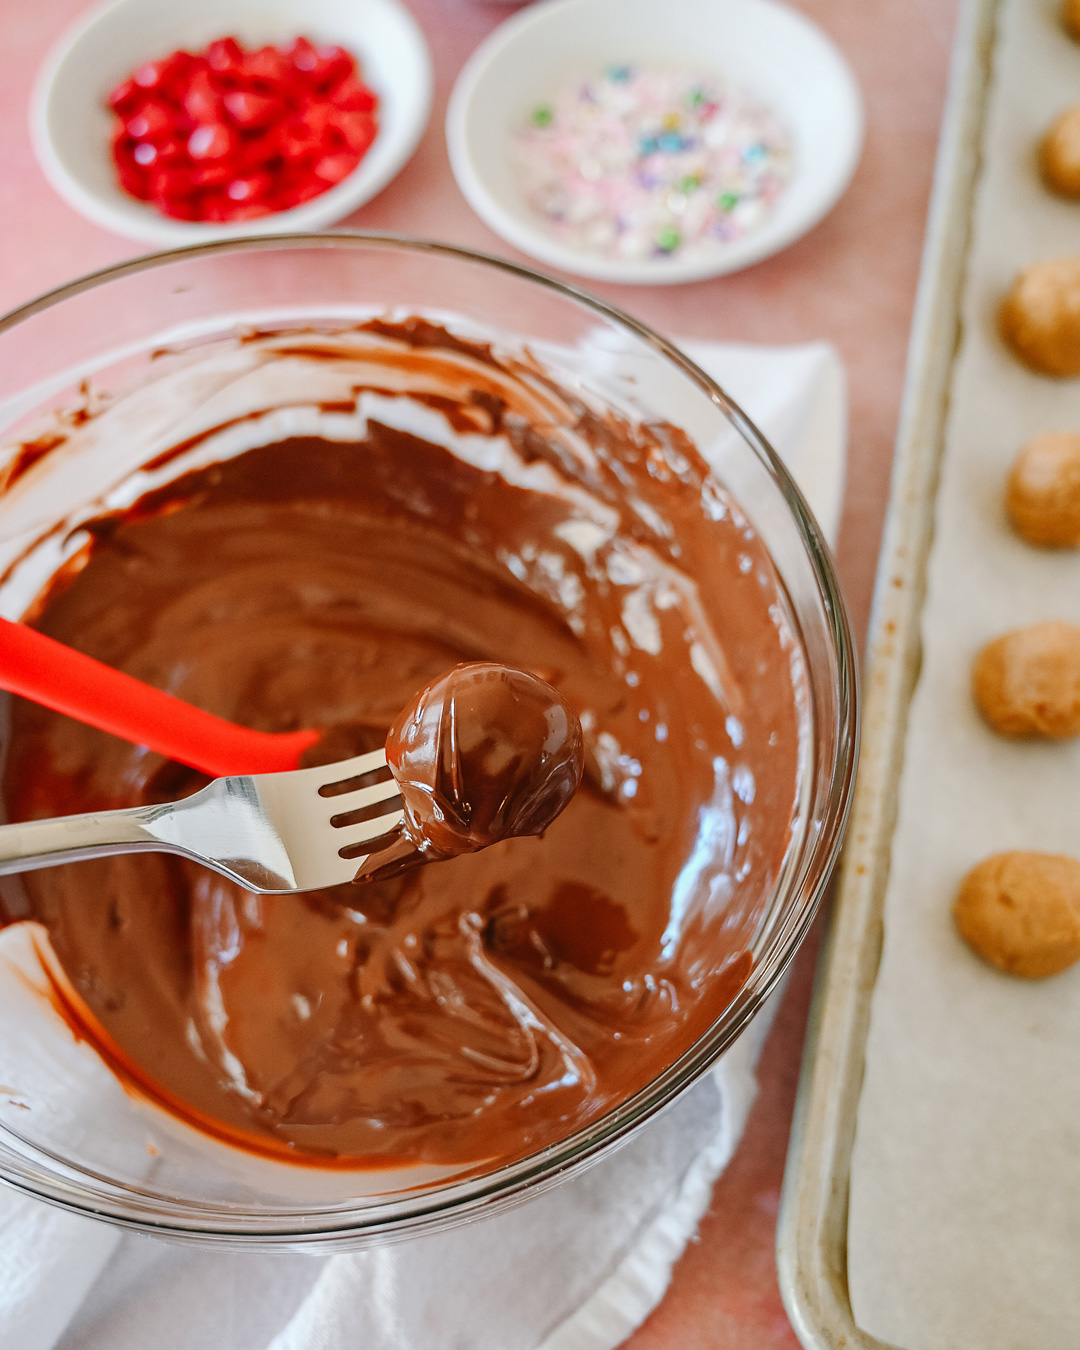
There is a better than good chance that your Valentine’s Day is going to be celebrated at home this year. Might I suggest a chocolate and cheeseboard to set the mood? Is there anything sexier than cheese and chocolate? Maybe cheese, chocolate, and PEANUT BUTTER.
Just because we might be skipping the fancy restaurant this year, does not mean that we can’t make it special at home. When my husband and I had young children, we often put them to bed and had a nice evening on the couch with a bottle of wine and a cheeseboard.
Honestly, some of our best dates took place in the comfort of our living room when we didn’t have babysitters or much disposable income to speak of. Now we have teenagers and they go to bed later than us and we miss our cozy couch dates.
I love a theme and a holiday, so I really went with it for this board. Red and pink and roses and hearts – and there is nothing not to love on this cheeseboard.
Roth Grand Cru®️ alpine-style cheese is naturally nutty and pairs perfectly with peanut butter and chocolate. I made peanut butter balls to complement the complex flavors of the cheese. They are incredibly simple to make and one of my absolute favorite Valentine’s treats.
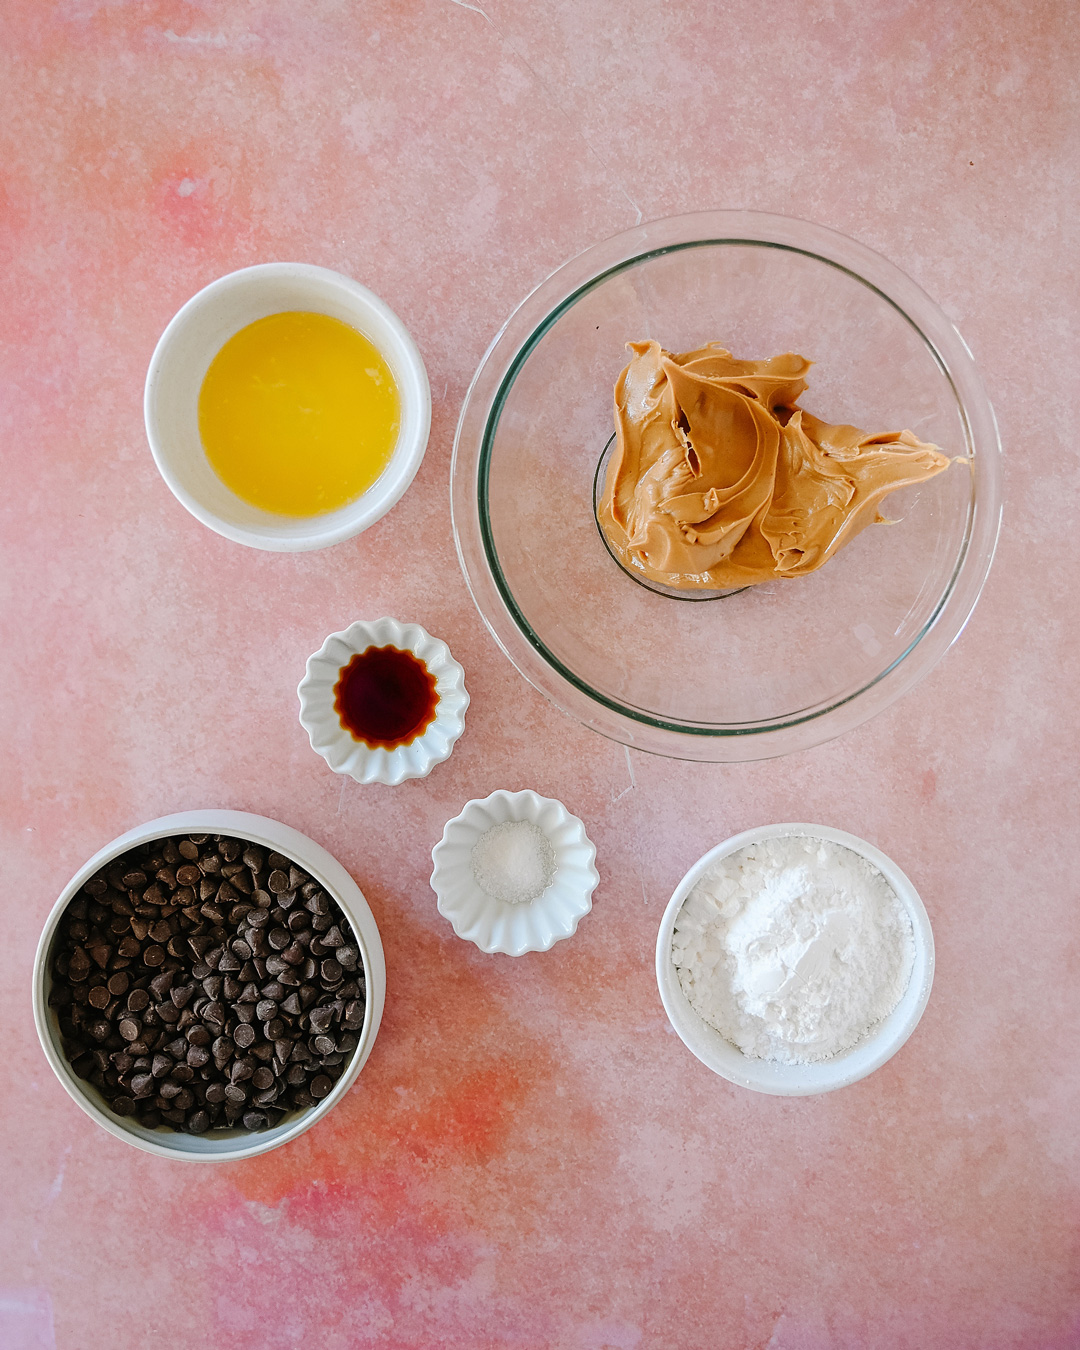
Ingredients for Peanut Butter Balls //
Peanut Butter: You can use smooth or chunky, but this isn’t the time to use the healthy kind. The kind that comes from the health food store or separates is great on bread, but you need to add so much sugar to get it to hold its shape.
Melted Butter: You don’t need a lot of butter, but it adds to the richness and helps the balls keep their shape.
Vanilla: A little vanilla adds depth of flavor and makes everything taste better.
Salt: Everything sweet needs a little salt to bring out and enhance the flavors of everything in the bowl. It makes the peanut butter more peanut buttery and the chocolate more chocolate-y.
Powdered Sugar: Adds sweetness but also literally holds everything together.
Chocolate: I used semisweet chocolate chips, but if you prefer, you can use milk or dark too.
Coconut Oil: I add a little coconut oil to my chocolate to add shine and help it set up. (This is also how to make homemade Magic Shell for ice cream.)
How to Make // The Steps
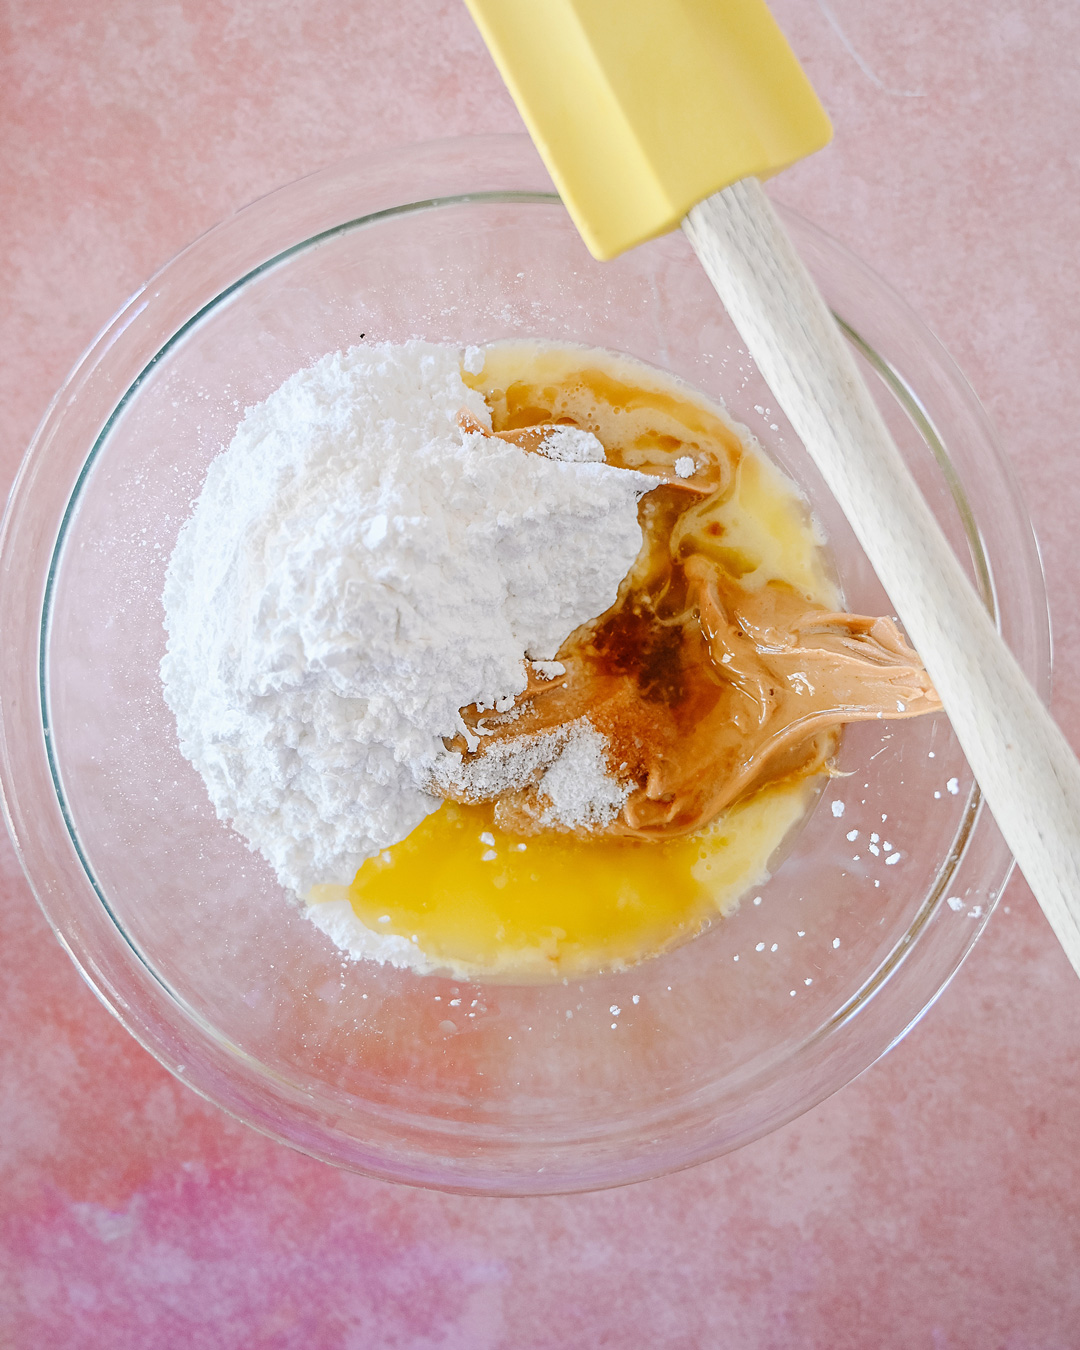
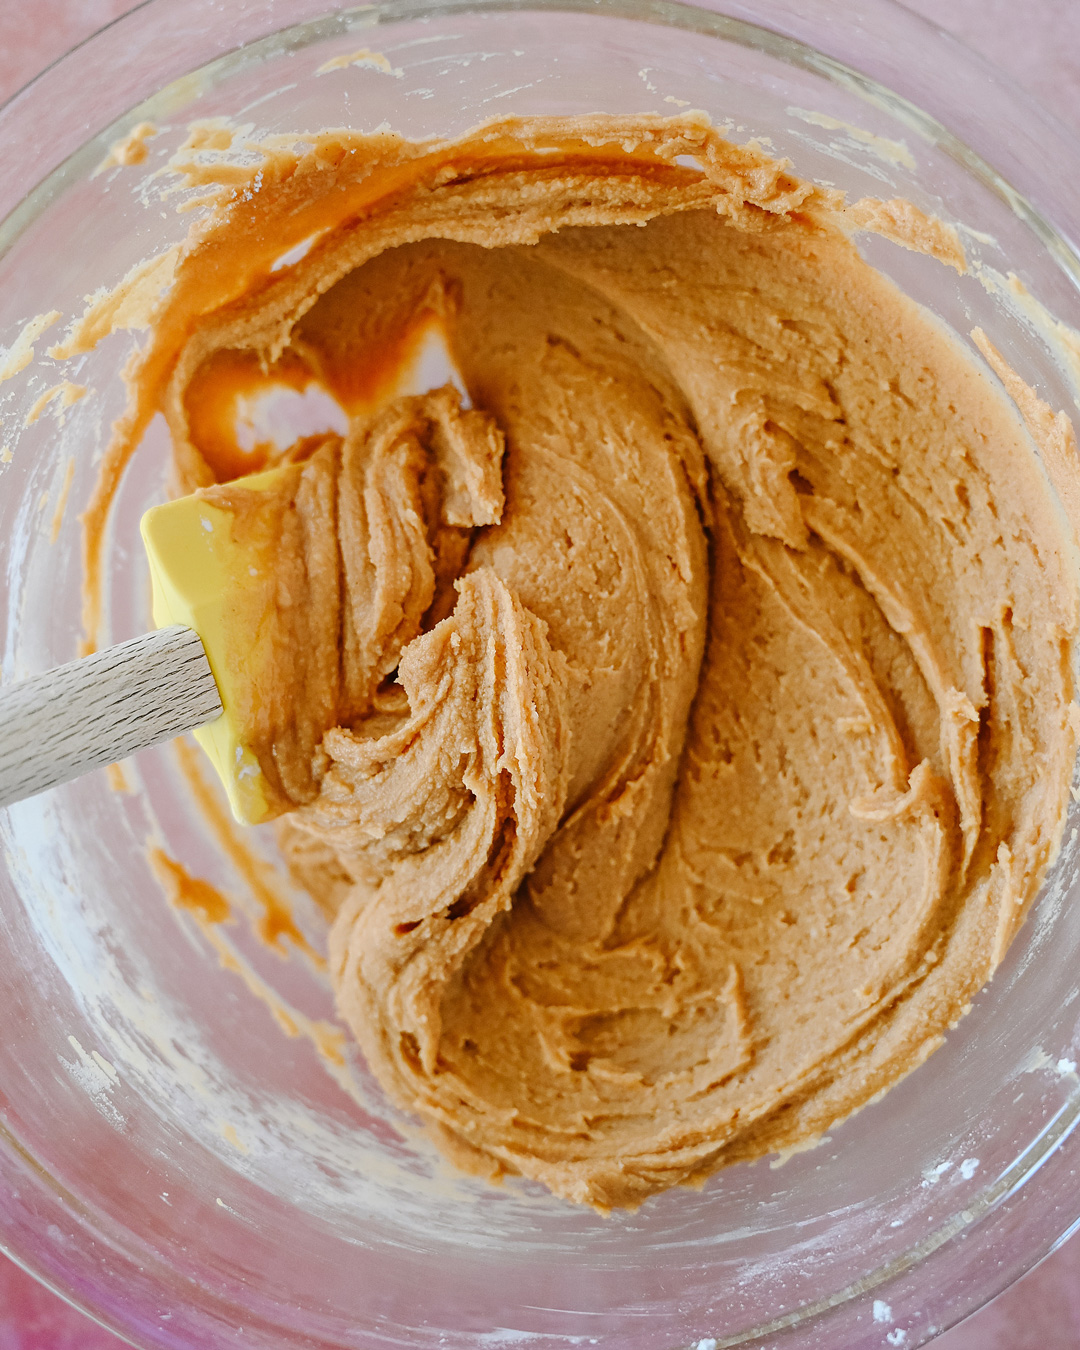
In a medium bowl, mix together 1 cup peanut butter, 1/4 cup melted butter, 1 teaspoon vanilla, 1 teaspoon kosher salt, and 2 1/2 cups powdered sugar. Mix until smooth and well combined.
Chill the mixture for 10 to 15 minutes.
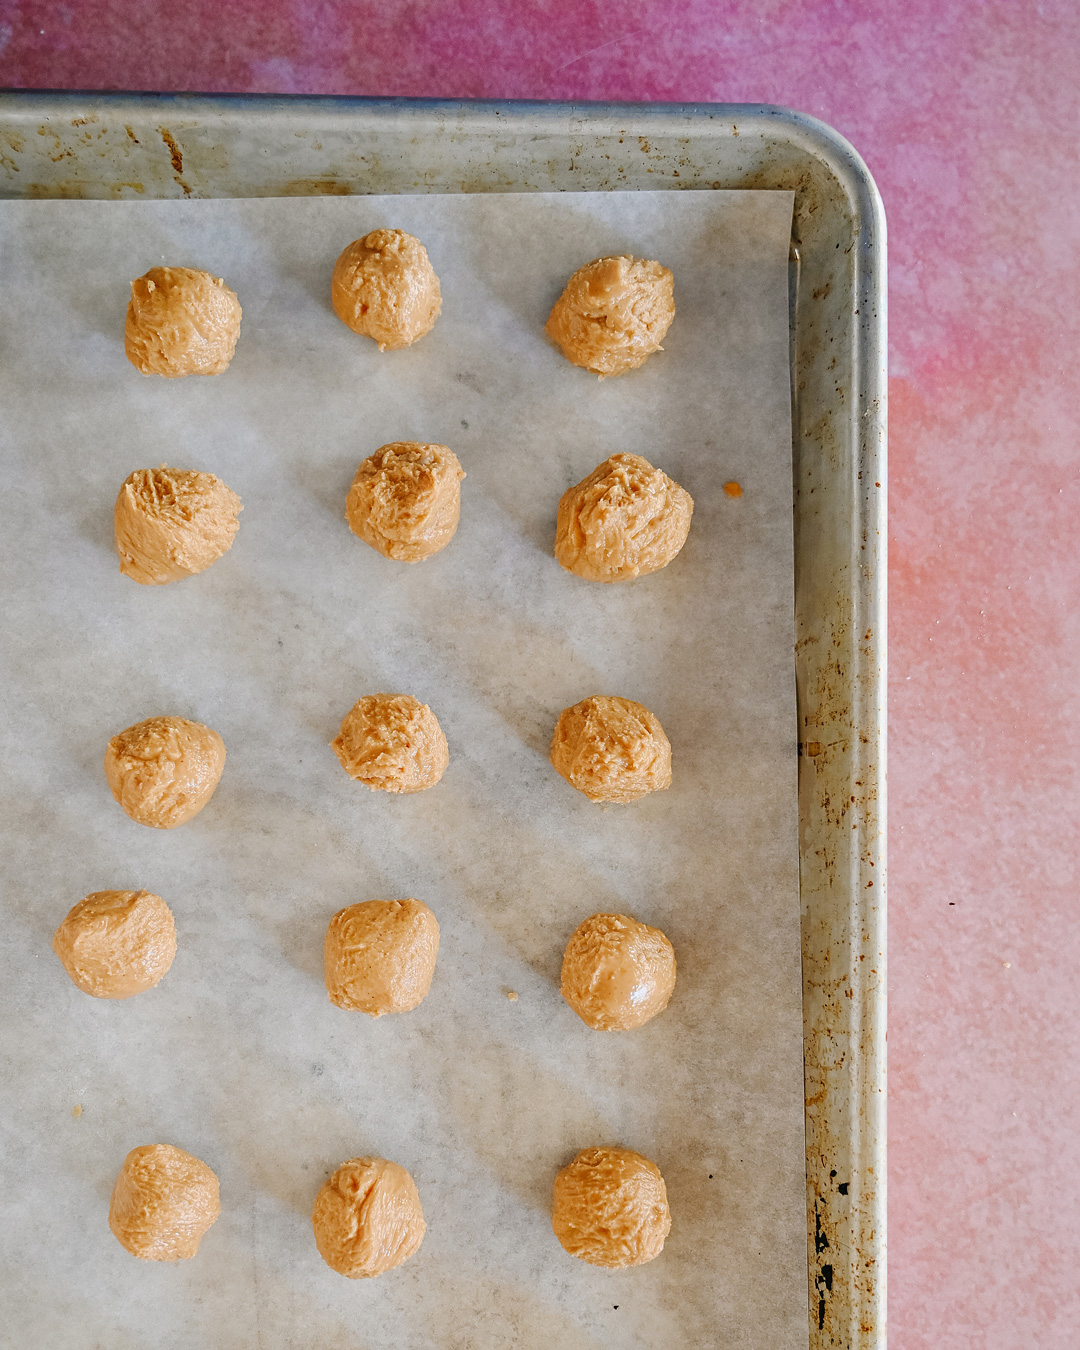
Portion the mixture into tablespoon-sized balls. Roll them into balls and place on a parchment-lined baking sheet.
Freeze until firm, about 30 minutes.
When ready to dip, melt 1 (12-oz) package semisweet chocolate chips over a double boiler or in the microwave. Add 1 tablespoon coconut oil and mix until combined.
Use a fork or skewer to dip the peanut butter balls into the chocolate. Let the excess chocolate drip and place them on the parchment paper.
Add sprinkles if you like.
Let sit until the chocolate is firm.
Tips for Making Peanut Butter Balls //
When you are making something with so few ingredients, make sure to use the best ingredients you can. It makes a big difference in the end result. Use high-quality peanut butter and chocolate.
While you are working with the balls, if they’re too soft to dip, put them back in the freezer to set back up.
If your chocolate cools and becomes too thick, put it in the microwave for 10-20 seconds until it is back to a dipping consistency.
I sometimes like to add rice cereal or crushed cornflakes to the mixture for a little extra crunch. Or even mini chocolate chips or toffee bits would be amazing!
You can use white, milk, or dark chocolate if you prefer. There is no wrong chocolate/peanut butter combination!
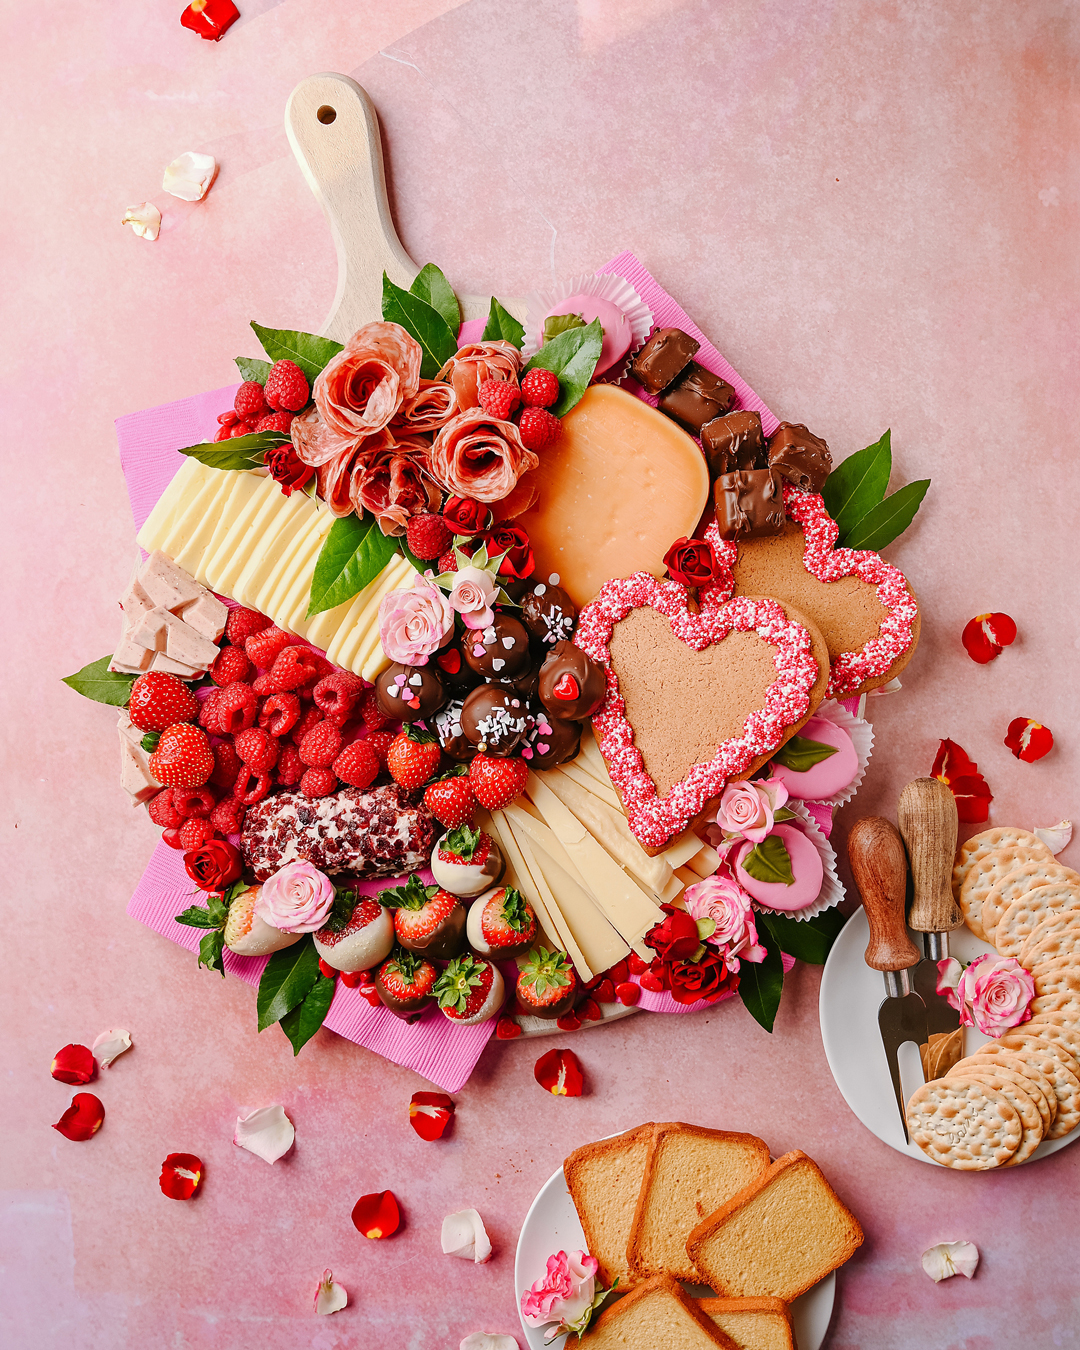
How to Make a Valentine’s Day Cheeseboard with Peanut Butter Balls //
I love a theme and I also love a holiday, so creating this board was just a lot of fun for me. I found as many things in the grocery store that are red, pink, heart-shaped, and fun for Valentine’s Day.
The Roth Cheeses //
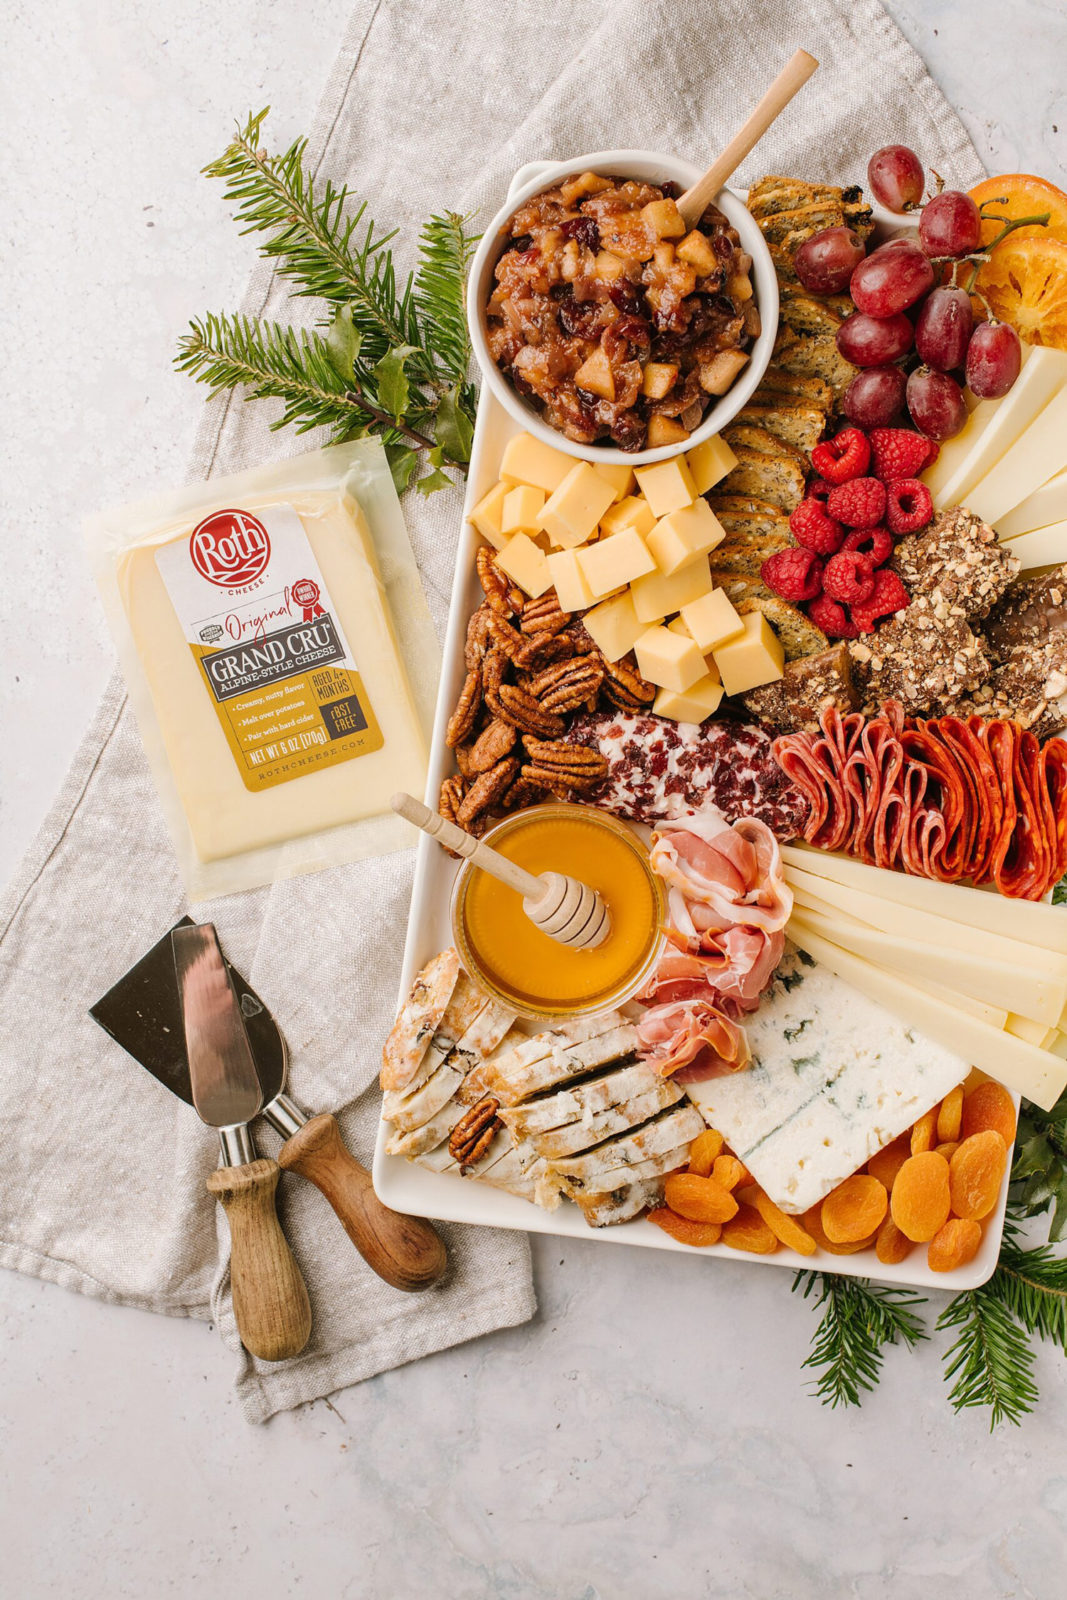
The first step, pick your Roth cheeses and place them on your cutting board. I like to keep some wedges whole, and slice others. I like the way that it looks, and I like that it makes it easy to eat.
Grand Cru®️ has quickly become my husband’s favorite cheese, so that was the inspiration behind this Valentine’s date night cheeseboard. It is mellow and has just a bit of natural sweetness, so it’s perfect on a board that features so many sweets.
Prairie Sunset®️ and chocolate are also a match made in heaven, which is why I chose those two kinds of cheese to pair with all of the chocolate you find on this board.
Chèvre is mild and fresh. In my humble opinion, an excellent base on a cracker with some prosciutto and dried fruit. I took it a step further and rolled it dried cranberries for color and extra flavor.
Havarti rounds out the cheese selection. It’s super creamy and I wanted something more salty and savory to round out all of the sweetness on this cheeseboard.
The Rest for Your Valentine’s Day Cheeseboard //
Once you have your cheeses laid down on your cutting board, I like to fill in some of the holes with my bigger items. I made roses out of salami and bay leaves, so they took up a nice spot at the top of the board.
I placed my peanut butter balls in the middle because next to the cheese, they are the star of the show.
There is a cute bakery in my town that specializes in gingerbread cookies, so I bought a few large hearts and made sure that they were also a focal point.
Once I had my main items placed, I filled in any holes with smaller items. I had raspberries, chocolate-covered strawberries, chocolate caramels, white chocolate raspberry chunks (they have Pop Rocks in there and it’s my new favorite candy), little pink cakes, and heart candies.
This board is FULL of delicious treats. To finish it off and really make it look romantic, I added spray roses and more fresh bay leaves.
I love this cheeseboard turned out and I can’t wait to share it with my love this Valentine’s Day.
Our holidays this year might be smaller, but that doesn’t mean they won’t be full of traditions or as festive. Growing up, we had a cheeseboard as part of our Christmas morning breakfast. This was before cheese boards were part of our everyday vernacular. We had cheese and crackers, but not like the full spread.
We felt very fancy eating cheeses we picked out at the gourmet cheese shop, with little jars of mustards and jams, teeny tiny pickles, olives, and crusty bread while wearing our pajamas after opening our presents.
Now, we don’t save the good cheese for just Christmas morning, we eat cheese boards with the good cheese on them all the time at home. We keep a well-stocked pantry so we can throw together a good cheese pairing at a moment’s notice. And we do. Often.
One upside of 2020 is that we can buy excellent quality cheeses at our local grocery store any time we want.
A few years ago, I went to Wisconsin and met a few cheesemakers, and toured their facilities. I sampled their cheeses and saw firsthand the pride and love they put into their product. People just don’t make cheese, they liveand breathe cheese.
It stayed with me and now I actively seek out Wisconsin cheeses, like Roth Grand Cru®, because I know that they will be made with milk that comes from family farms. More often than not, you can see the silo from the parking lot, they are that close.
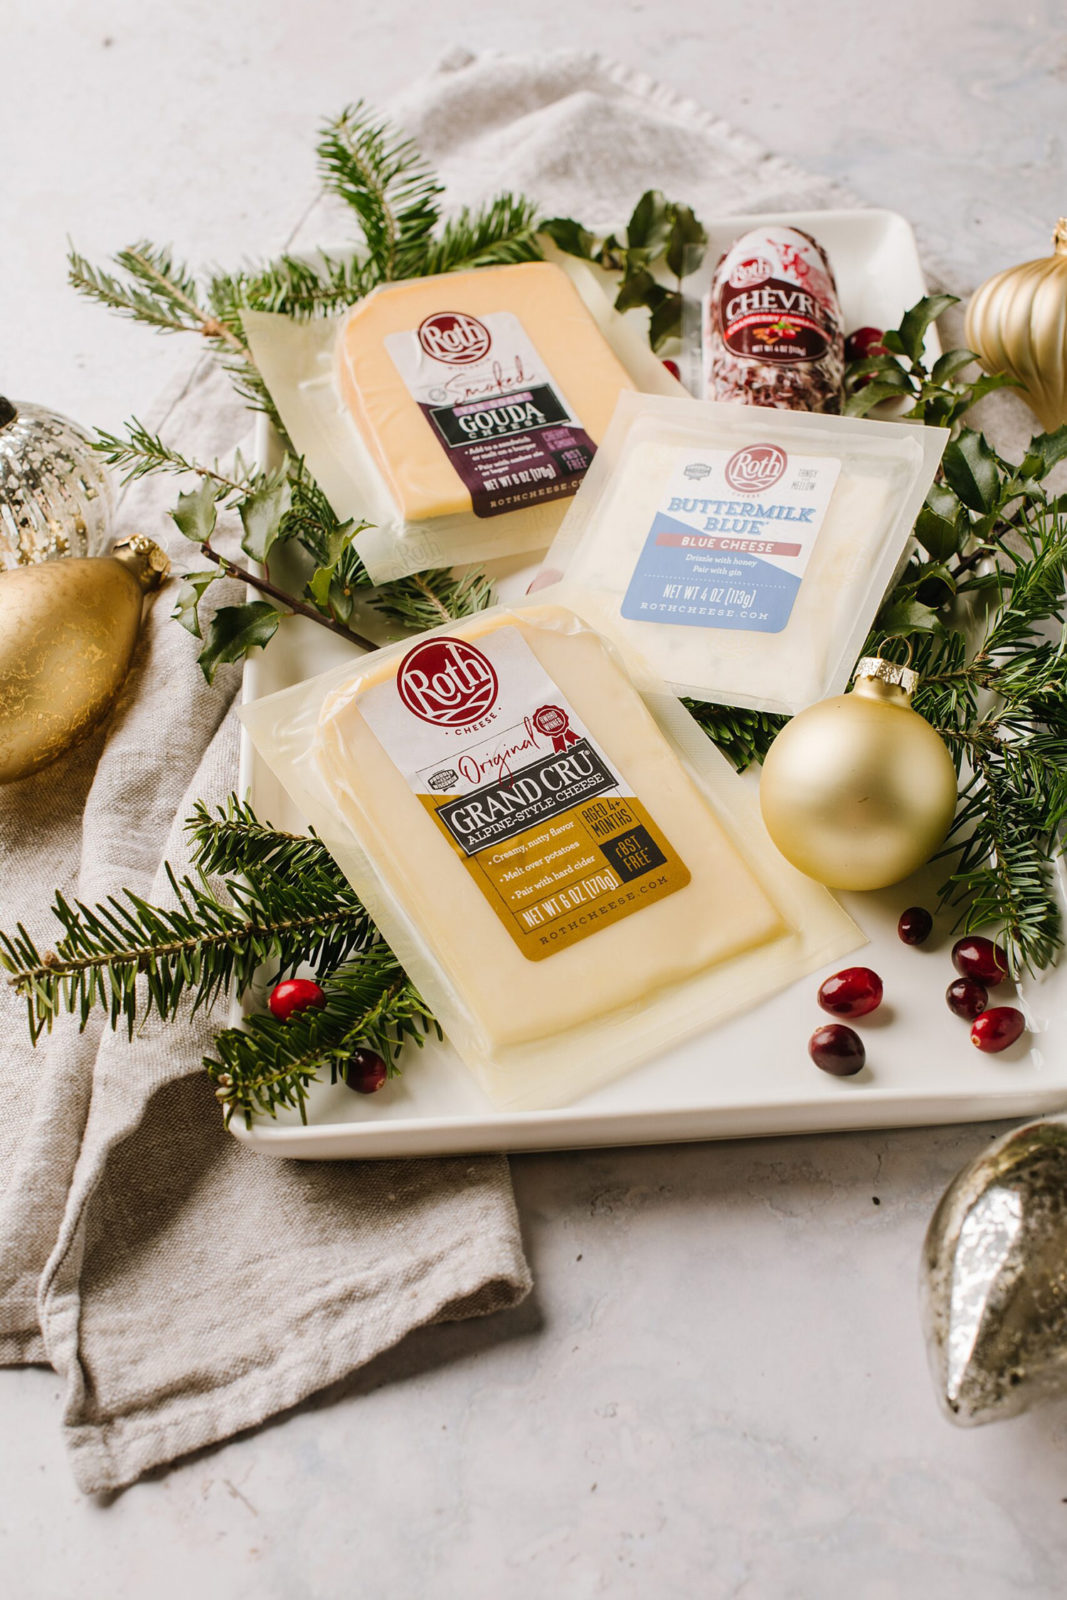
Roth Cheese is a brand that I look for in the cheese case because I know that I’m going to get a well-crafted and delicious cheese, made with all-natural ingredients and rBST-free milk, no matter which variety I choose. I also really like that all of the packages have pairing and cooking ideas on them.
I’ve made so many cheese boards that I think that I have cracked the code for making stellar ones every time that are just as pretty as they are tasty.
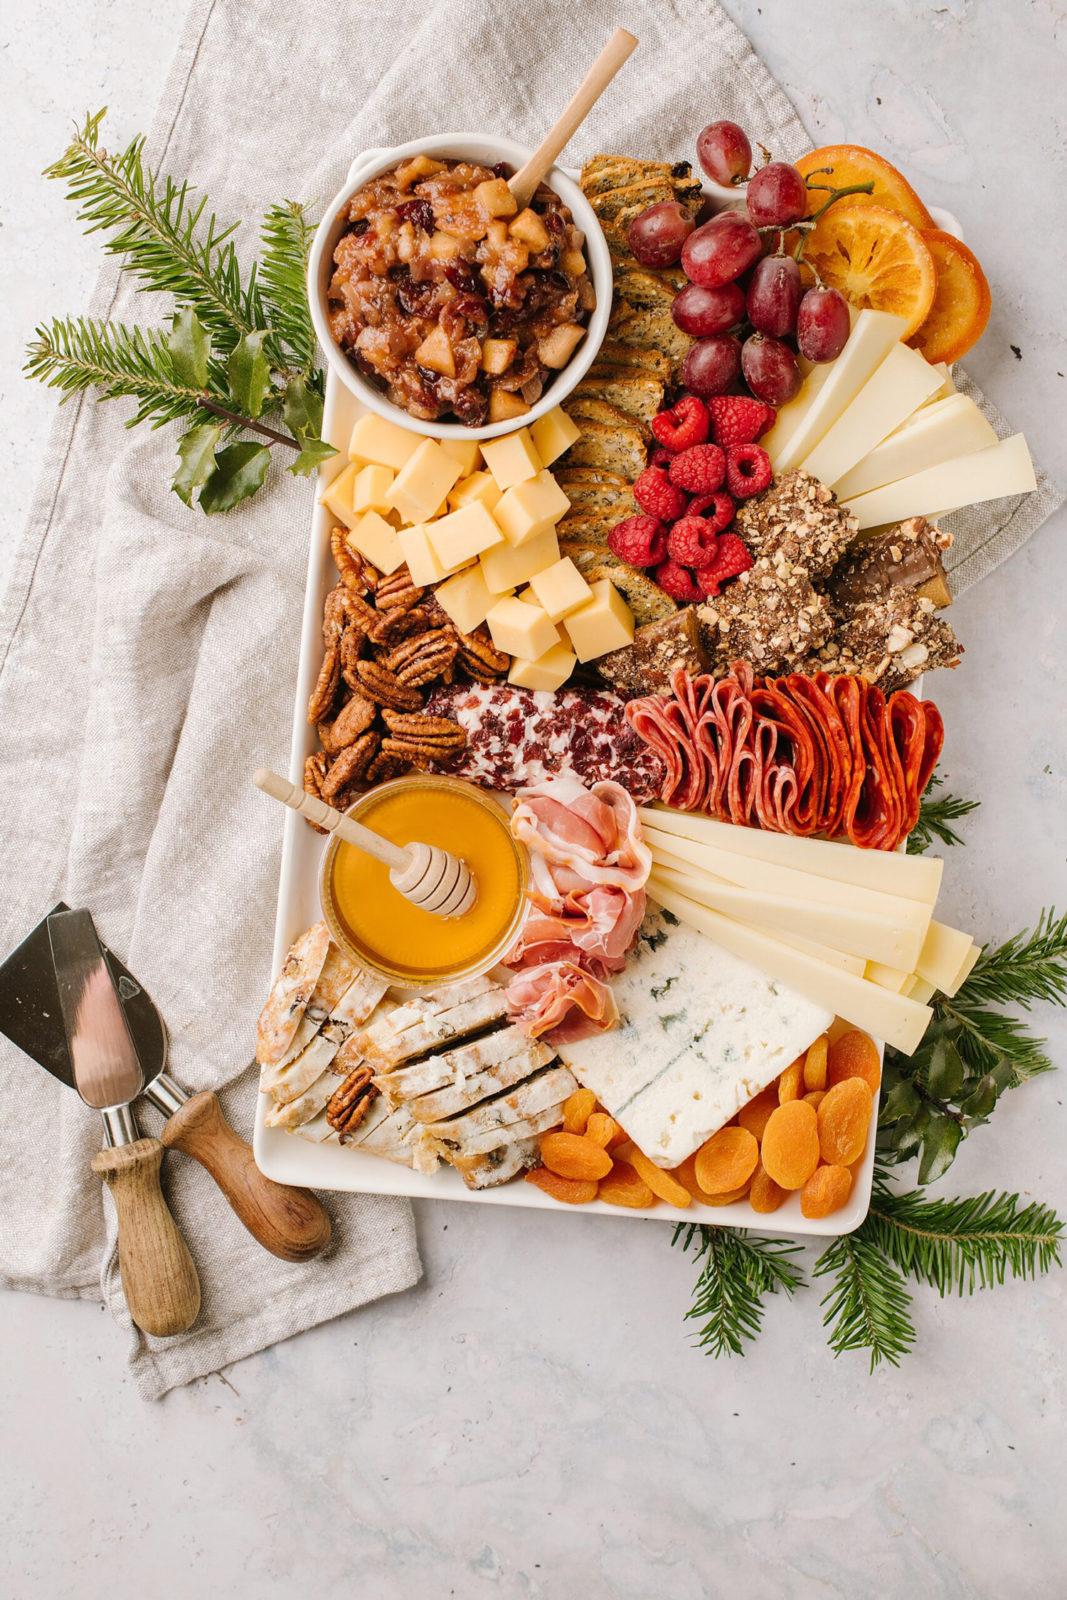
How to Choose Cheese For Your Board //
When I’m making a cheese board, I want a few different kinds of cheese. Different textures, different flavor profiles, different ages, different colors. I want there to be lots of different bite possibilities.
Age // Grand Cru® is Roth’s signature alpine-style cheese. It is similar to Gruyère, cultured in cooper vats and then aged for 4+ months. It is delicious for snacking, but also melts beautifully. We also use this for our New Year’s Eve raclette because it’s heaven melted over roasted potatoes.
Texture // Buttermilk Blue® is a creamy and mellow blue that is aged for two months. A lot of blue cheeses can be too strong for me, but this one is just right.
Flavor // Van Gogh Gouda is slightly sweet and mellow. It also melts well and is delicious in mac and cheese.
You can find Grand Cru® and other Roth Cheeses at your local grocer. Use their store locator for the closest location to you.
What to Put on Your Cheese Board //
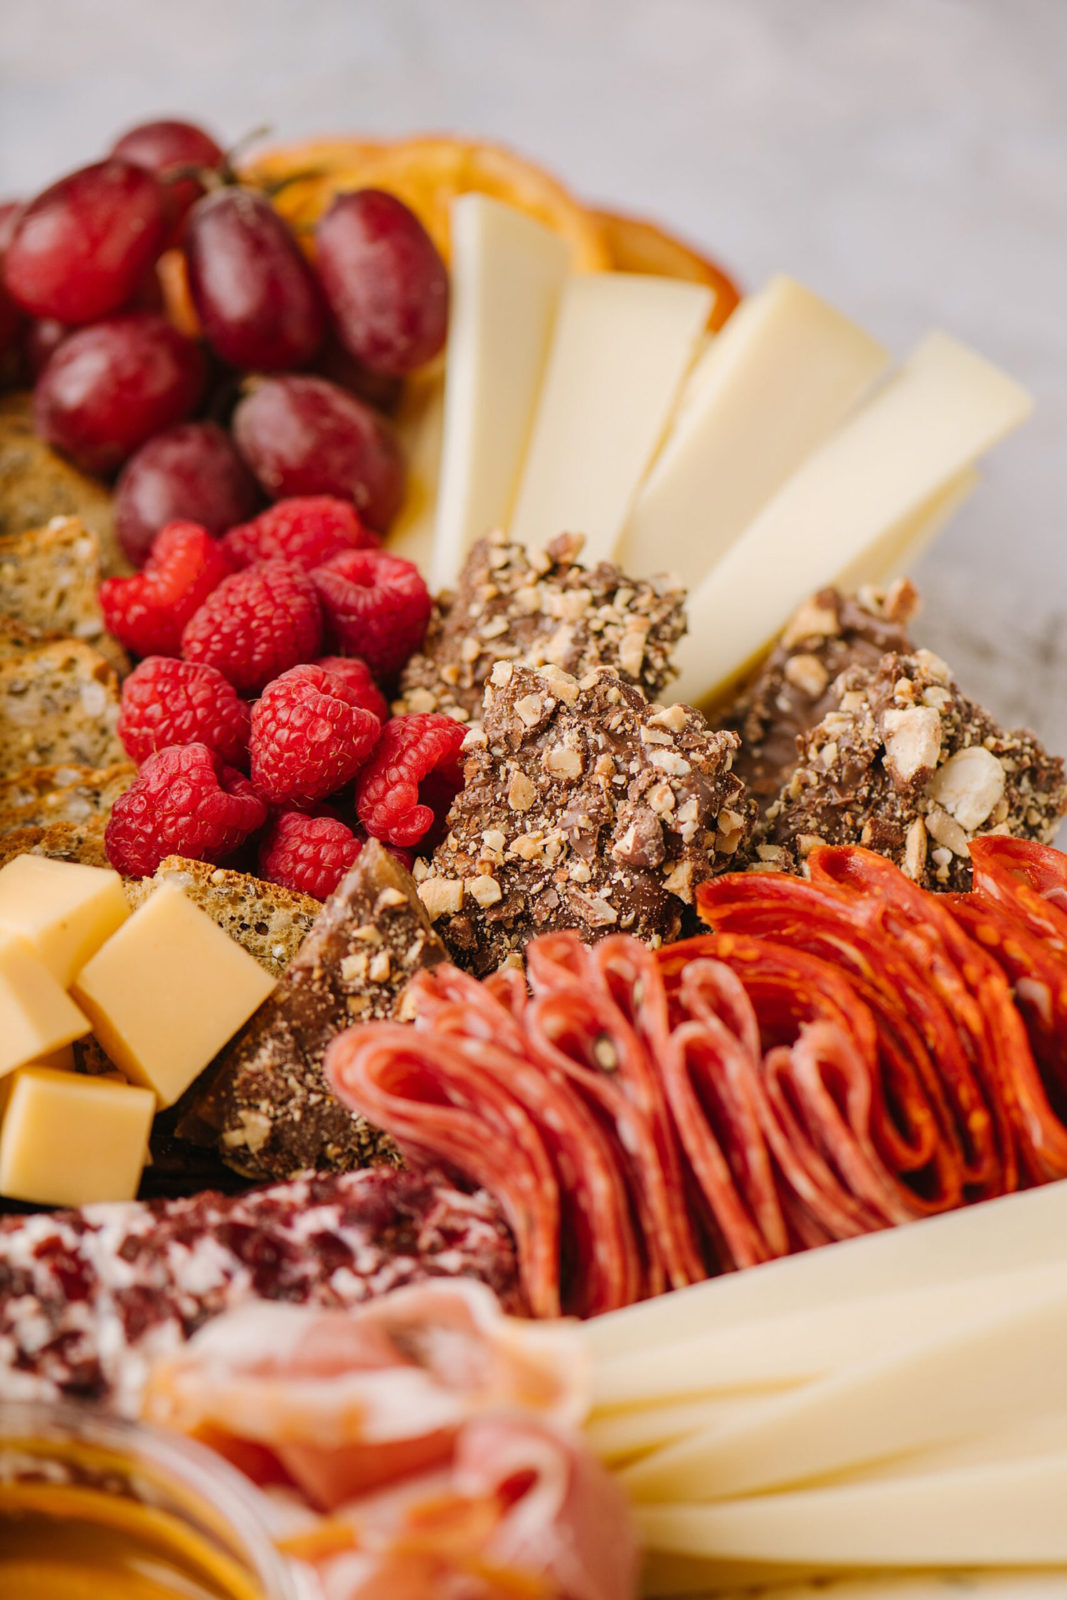
Like with the cheeses you choose, you also need a variety with the other things on the board. Crunchy, sweet, salty, spicy. The way I like to think about it, combinations of things to make amazing bites. I also like to put on things that are seasonal or unexpected and fun, like the stollen on this board.
Meats // Salami, prosciutto, ham, any cured meat you like
The Unexpected // Chocolates, potato chips, caramel corn, pickled vegetables, seasonal things, cookies
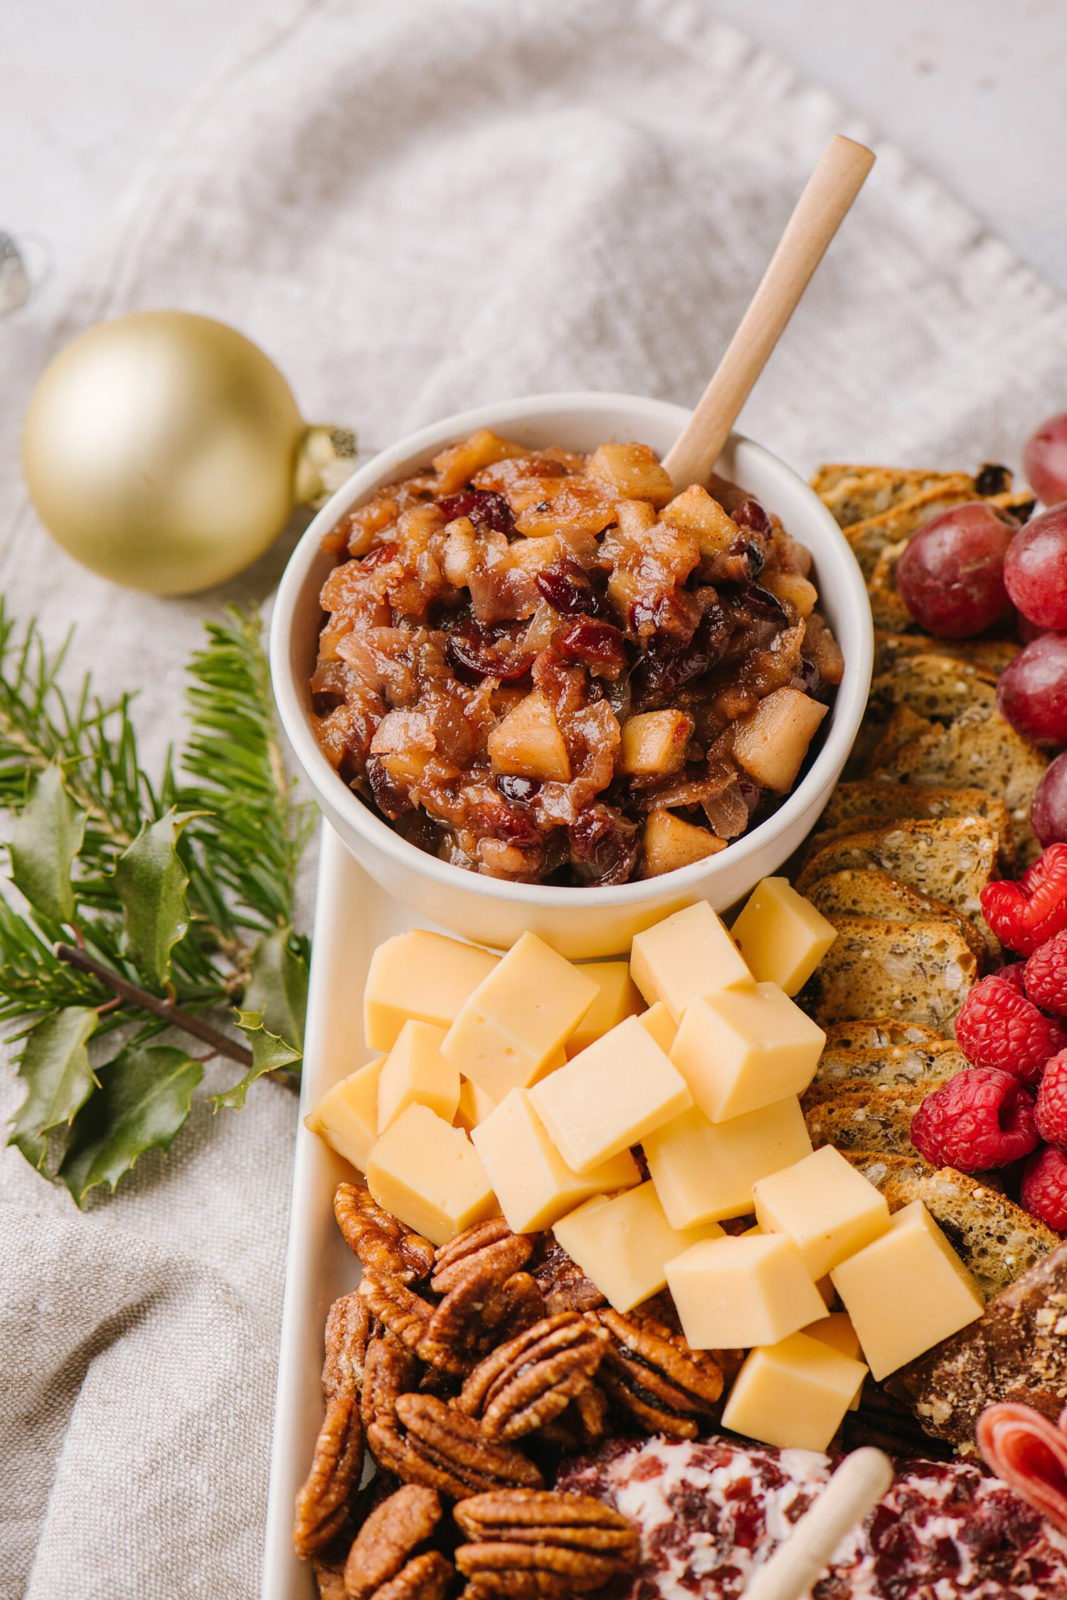
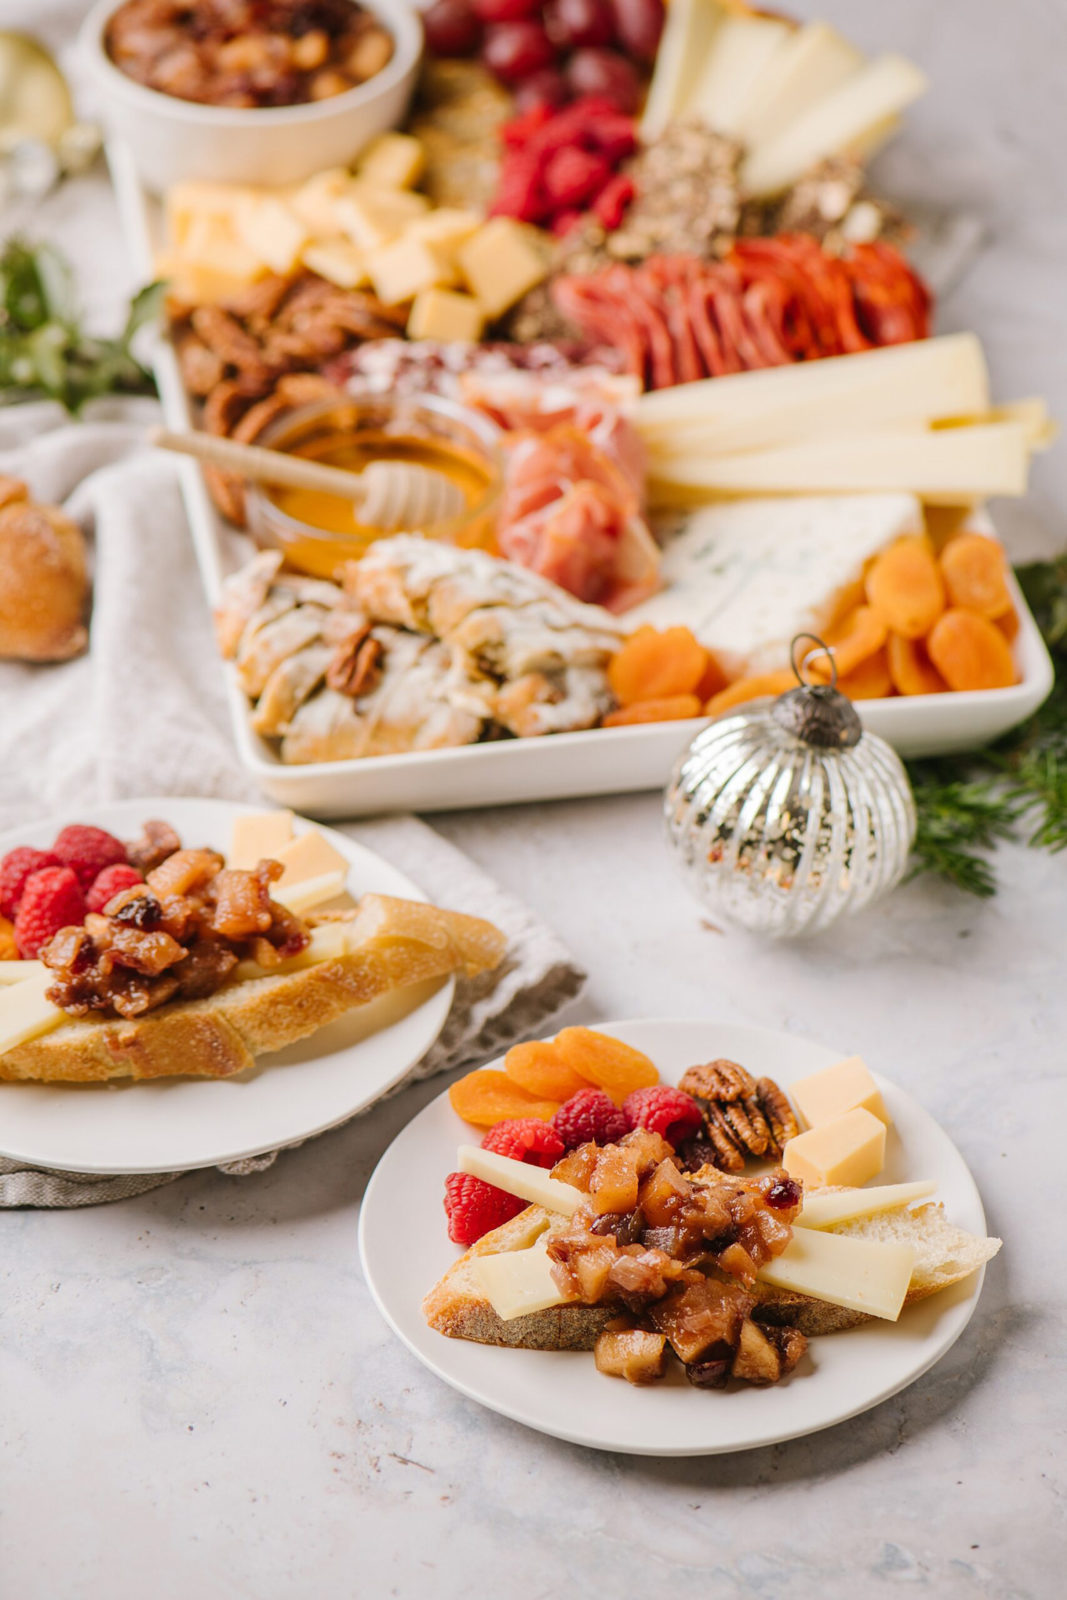
I made a homemade Apple Cranberry Chutney and it will go perfectly with the Grand Cru® and the other cheeses on this board.
How to Put Together A Visually Appealing Cheese Board //
The beauty of a cheese board is, well, cheese. But also they are really beautiful on your table. There are some tricks for making them look Instagram-worthy.
Lay your cheeses out first // Your eyes are trained to see things in triangles and patterns. Cheese is often round and sliced into a triangle. I place the cheeses in a general triangle shape on the platter and point the edges towards each other. I also will pre-slice or cube some for ease of eating, but also visual interest.
Color // I pick a color palette and try to pick things that will compliment each other. This board has lots of warm colors – reds, oranges, and yellows. All the colors work together and don’t compete with each other. You can also do the opposite – pick colors that are opposite on the color wheel. Purple and green, blue and orange, or red and green.
Make it look abundant // I like my boards to look overflowing. Use a smaller platter or container and pile things higher on it.
Fill all the space // I really like how a full platter looks. Where you can’t see the surface that the food is sitting on. It looks like a rectangle of meats and cheeses sitting on a table and I’m here for that. Nuts, dried fruits, and berries are really good filler for this.
How can you arrange it in a different way // Instead of just taking a handful of crackers on putting them on a platter, maybe stack them or line them up or wave them around a bowl? Maybe fold meats into ribbons or pile them into little purses (this is really good for prosciutto)?
Think in odd numbers // Your brain tells your eyes to see things in patterns, and it also really likes odd numbers. So groupings of 3’s and 5’s draw your eye around your platter.
Don’t overthink it and have fun // Even though I was styling this board to be shot for a post, it took me less than 10 minutes to put it together. I think that when you are working with foods that are naturally colorful and beautiful like cheese and fruit and chutneys, it is difficult to make it look anything less than gorgeous. Just have fun with it.
How to Make Apple Cranberry Chutney //
I made this holiday-spiced Apple Cranberry Chutney to go on my cheese board because I love how in an English pub when you order a cheese plate, it always has a chutney on it. And also because I was a little overzealous with my apple purchasing and found myself with an abundance of apples that needed to be used up.
During the holidays, I do like to take the extra time to make special condiments to have on hand, whether for gift giving or for when I am going to make a cheese board or serve a pork roast or a roast chicken. It makes me feel very Nigella Lawson-esque.
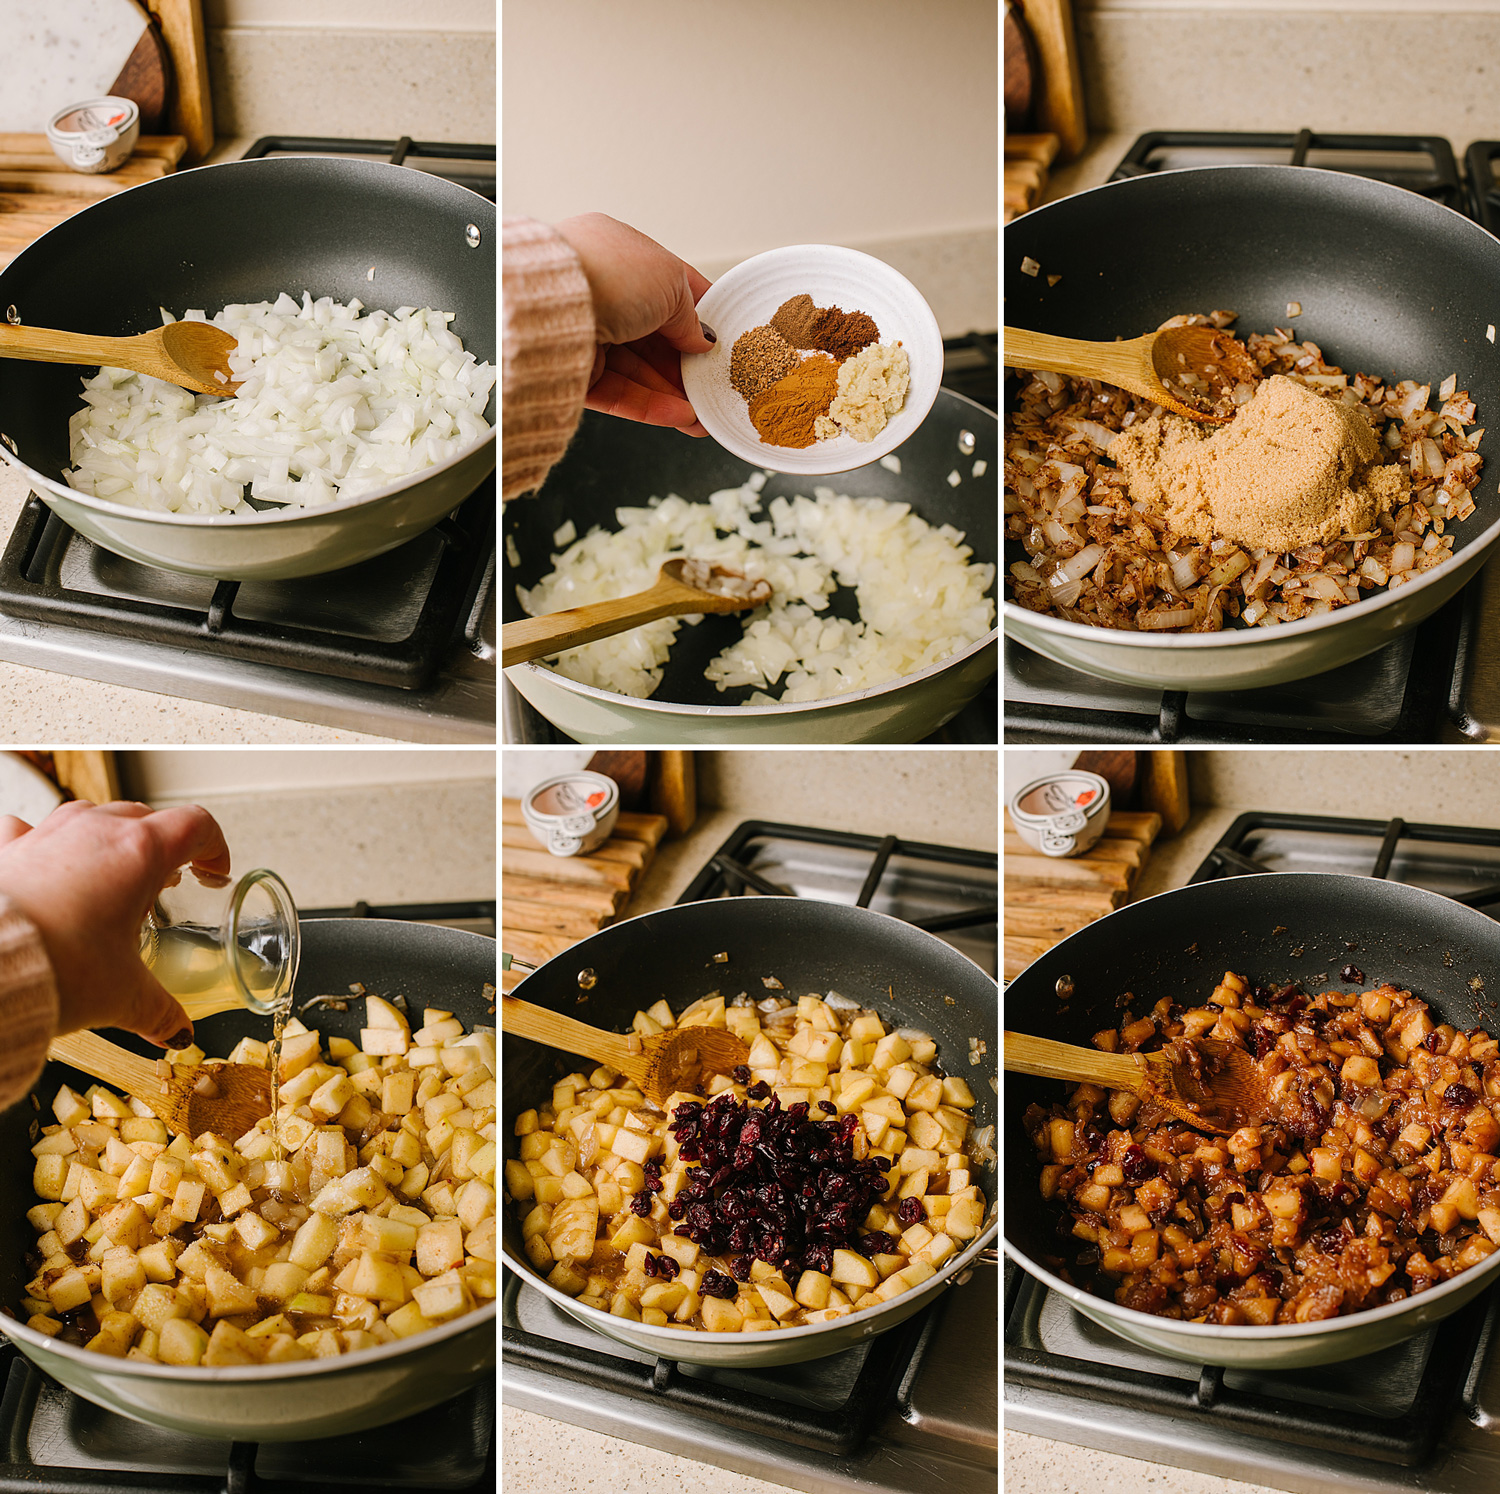
I created this apple and dried cranberry chutney recipe using things I already had on hand. Apples, cider, onions, fresh ginger, spices, brown sugar, apple cider vinegar, salt, lemon juice, and dried cranberries.
If you have never had a chutney before, it is a savory condiment, like a jam. It’s Indian in origin, and why you see it in English pubs. Did you know that the national food of England is chicken tikka masala?
It’s simple to make, pairs perfectly with cheese and meats, and when you are making it, you can’t help but get into the holiday spirit.
How to Make // The Steps
Heat oil in a Dutch oven or large saucepan over medium heat. Saute onions for one to two minutes, or until translucent.
Add fresh ginger and spices, and cook for an additional minute.
Add brown sugar, apples, cider, apple cider vinegar, salt, and lemon juice.
Reduce heat to low, and let the apples cook down and begin to soften about 10 minutes.
Use a masher and mash about half of the apples. Add the dried cranberries and continue to simmer for an additional 15 to 20 minutes, or until the mixture is thick and the liquid has evaporated.
Let cool and put into a jar with a tight-fitting lid. Store in the refrigerator for up to 2 weeks or frozen for up to 2 months.